JVC THG51 Instructions - Page 11
Optional Equipment, Connection
 |
UPC - 046838039348
View all JVC THG51 manuals
Add to My Manuals
Save this manual to your list of manuals |
Page 11 highlights
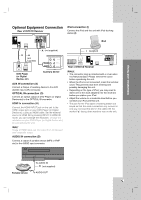
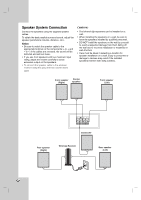
Introduction Installation and Setup Optional Equipment Connection Rear of DVD/CD Receiver iPod connection (I) Connect the iPod and the unit with iPod docking station.(I). iPod A (not supplied) OH (not supplied) OUT IN VIDEO AUDIO (L) OPTICAL OUT DVD Player (or Digital Device, etc) AUDIO (R) Auxiliary device AUX IN connection (A) Connect a Output of auxiliary device to the AUX AUDIO Input (L/R) Connector. OPTICAL IN connection (O) Connect an optical output of DVD Player (or Digital Device etc) to the OPTICAL IN connector. HDMI In connection (H) Connect the HDMI INPUT jack on the unit to the HDMI output jack on your DVD Player (or Digital Device etc.) using an HDMI cable. Set the external source to HDMI IN by pressing INPUT. In HDMI IN mode, you can't change the resolution. Change the resolution on your DVD Player (or Digital Device etc.) by connectiong the unit. Note: Image of HDMI input can not output from component and composite output. AUDIO IN connection (D) Connect a output of portable device (MP3 or PMP etc) to the AUDIO input connector. I (supplied) Rear of DVD/CD Receiver Notes: • The connector plug is protected with a cover when it is first purchased. Please remove the cover before operationg the unit. • When the iPod is not connected, insert the terminal cover. This prevents dust from entering and possibly damaging the unit. • Depending on the type of iPod, you may need to insert one of the dock adapters into the dock slot before you station your iPod. • Adjust the volume to a moderate level before you connect your iPod and this unit. • The jack for the iPod cable of docking station are keyed so that the cable connectors only connect in one way. Connect the end on the cable with the marked "v" facing down wards to rear on the unit. Operation Reference Portable device To AUDIO IN D (not supplied) To AUDIO OUT 7
-
 1
1 -
2
-
3
-
4
-
5
-
 6
6 -
 7
7 -
 8
8 -
 9
9 -
 10
10 -
 11
11 -
 12
12 -
 13
13 -
 14
14 -
 15
15 -
 16
16 -
17
-
18
-
19
-
20
-
21
-
22
-
23
-
24
-
25
-
26
-
27
-
28
-
29
-
30
-
31
-
32
-
33
 |
 |
