JVC THG51 Instructions - Page 13
Initial Setting an ID of Wireless
 |
UPC - 046838039348
View all JVC THG51 manuals
Add to My Manuals
Save this manual to your list of manuals |
Page 13 highlights
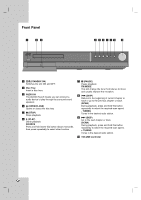
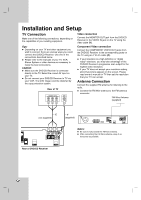
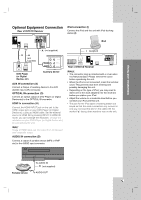
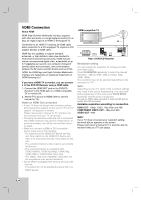
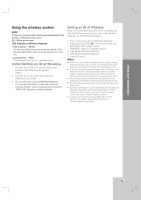
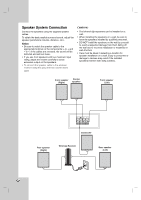
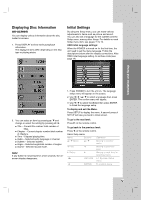
Setup the wireless system Note: If there is a product with a strong electromagnetic field nearby, interference may occur. (Ex : Micro wave oven) LED indicator of Wireless Receiver * LED indicator - "BLUE" The Wireless Receiver is receiving the signal of the Wireless transmitter which is incorporated in the main unit. * LED indicator - "RED" The Wireless Receiver is in standby mode. Initial Setting an ID of Wireless 1 Connect the Wireless Receiver and the rear speaker (right, left) with the speaker cables. 2 Connect the power cord of the Wireless Receiver to the outlet. 3 Turn on the main unit and Wireless Receiver. The wireless transmitter in the main unit and wireless receiver will be automatically connected. "MATE OK" appears in display window. Setting an ID of Wireless When the unit is manufactured, the ID is already set. If an interference occurs or you use a new Wireless Receiver, an ID should be set again. 1. Turn on the main unit and Wireless Receiver. 2. Press and hold STOP(x) on the front of unit and MUTING on the remote control. "REMATE" appears in display window. 3. Turn off the Wireless Receiver. 4. Turn on the Wireless Receiver: A new ID is set.. Notes: If there is a strong electromagnetic wave product nearby, interference may occur. Put the unit (Wireless Receiver and main unit) away from there. (Ex: Microwave oven) If there is no audio signal for longer than 10 minutes, the Wireless Receiver will automatically switch to standby mode. In power saving mode, both LEDs will turn red. LEDs will turn blue when there is any audio signal back. If you operate main unit then wireless speakers (rear speakers) sound within a few seconds in standby mode. Set the distance between this unit and Wireless Receiver within 10m. Optimum performance can be implemented only when the Wireless Transmitter and the Wireless Receiver within distance of 2m to 10m is used since communication failure may occur if longer distance is used. It takes a few seconds (and may take longer) for the Wireless Transmitter and Wireless Receiver to communicate with each other. Installation and Setup 9
-
 1
1 -
2
-
3
-
4
-
5
-
6
-
7
-
 8
8 -
 9
9 -
 10
10 -
 11
11 -
 12
12 -
 13
13 -
 14
14 -
 15
15 -
 16
16 -
 17
17 -
 18
18 -
19
-
20
-
21
-
22
-
23
-
24
-
25
-
26
-
27
-
28
-
29
-
30
-
31
-
32
-
33
 |
 |