Jensen UCD200 Owners Manual - Page 7
Operating Instructions
 |
UPC - 043258301659
View all Jensen UCD200 manuals
Add to My Manuals
Save this manual to your list of manuals |
Page 7 highlights
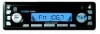
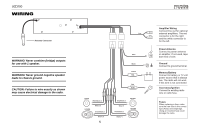
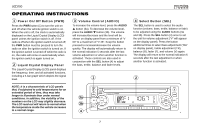
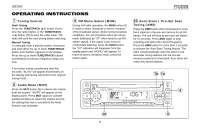
UCD200 OPERATING INSTRUCTIONS 1 Power On/Off Button (PWR) Press the PWR button (1) to turn the unit on and off when the vehicle ignition switch is on. When the unit is off, the clock is automatically displayed on the Liquid Crystal Display (LCD) panel unless the ignition switch is off. If the radio is off when the ignition switch is turned off, the PWR button must be pressed to turn the radio on after the ignition switch is turned on. If the ignition switch is turned off while the radio is on, the radio will come on automatically when the ignition switch is again turned on. 2 Liquid Crystal Display Panel The Liquid Crystal Display (LCD) panel displays the frequency, time, and all activated functions, including a 5-bar graph which depicts the signal level. 3 Volume Control (AUDIO) To increase the volume level, press the AUDIO button (3a). To decrease the volume level, press the AUDIO button (3b). The volume will increase/decrease and the level will be shown on display panel from a minimum of "V 00" to a maximum of "V 46". Keep the button pressed to increase/decrease the volume quickly. The display will automatically return to the normal indication 5 seconds after the last volume adjustment or when another function is activated. These controls are also used in conjunction with the SEL button (4) to adjust the bass, treble, balance and fader levels. 1 4 Select Button (SEL) The SEL button is used to select the audio function (volume, bass, treble, balance or fade) to be adjusted using the AUDIO buttons (3a and 3b). Press the SEL button (4) once to set the unit for volume adjustment ("V" will appear on the display panel). Press the button additional times to select bass adjustment ("BA" on display panel), treble adjustment (TR), balance (B), fader (F), and volume (V) again. The display will return to the normal indication 5 seconds after the last adjustment or when another function is activated. 2 NOTE: It is a characteristic of LCD panels that, if subjected to cold temperatures for an extended period of time, they may take longer to illuminate than under normal conditions. In addition, the visibility of the numbers on the LCD may slightly decrease. The LCD read-out will return to normal when the temperature inside the vehicle increases to a normal range. 3a 3b 4 RELEASE / PWR EQ AUDIO SEL UCD200 AMS 1 AM / FM / CD RECEIVER 2 SCN 3 RPT 4 RDM 5 6 EJECT MODE DISP TUNE TRACK BAND MON LOU MUT 7
-
 1
1 -
 2
2 -
 3
3 -
 4
4 -
 5
5 -
 6
6 -
 7
7 -
 8
8 -
 9
9 -
 10
10 -
 11
11 -
 12
12 -
13
-
14
-
15
-
16
-
17
-
18
-
19
-
20
-
21
-
22
-
23
-
24
-
25
-
26
-
27
-
28
-
29
-
30
-
31
-
32
-
33
-
34
-
35
-
36
-
37
-
38
-
39
-
40
-
41
-
42
-
43
-
44
-
45
-
46
-
47
 |
 |
