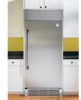
Kenmore 4412 Use and Care Guide - Page 8
Crispers, Adjustable, Dividers, Filter, The Air Filter, Water
 |
View all Kenmore 4412 manuals
Add to My Manuals
Save this manual to your list of manuals |
Page 8 highlights
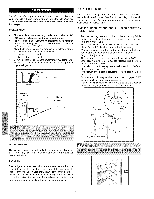
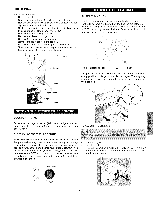
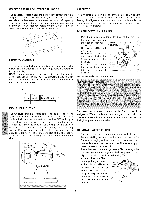
CRISPERS WITH ADJUSTABLE DIVIDERS AiR FILTER The crispers, located under the bottom refrigerator shelf, are designed for storing fruits, vegetables, and other fresh produce. Wash items in clear water and remove excess water before placing them in the crispers. Items with strong odors or high moisture content should be wrapped before storing. Dividers may be adjusted for different size items within the crisper. The air filter is located on the back of the control box. In general, you should change the air filter every six months to ensure optimal filtering of refrigerator odors. You may want to adjust this time period depending on the types and amounts of food you typically store in your refrigerator. TO REPLACE THE AIR FILTER: HUMiDiTY CONTROL The humidity control allows you to adjust the humidity within the crisper. This can extend the life of fresh vegetables that keep best in high humidity. NOTE: Leafy vegetables keep best when stored with the humidity control set on HIGH HUMIDITY, or in a drawer without a humidity control. This keeps incoming air to a minimum and maintains maximum moisture content. • Push the plastic bubble tab at the back of the control box housing. This releases the hinged bottom half to drop open. • Remove the old filter and discard it. • Unpackage the new filter and place it inside the hinged bottom half of the housing. • Push the hinged bottom half upward until the tab snaps into closed position. PureSource2 TM WATER FILTER MID LEVEL LiGHTiNG The mid level lighting is located at the back of the crispers. The lights come on automatically when the door is opened.To replace the light bulb, turn the temperature control to OFF and unplug the electrical cord. Remove the lens from the lamp housing by unsnapping it from the lamp housing using your fingers or a screwdriver. Be careful not to break the locking tabs on the lamp housing. Replace the old bulb with a bulb of the same type and wattage. To replace the lens, snap one side of the lens opening to the tab on the lamp housing. Then carefully attach the other side. To Remove Light Lens _.L Press Tabs in Direction Shown. Mid Level Lighting The water filter is located on the upper left front corner of the refrigerator. Water conditions vary throughout the world, but changing the water filter every 6 - 9 months normally will ensure the highest possible water quality. TO INSTALL WATER FILTER: The water filter cartridge comes separate inside the unit. Before installing the water filter, be sure to remove the filter from the packaging and two plastic caps that protect the inlet and outlet ports of the water filter. The water supply does not need to be turned off. Insert the water filter cartridge into the filter housing. When the cartridge is almost in, you will feel it stop against the clip assembly in the back of the housing. The clip assembly holds the filter cartridge firmly in place. At this point, you will need to push firmly until the cartridge snaps fully in place. When completely in place, the front of the filter cartridge will be flush with the front of the housing." 8
-
 1
1 -
2
-
 3
3 -
 4
4 -
 5
5 -
 6
6 -
 7
7 -
 8
8 -
 9
9 -
 10
10 -
 11
11 -
 12
12 -
 13
13
 |
 |
