Kenmore 4433 Installation Instructions - Page 1
Kenmore 4433 - Pro 23.1 cu. Ft Manual
 |
View all Kenmore 4433 manuals
Add to My Manuals
Save this manual to your list of manuals |
Page 1 highlights
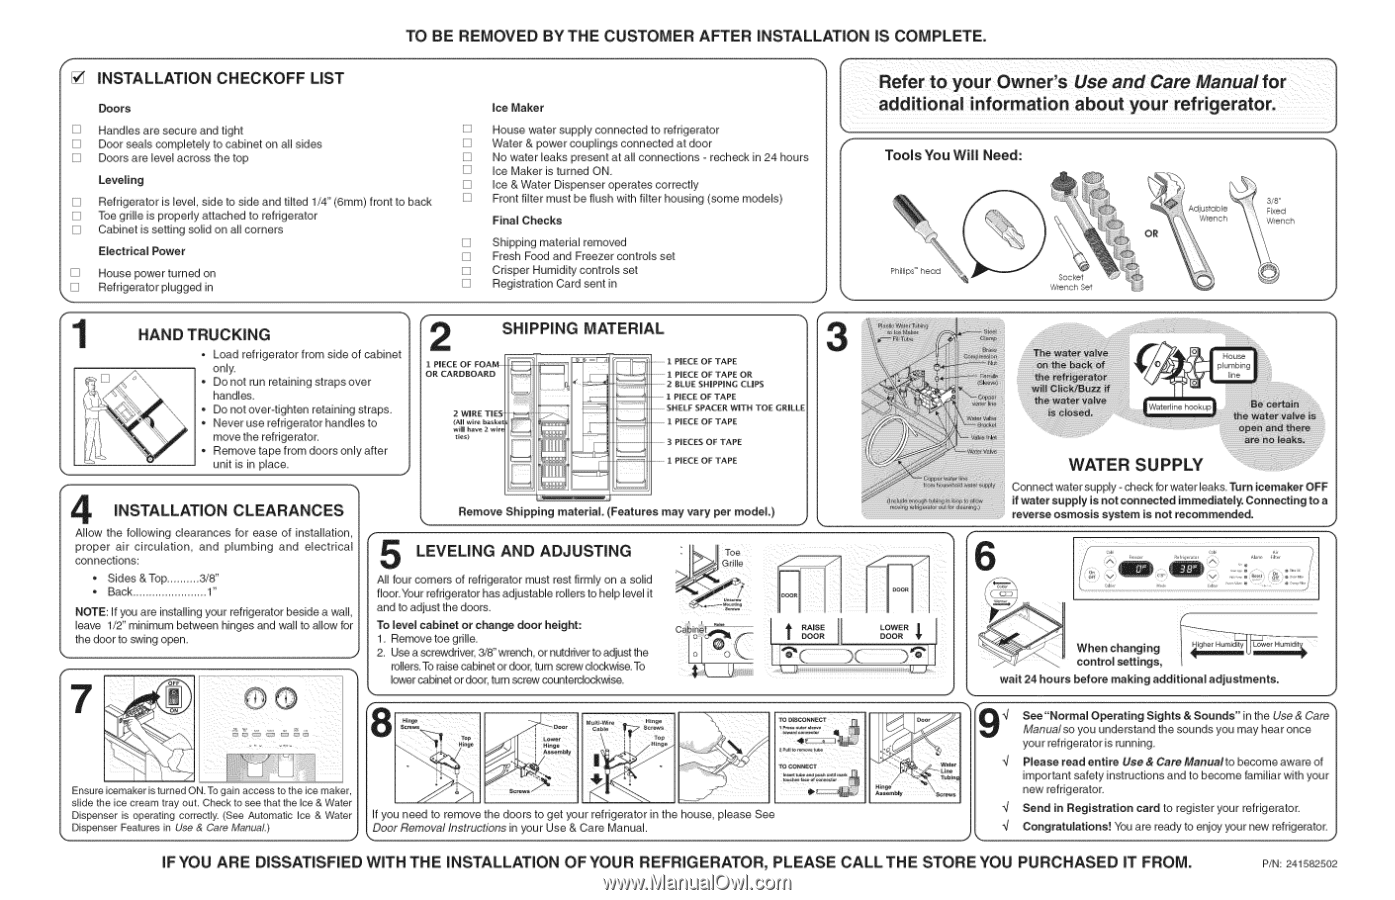
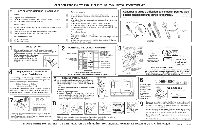
TO BE REMOVED BY THE CUSTOMER AFTER INSTALLATION iS COMPLETE. f [] iNSTALLATiON CHECKOFF LiST .o o.°o,!, c.,oM.°u,i Doors ice Maker I additional information about your refrigerator! [] Handles are secure and tight [] House water supply connected to refrigerator [] Door seals completely to cabinet on all sides [] Doors are level across the top Leveling [] Water & power couplings connected at door [] No water leaks present at all connections - recheck in 24 hours [] Ice Maker is turned ON. [] Ice & Water Dispenser operates correctly Tools You Will Need: [] Refrigerator is level, side to side and tilted 1/4" (6mm) front to back [] Front filter must be flush with filter housing (some models) [] Toe grille is properly attached to refrigerator [] Cabinet is setting solid on all corners Final Checks Electrical Power [] Shipping material removed [] Fresh Food and Freezer controls set [] House power turned on [] Refrigerator plugged in [] Crisper Humidity controls set [] Registration Card sent in 1 HAND TRUCKING , Load refrigerator from side of cabinet only. • Do not run retaining straps over handles. Do not over-tighten retaining straps. Never use refrigerator handles to move the refrigerator. • Remove tape from doors only after unit is in place. .J SHIPPING 1 PIECE OF FOAM OR CARDBOARD 2 WIRE TIES [_tc:_- (wAillll whiarvee b2aswkeirte _ '_ ties) MATERIAL ........1. PIECE OF TAPE ........1...P. IECE OF TAPE OR .... 2 BLUE SHIPPING CLIPS 1 PIECE OF TAPE .......S..H.. ELF SPACER WITH TOE GRILLE 1 PIECE OF TAPE .... 3 PIECES OF TAPE ........1. PIECE OF TAPE 3F INSTALLATION CLEARANCES Allow the following clearances for ease of installation, proper air circulation, and plumbing and electrical connections: • Sides &Top .......... 3/8" Back 1" NOTE: If you are installing your refrigerator beside a wall, leave 1/2" minimum between hinges and wall to allow for the door to swing open. J Remove Shipping material. 'Features may vary per model.) f LEVELING AND ADJUSTING All four corners of refrigerator must rest firmly on a solid floor.Your refrigerator has adjustable rollers to help level it and to adjust the doors. To level cabinet or change door height: 1. Remove toe grille. 2. Use a screwdriver, 3/8" wrench, or nutdriver to adjust the rollers.To raise cabinet or door, turn screw clockwise. To lowercabinet or door, turn screw counterclockwise. %., : od Cabine_ L, ii __Door ]L Ensureicemakeris turned ON. Togain access to the ice maker, slide the ice cream tray out. Check to see that the Ice & Water Dispenser is operating correctly. (See Automatic Ice & Water Dispenser Features in Use & Care Manual.) J If you need to remove the doors to get your refrigerator in the house, please See Door Removal Instructions in your Use & Care Manual. WATER SUPPLY .... Connect water supply - check for water leaks. Turn icemaker OFF if water supply is not connected immediately. Connecting to a reverse osmosis system is not recommended. J o ve. I DOOR _j -. Door Water • -." Line Hinge Assembly Screws When changing control settings, wait 24 hours before making additional adjustments. 9_/ % See"Normal Operating Sights & Sounds" in the Use & Care Manualso you understand the sounds you may hear once your refrigerator is running. _/ Please read entire Use & Care Manualto become aware of important safety instructionsand to become familiar with your new refrigerator. _/ Send in Registration card to register your refrigerator. ",] Congratulations! You are ready to enjoy your new refrigerator. J IFYOU ARE DISSATISFIED WITH THE INSTALLATION OFYOUR REFRIGERATOR, PLEASE CALLTHE STORE YOU PURCHASED IT FROM. P/N2: 41582502
-
 1
1 -
 2
2 -
 3
3
 |
 |