Kenmore 4689 Installation Instructions - Page 7
T; uit - installation guide
 |
View all Kenmore 4689 manuals
Add to My Manuals
Save this manual to your list of manuals |
Page 7 highlights
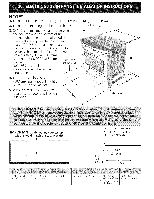
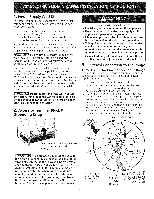
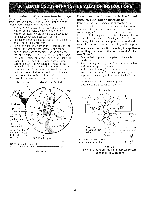
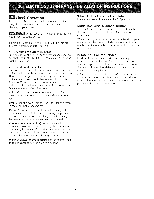
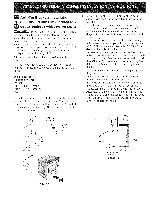
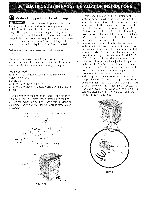
WherelocalcodesDONOTpermit connectingthe appliance-groundingconductorto the neutral (white)wire, or if connectingto 4-wire electrical system(seeFigure6): 1. Besurethatnopowerissuppliedonthecablefrom residence. 2. Removtehe groundingstrapfromtheterminabl lock andfromtheapplianceframe. 3. Inthecircuitbreakerfu, seboxorjunctionbox: a)Connectthewhiteappliancecablewireto the neutra(lwhite)wire. b)Connectthe2 blackwirestogether. c)Connectthe2 redwirestogether. d)Connectthegreen(or barecopperg) rounding wireto thegroundingwireof the circuitbreaker, fuseboxor junctionbox. CablferomResidence Green (or Bare Red_ b\ [-_ _ Copper)Wire _ _Black White Wire • Tile countertops may need trim cut back 3/4"(1.9 cm) from each front corner and/or rounded edge flattened (Figure 7). (1.9 cm) I 31,/,, ..-.-_ (81 cm) Formed or tile countertop trimmed _A" (1,9 cm) back at front corners of countertop opening, Figure 7 If the existing cutout width is greater than 30 1/16" (76,4 cm), reduce the 3A" (1.9 cm) dimension. Countertop must be level, Place a level on the countertop, first side to side, then front to back. If the countertop is not level, the range will not be level. The oven must be level for satisfactory baking results. Cooktop sides of range fit over edges of countertop opening Green(or Bare fL:_ Copper)Wire _ Junction Box _...... Cablefrom Appliance Wires] Range Installation _,isT; uitImportant Note: Door removal is not a requirement for installation of the range, but is an added convenience. Connector (or CSA listed) Refer to the Use and Care Guide for NOTE: Be sure to remove the supplied grounding strap. oven door removal instructions. Figure 6 - 4-Wire Electrical System (Example: Junction Box) Cabinet Construction Standard Installation To eliminate the risk of burns or fire by reaching over heated surface units, do not have cabinet storage space above the range. If there is cabinet storage space above range, reduce risk by installing a range hood that projects horizontally a minimum of 5" (12.7 cm) beyond the bottom of the cabinet. The range cooktop overlaps the countertop at the sides and the range rests on the floor. The cooktop is 31 1/2" (81 cm)wide. Install base cabinets 30" (76.2 cm) apart. Make sure they are plumb and level before attaching cooktop. Shave raised countertop edge to clear 31 1/2" (81 cm) wide range top rim. Countertop Preparation • The cooktop sides of the range fit over the cutout edge of your countertop. • If you have a square finish (flat) countertop, no countertop preparation is required. Cooktop sides lay directly on edge of countertop. • Formed front-edged countertops must have molded edge shaved flat 3/4" (1.9 cm) from each front corner of opening (Figure 7). Install cabinet doors 31 " (78.7 cm) min. apart so it will not interfere with range door opening. Cutout countertop exactly as shown on page 1. 7
-
 1
1 -
 2
2 -
 3
3 -
 4
4 -
 5
5 -
 6
6 -
 7
7 -
 8
8 -
 9
9 -
 10
10 -
 11
11 -
 12
12 -
13
-
14
-
15
-
16
-
17
-
18
-
19
-
20
-
21
-
22
-
23
-
24
 |
 |
