Kenmore 4689 Installation Instructions - Page 8
Leveling - sears
 |
View all Kenmore 4689 manuals
Add to My Manuals
Save this manual to your list of manuals |
Page 8 highlights
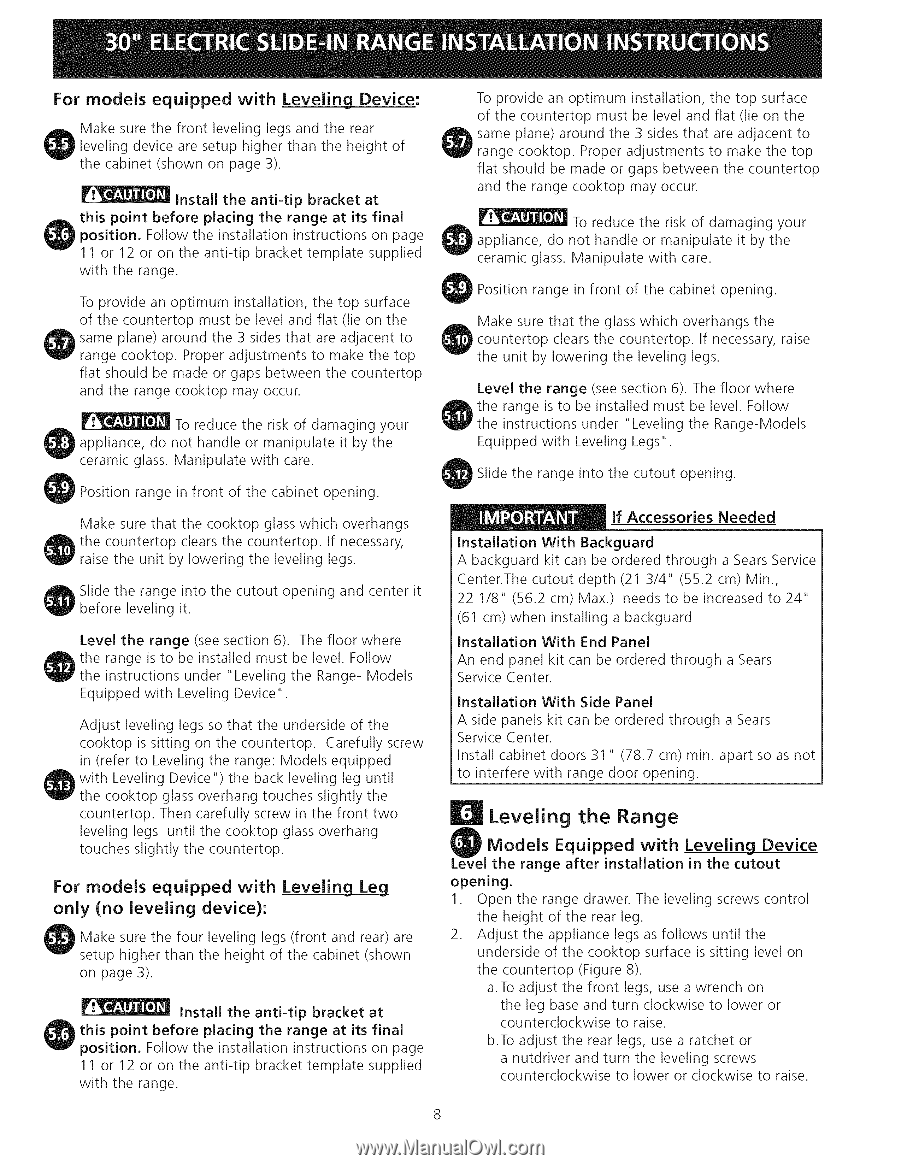
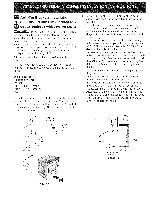
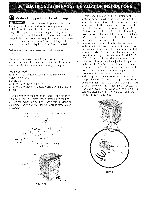
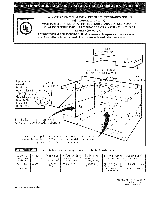
For models equipped with Leveling Device: Make sure the front leveling legs and the rear leveling device are setup higher than the height of the cabinet (shown on page 3). install the anti-tip bracket at this point before placing the range at its final position. Follow the installation instructions on page 11 or 12 or on the anti-tip bracket template supplied with the range. To provide an optimum installation, the top surface of the countertop must be level and flat (lie on the same plane) around the 3 sides that are adjacent to range cooktop. Proper adjustments to make the top flat should be made or gaps between the countertop and the range cooktop may occur. O To reduce the risk of damaging your appliance, do not handle or manipulate it by the ceramic glass. Manipulate with care. Position range in front of the cabinet opening. To provide an optimum installation, the top surface of the countertop must be level and flat (lie on the same plane) around the 3 sides that are adjacent to range cooktop. Proper adjustments to make the top flat should be made or gaps between the countertop and the range cooktop may occur. To reduce the risk of damaging your appliance, do not handle or manipulate it by the ceramic glass. Manipulate with care. Position range in front of the cabinet opening. Make sure that the glass which overhangs the countertop clears the countertop. If necessary, raise the unit by lowering the leveling legs. Level the range (see section 6). The floor where he range is to be installed must be level. Follow the instructions under "Leveling the Range-Models Equipped with Leveling Legs". Slide the range into the cutout opening. Make sure that the cooktop glass which overhangs the countertop clears the countertop. If necessary, raise the unit by lowering the leveling legs. Slide the range into the cutout opening and center it before leveling it. Level the range (see section 6). The floor where the range is to be installed must be level. Follow the instructions under "Leveling the Range- Models Equipped with Leveling Device". Adjust leveling legs so that the underside of the cooktop is sitting on the countertop. Carefully screw in (refer to Leveling the range: Models equipped with Leveling Device") the back leveling leg until the cooktop glass overhang touches slightly the countertop. Then carefully screw in the front two leveling legs until the cooktop glass overhang touches slightly the countertop. For models equipped with Levelin Lg_L_e_g only (no leveling device): Make sure the four leveling legs (front and rear) are setup higher than the height of the cabinet (shown on page 3). Install the anti-tip bracket at this point before placing the range at its final position. Follow the installation instructions on page 11 or 12 or on the anti-tip bracket template supplied with the range. lf Accessories Needed Installation With Backguard A backguard kit can be ordered through a Sears Service Center.The cutout depth (21 3/4" (55.2 cm) Min., 22 1/8" (56.2 cm) Max.) needs to be increased to 24" (61 cm) when installing a backguard installation With End Panel An end panel kit can be ordered through a Sears Service Center. installation With Side Panel A side panels kit can be ordered through a Sears Service Center. Install cabinet doors 31 " (78.7 cm) min. apart so as not to interfere with range door opening. Leveling the Range Models Equipped with Leveling Device the range after installation in the cutout opening. 1. Open the range drawer. The leveling screws control the height of the rear leg. 2. Adjust the appliance legs as follows until the underside of the cooktop surface is sitting level on the countertop (Figure 8). a.To adjust the front legs, use a wrench on the leg base and turn clockwise to lower or counterclockwise to raise. b.To adjust the rear legs, use a ratchet or a nutdriver and turn the leveling screws counterclockwise to lower or clockwise to raise.
-
 1
1 -
2
-
 3
3 -
 4
4 -
 5
5 -
 6
6 -
 7
7 -
 8
8 -
 9
9 -
 10
10 -
 11
11 -
 12
12 -
 13
13 -
14
-
15
-
16
-
17
-
18
-
19
-
20
-
21
-
22
-
23
-
24
 |
 |