Kenmore 5786 Use and Care Guide - Page 19
Crisper Lights, Upper Freezer Light on some models - vacuum cleaners
 |
UPC - 883049132471
View all Kenmore 5786 manuals
Add to My Manuals
Save this manual to your list of manuals |
Page 19 highlights
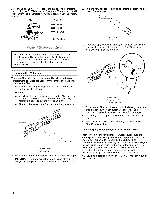
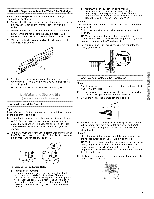
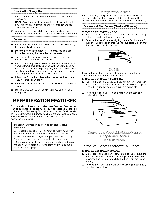
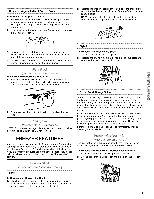
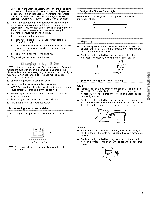
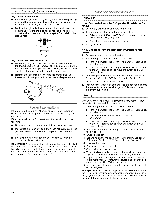
Do not allow the Stainless Steel Cleaner and Polish to come into contact with any plastic parts such as the trim pieces, dispenser covers or door gaskets. If unintentional contact does occur, clean plastic part with a sponge and mild detergent in warm water. Dry thoroughly with a soft cloth. 5. There is no need for routine condenser cleaning in normal home operating environments. If the environment is particularly greasy or dusty, or there is significant pet traffic in the home, the condenser should be cleaned every 2 to 3 months to ensure maximum efficiency. If you need to clean the condenser: • Remove the base grille. See "Base Grille" graphic or "Base Grille" section. • Use a vacuum cleaner with a soft brush to clean the grille, the open areas behind the grille and the front surface area of the condenser. • Replace the base grille when finished. 6= Plug in refrigerator or reconnect power. Refrigerator Control Panel Light Reach behind the refrigerator control panel to remove and replace light bulb. Crisper Lights If necessary, remove the top crisper drawer to access the crisper light shield. Remove the light shield by lifting the ends out of the brackets as shown. Replace the light shield by inserting the ends into the brackets. If necessary, replace the top crisper drawer. NOTE: Not all appliance bulbs will fit your refrigerator. Be sure to replace the bulb with one of the same size and shape. The dispenser light requires a heavy duty 1O-watt bulb. All other lights require a 40-watt appliance bulb. Replacement bulbs are available from your dealer. 1. Unplug refrigerator or disconnect power. 2. Remove light shield when applicable as shown. NOTE: To clean the light shield, wash it with warm water and liquid detergent. Rinse and dry the shield well. 3. Remove light bulb and replace with one of the same size, shape and wattage. 4. Replace light shield when applicable as shown. 5. Plug in refrigerator or reconnect power. Dispenser Light (on some models) Reach through the dispenser area to remove and replace light bulb. Upper Freezer Light (on some models) Style 1 • Remove light shield by grasping the top center of the shield and pulling forward while turning it slightly to one side. If necessary, remove top crisper drawer to gain access to the crisper light shield. • Replace the light shield by inserting the tabs on one end into the slotted holes in the refrigerator or freezer liner. Then, bend the shield at the center to insert the tabs on the other end. A. Dispenser light NOTE: On some models, the dispenser lights are LEDs that can not be changed. Style 2 • Remove the light shield by squeezing the sides of the light shield in toward the center while pulling the shield forward as shown. Replace the light shield by fitting the tabs into the slotted holes in the freezer liner. Push in the shield until it snaps into place. 19
-
 1
1 -
2
-
3
-
4
-
5
-
6
-
7
-
8
-
9
-
10
-
11
-
12
-
13
-
 14
14 -
 15
15 -
 16
16 -
 17
17 -
 18
18 -
 19
19 -
 20
20 -
 21
21 -
 22
22 -
 23
23 -
 24
24 -
25
-
26
-
27
-
28
-
29
-
30
-
31
-
32
-
33
-
34
-
35
-
36
-
37
-
38
-
39
-
40
-
41
-
42
-
43
-
44
-
45
-
46
-
47
-
48
-
49
-
50
-
51
-
52
-
53
-
54
-
55
-
56
-
57
-
58
-
59
-
60
-
61
-
62
-
63
-
64
-
65
-
66
-
67
-
68
-
69
-
70
-
71
-
72
-
73
-
74
-
75
-
76
-
77
-
78
-
79
-
80
 |
 |
