Kenwood CMOS-320 Operation Manual - Page 10
Camera Setting Procedure, Overhead View Image Adjustment, Centering
 |
View all Kenwood CMOS-320 manuals
Add to My Manuals
Save this manual to your list of manuals |
Page 10 highlights
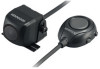
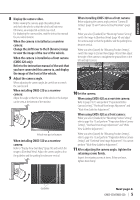
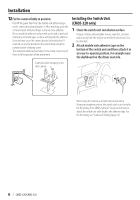
Camera Setting (CMOS-320 only) Camera Setting Procedure 1 Complete all of the required connections in advance. 2 Display the camera video. For displaying the camera video, read the instruction manual for your video monitor. 3 Press and hold the view and + buttons of the switch unit simultaneously to enter the camera adjustment mode. 4 First select the positioning of the camera. Select [Lower] when installing the camera at a height of 30cm to below 50cm (0.98feet to below 1.64feet). 6 Select a camera adjustment item and adjust it. The following items are available for camera adjustment. 1. Overhead view image adjustments (Centering, Right-and-Left angle, Up-and-Down Angle) 2. Wide view guideline adjustments (Size, Horizontal direction, Red Line Position Setting) To select an item: Press the + or - button to select an item and press the view button to enter the selection. When an adjustment item is selected, the frame of its icon turns from blue to yellow. To adjust the item: After selecting the item, press the + or - button to adjust it and press the view button to enter the adjusted value. 7 End the setting. Use the + or - button to select an item and press the view button to enter the selection. • When using the camera as the rearview camera, select [OK]. And then go to step 6. • When using the camera as the front camera, select [Normal] and then select [OK]. And then go to step 5. • Selecting [Reset All] resets all of the camera settings to the defaults. 5 Adjust the camera's mounting position with the + or - buttons on the switch unit. Overhead View Image Adjustment (Centering) This item adjusts the center of the camera installation position. 1 Select "OVERHEAD VIEW IMAGE ADJUSTMENT (CENTERING)". 2 Press the + or - button of the switch unit so that the two white lines appear on the position corresponding to the center line of the vehicle. Select [Standard] when installing the camera at a height of 50cm to 80cm (1.64feet to 2.62feet). 10 | CMOS-320/CMOS-220 Adjustment is possible by two steps to the left and right. If the adjustment is not possible in the currently available range, change the camera position before retry. • Select [Back] to go back to the previous adjustment item. • Select [Next] to advance to the next adjustment item. • Selecting [Reset] in an individual adjustment item resets the camera setting of that item to the default.
-
 1
1 -
2
-
3
-
4
-
 5
5 -
 6
6 -
 7
7 -
 8
8 -
 9
9 -
 10
10 -
 11
11 -
 12
12 -
 13
13 -
 14
14 -
 15
15 -
16
-
17
-
18
-
19
-
20
-
21
-
22
-
23
-
24
-
25
-
26
-
27
-
28
-
29
-
30
-
31
-
32
-
33
-
34
-
35
-
36
-
37
-
38
-
39
-
40
-
41
-
42
-
43
-
44
-
45
-
46
-
47
-
48
-
49
-
50
-
51
-
52
-
53
-
54
-
55
-
56
-
57
-
58
-
59
-
60
 |
 |
