Kenwood DNX7100 Installation Manual - Page 8
Installing the Escutcheon - installation
 |
UPC - 019048170972
View all Kenwood DNX7100 manuals
Add to My Manuals
Save this manual to your list of manuals |
Page 8 highlights
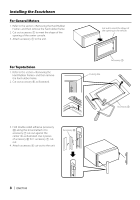
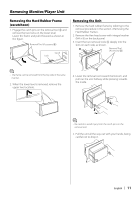
Installing the Escutcheon For General Motors 1. Refer to the section and then remove the hard rubber frame. 2. Cut out accessory 7 to meet the shape of the opening of the center console. 3. Attach accessory 7 to the unit. For Toyota/Scion 1. Refer to the section and then remove the hard rubber frame. 2. Cut out accessory 7 as illustrated. Cut out to meet the shape of the opening in the vehicle. Accessory 7 Cutting line 3. Fold double-sided adhesive (accessory 8) along the slit and attach it to accessory 7 cut-out against the center rib as illustrated. Use 2 pieces of accessory 8 for 1 accessory 7 cutout. 4. Attach accessory 7 cut-out to the unit. Accessory 8 Accessory 7 8 | DNX7100
-
 1
1 -
2
-
 3
3 -
 4
4 -
 5
5 -
 6
6 -
 7
7 -
 8
8 -
 9
9 -
 10
10 -
 11
11 -
 12
12 -
 13
13 -
14
-
15
-
16
-
17
-
18
-
19
-
20
-
21
-
22
-
23
-
24
-
25
-
26
-
27
-
28
-
29
-
30
-
31
-
32
 |
 |
8
|
DNX7100
Installing the Escutcheon
For General Motors
1. Refer to the section <Removing the Hard Rubber
Frame> and then remove the hard rubber frame.
2. Cut out accessory
7
to meet the shape of the
opening of the center console.
3. Attach accessory
7
to the unit.
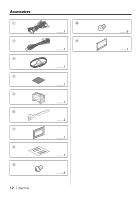
For Toyota/Scion
1. Refer to the section <Removing the
Hard Rubber Frame> and then remove
the hard rubber frame.
2. Cut out accessory
7
as illustrated.
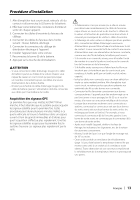
3. Fold double-sided adhesive (accessory
8
) along the slit and attach it to
accessory
7
cut-out against the
center rib as illustrated. Use 2 pieces
of accessory
8
for 1 accessory
7
cut-
out.
4. Attach accessory
7
cut-out to the unit.
Accessory
7
Cut out to meet the shape of
the opening in the vehicle.
Cutting line
Accessory
7
Accessory
8