Kenwood DRV-830 Operation Manual - Page 7
How to Install
 |
View all Kenwood DRV-830 manuals
Add to My Manuals
Save this manual to your list of manuals |
Page 7 highlights
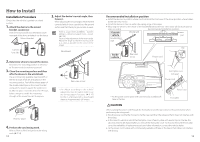
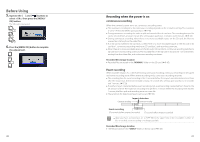
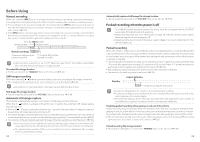
HHoowwtotoInIsntasltlall Installation Procedure Check that the vehicle is parked on a level surface. 1. Attach the device to the mount bracket. (accessory) Insert the mount bracket into the bracket attachment part of the device and attach it to the device. Mount bracket Camera lens side 5. Adjust the device's mount angle, then fasten it. When adjusting the mount angle, check that the camera's field of vision is parallel to a flat ground surface and that the sky to ground ratio is equal. There is a spirit level at [MENU] - [System settings] - [Mouting support tools] - [Level]. (➜ P. 34) Use it to help adjustment of the mount angle. Adjust the angle so that the moving circle is as close as possible to the center of the screen. Windshield 2. Determine where to mount the device. Determine the mounting position in reference to "Recommended installation position". 3. Clean the mounting surface and then affix the device to the windshield. Use a commercially available cleaning cloth or the like to wipe off all dirt and grease on the mounting surface. Peel off the release paper of the double-sided tape on the mount bracket and push the bracket against the windscreen to affix it in place. Leave the device for 24 hours before using it to enable the mounting strength of the mount bracket to improve. Rear-view mirror • The "Adjust according to the vehicle" adjustments must be made in order to use the driving support functions. (➜ P. 17) Do this in a flat place with a line-of-sight distance of approximately 200 meters. Release paper 4. Perform the cord wiring work. Refer to "How to Wire" and perform the wiring work.(➜ P. 14) 12 Recommended installation position z Install the device in a position where it will not block the front view of the driver (position where hidden by the rear-view mirror). z Install the device so that it is within the wiping range of the wiper. z Mounting the device to the center of the windshield behind the rear-view mirror will facilitate optimal video recording. Recommended installation position Outside vehicle Windshield Ceramic part Doublesided tape Clip Inside vehicle Rearview mirror Power cord Front pillar cover Soft tape* Power cord Power cord * Fix the power cord in place with commercially available soft tape or the like. Front pillar CAUTION When passing the power cord through the front pillar or another part, observe the points below when performing the wiring work. z Wire the power cord farther forward or farther rearward than the airbag so that it does not interfere with the airbag. z In the case of a vehicle in which the front pillar cover is fixed in place with special clips or the like, the clips may need to be replaced after you remove the front pillar cover. For how to remove the front pillar cover, the availability of replacement parts and other information, contact the vehicle dealer. z Fix the power cord in place with commercially available soft tape or the like so that it does not interfere with driving. 13
-
 1
1 -
 2
2 -
 3
3 -
 4
4 -
 5
5 -
 6
6 -
 7
7 -
 8
8 -
 9
9 -
 10
10 -
 11
11 -
 12
12 -
13
-
14
-
15
-
16
-
17
-
18
-
19
-
20
-
21
-
22
-
23
-
24
-
25
 |
 |
