Kenwood DRV-830 Operation Manual - Page 8
How to Wire, Part Names and Functions
 |
View all Kenwood DRV-830 manuals
Add to My Manuals
Save this manual to your list of manuals |
Page 8 highlights
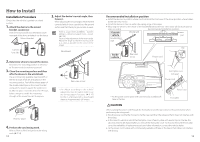
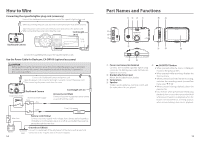
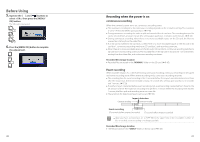
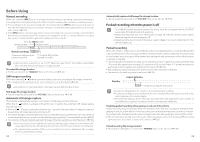
How to Wire Connecting the cigarette lighter plug cord (accessory) Connect the dashboard camera and power cord of the cigarette lighter plug cord. When disconnecting the power cord, disconnect it while pressing the hook of the connector. Open the power cord connector terminal's cover and connect the power cord. After connecting the power cord, close the cover. Cord length (4 m) Fuse (2 A) Dashboard Camera Connect the cigarette lighter plug to the cigarette lighter socket. Use the Power Cable for Dashcam; CA-DR100 (optional accessory) CAUTION Before performing the connection work, first check that the engine key is removed and then be sure to disconnect the negative terminal of the battery to prevent a short-circuit accident. Connect the Dashboard Camera and power cord. Open the power cord connector terminal's cover and connect the power cord. After connecting the power cord, close the cover. Dashboard Camera Engine key switch Accessory power supply Fuse ACC Cord length (3.5 m) Accessory cord (Red) Connect to a power supply that can be turned on and off with the switch. Fuse (2 A) BATT Main fuse Battery GND 14 Battery cord (Yellow) Connect to a power supply with a voltage that is always applied regardless of whether or not the engine key is on or off at a point after the power has passed through the main fuse. Ground cord (Black) Connect to a metal part of the vehicle (part of the chassis with an electrical connection to the negative side of the power supply). Part Names and Functions 432 1 %$ 5 6 7 8 !@ # 90 1 Power cord connector terminal Connect the included cigarette lighter plug cord or the CA-DR100 power cable for Dashcam (optional accessory). 2 Bracket attachment part Mount the included mount bracket. 3 Camera lens 4 Speaker Outputs audio guidance, warning sounds and the audio when files are played. 5 /SHORTCUT button z When pressed while the menu is displayed, moves to the previous item. z When pressed while recording, displays the shortcut menu. z When pressed and held while recording, switches the recording mode (normal/low frame rate). ➜ P. 33) z When pressed during playback, plays the previous file. z Fast-reverses when pressed and held during playback, slow-reverses when pressed and held while paused. Switches to playback when the button is released while fast-reversing, to pause when released during slow-reverse playback. 15
-
 1
1 -
2
-
 3
3 -
 4
4 -
 5
5 -
 6
6 -
 7
7 -
 8
8 -
 9
9 -
 10
10 -
 11
11 -
 12
12 -
 13
13 -
14
-
15
-
16
-
17
-
18
-
19
-
20
-
21
-
22
-
23
-
24
-
25
 |
 |
