Kenwood TS-870S User Manual - Page 20
Microphone
 |
View all Kenwood TS-870S manuals
Add to My Manuals
Save this manual to your list of manuals |
Page 20 highlights
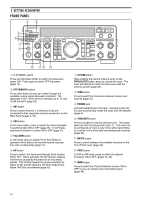
3 GETTING ACQUAINTED ANT ATT DOWN UP VOX FULL/SEMI AIP AT TUNE THRU/AUTO SEND AGC METER HF TRANSCEIVER PROC MONI KEY SPEED PROC 4 MONI 6 TS-870 1 CH 1 6 M.IN ON AIR 2 CH 2 7 M>VFO ENTER PHONES MIC SLOW OFF CAR 4 2 0 2 FAST 0 DELAY MIC 6 4 8 2 10 0 8 3 CH 3 8 SCAN 10 PWR 6 8 10 4 CH 4 9 CLR 5 REC 0 F.LOCK QUICK MEMO M.IN MR FINE $1 NB button Press to switch the analog Noise Blanker function ON or OFF. This function works best against short duration pulse noise {page 53}. $2 AF gain control Adjusts the audio frequency gain. Turn the control clockwise to increase the gain; counterclockwise to decrease the gain {page 19}. $3 RF gain control Adjusts the radio frequency gain. Turn the control clockwise to increase the gain; counterclockwise to decrease the gain {page 19}. $4 RIT/XIT control After switching ON the RIT or XIT function, turn to select the desired frequency offset with respect to the current frequency {pages 44, 45}. $5 NB control When using the Noise Blanker function, turn to adjust the noise blanking level {page 53}. To prevent distorting your receive signal, use the minimum blanking level necessary. $6 SQL control The Squelch control can be used for muting the receiver during no signal periods. The more clockwise that the control is turned, the higher the noise threshold level. Therefore, the stronger the received signal must be to open the squelch. Leave fully counterclockwise for weak signal reception {page 19}. DIGITAL SIGNAL PROCESSOR AUTO NOTCH BEAT CANCEL N.R. TX EQ. LO/WIDTH FILTER HI/SHIFT AT TUNE TF-SET 1MHz MODE LSB /USB CW/- R FSK /- R FM/AM DOWN A=B MENU RX TX A B M.CH UP RIT XIT CLEAR NB RIT/XIT AF 4 2 RF 6 8 M.CH/VFO.CH 0 NB 4 2 10 SQL 6 8 0 10 $1 $2 $4 $3 $5 $6 $7 $7 M.CH/VFO.CH control In VFO mode, turn to step the frequency up or down {page 21}. In memory channel mode, turn to select the desired memory channel {page 55}. The control is also used for selecting boundaries for the Automatic Mode function {page 48} and for selecting Menu numbers when accessing the Menu {page 24}. MICROPHONE q UP/DWN buttons Use these buttons to step the VFO frequency or memory channels up or down. The selected frequency or channel will change continuously in the direction of the button label if a button is pressed and held down. w PTT (Push-to-Talk) switch The transceiver is placed in transmit mode when this non-locking switch is held down. Releasing the switch returns the transceiver to receive mode. q DWN UP w PTT 14
-
 1
1 -
2
-
3
-
4
-
5
-
6
-
7
-
8
-
9
-
10
-
11
-
12
-
13
-
14
-
 15
15 -
 16
16 -
 17
17 -
 18
18 -
 19
19 -
 20
20 -
 21
21 -
 22
22 -
 23
23 -
 24
24 -
 25
25 -
26
-
27
-
28
-
29
-
30
-
31
-
32
-
33
-
34
-
35
-
36
-
37
-
38
-
39
-
40
-
41
-
42
-
43
-
44
-
45
-
46
-
47
-
48
-
49
-
50
-
51
-
52
-
53
-
54
-
55
-
56
-
57
-
58
-
59
-
60
-
61
-
62
-
63
-
64
-
65
-
66
-
67
-
68
-
69
-
70
-
71
-
72
-
73
-
74
-
75
-
76
-
77
-
78
-
79
-
80
-
81
-
82
-
83
-
84
-
85
-
86
-
87
-
88
-
89
-
90
-
91
-
92
-
93
-
94
-
95
-
96
-
97
-
98
-
99
-
100
-
101
-
102
-
103
-
104
 |
 |
