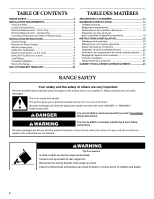
KitchenAid KESK901SBL Installation Instructions - Page 7
Installation, Instructions
 |
UPC - 883049026985
View all KitchenAid KESK901SBL manuals
Add to My Manuals
Save this manual to your list of manuals |
Page 7 highlights
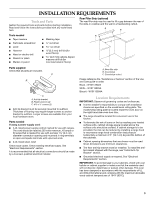
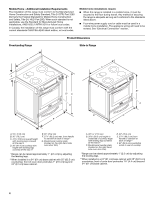
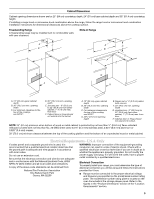
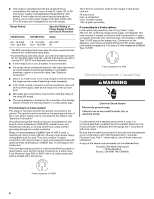
■ Check with a qualified electrical installer if you are not sure the range is properly grounded. Range Rating* 120/240 Volts 8.8 - 16.5 KW 16.6 - 22.5 KW 120/208 Volts 7.8 - 12.5 KW 12.6 - 18.5 KW Specified Rating of Power Supply Cord Kit and Circuit Protection Amps 40 or 50** 50 *The NEC calculated load is less than the total connected load listed on the model/serial rating plate. **If connecting to a 50-amp circuit, use a 50-amp rated cord with kit. For 50-amp rated cord kits, use kits that specify use with a nominal 1³⁄₈" (34.9 mm) diameter connection opening. ■ A time-delay fuse or circuit breaker is recommended. ■ This range is equipped with a CSA International Certified Power Cord intended to be plugged into a standard 14-50R wall receptacle. Be sure the wall receptacle is within reach of range's final location. ■ Do not use an extension cord. Countertop Preparation (for Slide-in Ranges Only) The cooktop sides of the slide-in range fit over the cutout edge of your countertop. If you have a square finish (flat) countertop and the opening width is 30" (76.2 cm), no countertop preparation is required. Formed front-edged countertops must have molded edge shaved flat ³⁄₈" (1.0 cm) from each front corner of opening. Tile countertops may need trim cut back ³⁄₈" (1.0 cm) from each front corner and/or rounded edge flattened. 30" (76.2 cm) ³⁄₈" (1.0 cm) INSTALLATION INSTRUCTIONS Unpack Range WARNING Excessive Weight Hazard Use two or more people to move and install range. Failure to do so can result in back or other injury. 1. Remove shipping materials, tape and protective film from the range. Keep cardboard bottom under range. Remove oven racks and parts package from inside oven. 2. To place range on its back, take 4 cardboard corners from the carton. Stack one cardboard corner on top of another. Repeat with the other 2 corners. Place them lengthwise on the floor behind the range to support the range when it is laid on its back. Using 2 or more people, firmly grasp the range and gently lay it on its back on the cardboard corners. 3. Pull cardboard bottom firmly to remove. Measure for Proper Height Slide-In Ranges: 1. Measure the distance of the countertop to the floor. Measure at all 4 locations corresponding to the 4 corners of the underside of the range cooktop, as shown. C A D B 30 ¾" (78.1 cm) If countertop opening width is greater than 30" (76.2 cm), adjust the ³⁄₈" (1.0 cm) dimension. Countertop must be level. Place level on countertop, first side to side, then front to back. If countertop is not level, range will not be level. Range must be level for satisfactory baking conditions. Measure at locations marked A, B, C, D. 2. Measure from the floor to the underside of the range cooktop. C B A A. Distance from floor to underside of range cooktop B. Range side frame C. Cooktop 3. Your leveling height will be the difference between the 2 measurements you have just taken. 7
-
 1
1 -
 2
2 -
 3
3 -
 4
4 -
 5
5 -
 6
6 -
 7
7 -
 8
8 -
 9
9 -
 10
10 -
 11
11 -
 12
12 -
13
-
14
-
15
-
16
-
17
-
18
-
19
-
20
-
21
-
22
-
23
-
24
 |
 |
