KitchenAid KFIS29BBBL Installation Guide - Page 6
Custom Door Panels
 |
View all KitchenAid KFIS29BBBL manuals
Add to My Manuals
Save this manual to your list of manuals |
Page 6 highlights
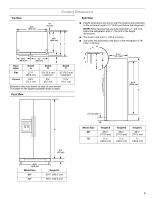
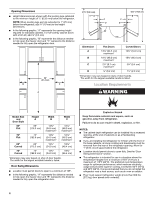
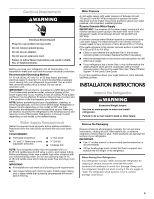
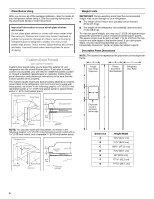
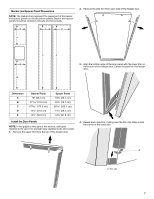
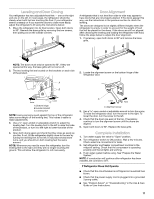
Clean Before Using After you remove all of the package materials, clean the inside of your refrigerator before using it. See the cleaning instructions in the Use & Care Guide or User Instructions. Important information to know about glass shelves and covers: Do not clean glass shelves or covers with warm water when they are cold. Shelves and covers may break if exposed to sudden temperature changes or impact, such as bumping. Tempered glass is designed to shatter into many small, pebble-size pieces. This is normal. Glass shelves and covers are heavy. Use both hands when removing them to avoid dropping. Custom Door Panels (on some models) Custom door panels allow you to blend the exterior of your refrigerator into the overall kitchen décor. If you plan to install custom wood panels, you will need to create the panels yourself or consult a qualified cabinetmaker or carpenter. Follow these panel dimension and placement instructions to be sure that the custom panels will fit properly. The custom panels must have backer panels attached in order to mount them to the refrigerator. It is most common to work with three panels, as shown in the following graphic: a ³⁄₄" (19.05 mm) decorative panel, a 1.59 mm) spacer panel or spacer strips, and a ¹⁄₄" (6.35 mm) backer panel. Decorative Panel Spacer Panel Spacer Panel 1/₁₆" (1.59 mm) Decorative Panel Backer Panel 3/4" (19.05 mm) Backer Panel 1/4" 1/₁₆" (6.35 mm) (1.59 mm) Door Trim 1" minimum (2.54 cm) NOTE: You can also work with two panels, as shown in the following graphic: a ³⁄₄" (19.05 mm) decorative panel routed with a 1.59 mm) cutout, and a separate ¹⁄₄" (6.35 mm) backer panel. Decorative Panel 1/16" (1.59 mm) 1/₁₆" (1.59 mm) Decorative Panel 3/₄" (19.05 mm) Backer Panel 11/16" (17.46 mm) Backer Panel 1/4" (6.35 mm) Door Trim 1" minimum (2.54 cm) Weight Limits IMPORTANT: Panels weighing more than the recommended weight may cause damage to your refrigerator. ■ The weight of the freezer door panel(s) cannot exceed 25 lbs (11.3 kg). ■ The weight of the refrigerator door panel(s) cannot exceed 41 lbs (18.6 kg). To minimize panel weight, you may use 2" (5.08 cm) spacer strips around the perimeter in place of solid full-sheet spacer panels. The spacer strips must be set in at least 1" (2.54 cm) from the top, bottom and side edges of the backer panel. If you use spacer strips, it is also recommended that you use two horizontally-centered 2" (5.08 cm) strips for added support. Decorative Panel Dimensions NOTE: The dashed line represents the placement of the dispenser frame. D D E Freezer Door Panel (Dispenser) Freezer Door Panel (Non-Dispenser) Refrigerator Door Panel A F G C Dispenser cutout is centered left-to-right B Dimension A B C D E F G Height/Width 19³⁄₈" (49.2 cm) 31³⁄₄" (80.6 cm) 68 173.2 cm) 15³⁄₈" (39.1 cm) 20" (50.8 cm) 17 43.3 cm) 11 29.1 cm) 6
-
 1
1 -
 2
2 -
 3
3 -
 4
4 -
 5
5 -
 6
6 -
 7
7 -
 8
8 -
 9
9 -
 10
10 -
 11
11 -
 12
12 -
13
-
14
-
15
-
16
-
17
-
18
-
19
-
20
-
21
-
22
-
23
-
24
-
25
-
26
-
27
-
28
-
29
-
30
-
31
-
32
-
33
-
34
-
35
-
36
 |
 |
