KitchenAid KHHS179LBT Installation Instructions - Page 5
Installation Instructions
 |
View all KitchenAid KHHS179LBT manuals
Add to My Manuals
Save this manual to your list of manuals |
Page 5 highlights
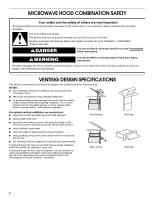
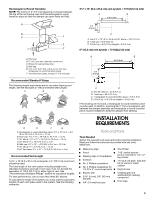
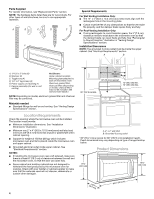
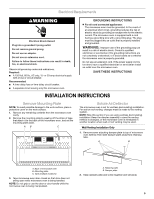
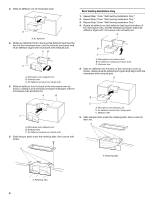
Electrical Requirements WARNING Electrical Shock Hazard Plug into a grounded 3 prong outlet. Do not remove ground prong. Do not use an adapter. Do not use an extension cord. Failure to follow these instructions can result in death, fire, or electrical shock. Observe all governing codes and ordinances. Required: ■ A 120 Volt, 60 Hz, AC only, 15- or 20-amp electrical supply with a fuse or circuit breaker. Recommended: ■ A time-delay fuse or time-delay circuit breaker. ■ A separate circuit serving only this microwave oven. GROUNDING INSTRUCTIONS ■ For all cord connected appliances: The microwave oven must be grounded. In the event of an electrical short circuit, grounding reduces the risk of electric shock by providing an escape wire for the electric current. The microwave oven is equipped with a cord having a grounding wire with a grounding plug. The plug must be plugged into an outlet that is properly installed and grounded. WARNING: Improper use of the grounding plug can result in a risk of electric shock. Consult a qualified electrician or serviceman if the grounding instructions are not completely understood, or if doubt exists as to whether the microwave oven is properly grounded. Do not use an extension cord. If the power supply cord is too short, have a qualified electrician or serviceman install an outlet near the microwave oven. SAVE THESE INSTRUCTIONS INSTALLATION INSTRUCTIONS Remove Mounting Plate NOTE: To avoid possible damage to the work surface, place a protective cover on the work surface. 1. Remove any remaining contents from the microwave oven cavity. 2. Remove the mounting plate by peeling off the strips of tape that attach it to the back of the microwave oven, and set the mounting plate aside. A B C Rotate Air Deflector The microwave oven is set for ventless (recirculating) installation. For wall or roof venting, changes must be made to the venting system. NOTE: Skip this section if you are using ventless (recirculating) installation. Keep the damper assembly in case the venting method is changed, or the microwave oven is reinstalled in another location where wall or roof venting may be used. Wall Venting Installation Only 1. Remove screw attaching damper plate to top of microwave oven exterior, then slide damper plate away from retaining tabs. A B A. Back of microwave oven B. Mounting plate C. Tape (multiple locations) 3. Tape microwave oven door closed so that door does not swing open while microwave oven is being handled. NOTE: Do not grip or use the door or door handle while the microwave oven is being manipulated. A. Retaining tabs B. Damper plate 2. Keep damper plate and screw together and set aside. 5
-
 1
1 -
 2
2 -
 3
3 -
 4
4 -
 5
5 -
 6
6 -
 7
7 -
 8
8 -
 9
9 -
 10
10 -
 11
11 -
12
-
13
-
14
-
15
-
16
-
17
-
18
-
19
-
20
-
21
-
22
-
23
-
24
 |
 |
