KitchenAid KHHS179LBT Installation Instructions - Page 6
Roof Venting Installation Only
 |
View all KitchenAid KHHS179LBT manuals
Add to My Manuals
Save this manual to your list of manuals |
Page 6 highlights
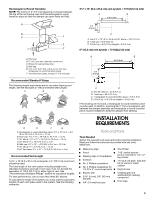
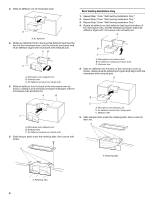
3. Slide air deflector out of microwave oven. A A. Air deflector 4. Rotate air deflector front to back so that deflector feet face the front of the microwave oven, and the exhaust port (open end) of air deflector aligns with microwave oven exhaust port. A B C A. Microwave oven exhaust port B. Deflector feet C. Air deflector exhaust port (open end) 5. Slide air deflector into the back of the microwave oven as shown, making sure its exhaust port (open end) aligns with the microwave oven exhaust port. A B C A. Microwave oven exhaust port B. Deflector feet C. Air deflector exhaust port (open end) 6. Slide damper plate under the retaining tabs, then secure with screw. Roof Venting Installation Only 1. Repeat Step 1 from "Wall Venting Installation Only." 2. Repeat Step 2 from "Wall Venting Installation Only." 3. Repeat Step 3 from "Wall Venting Installation Only." 4. Rotate air deflector so that deflector feet face the bottom of the microwave oven, and the exhaust port (open end) of air deflector aligns with microwave oven exhaust port. A B C A. Microwave oven exhaust port B. Air deflector exhaust port (open end) C. Deflector feet 5. Slide air deflector into the back of the microwave oven as shown, making sure its exhaust port (open end) aligns with the microwave oven exhaust port. A B C A. Microwave oven exhaust port B. Air deflector exhaust port (open end) C. Deflector feet 6. Slide damper plate under the retaining tabs. Save screw for later use. A A A. Retaining tabs A. Retaining tabs 6
-
 1
1 -
 2
2 -
 3
3 -
 4
4 -
 5
5 -
 6
6 -
 7
7 -
 8
8 -
 9
9 -
 10
10 -
 11
11 -
 12
12 -
13
-
14
-
15
-
16
-
17
-
18
-
19
-
20
-
21
-
22
-
23
-
24
 |
 |
