KitchenAid KSM1FPA Instruction Manual - Page 9
Installing the adjustable slicing disc
 |
View all KitchenAid KSM1FPA manuals
Add to My Manuals
Save this manual to your list of manuals |
Page 9 highlights
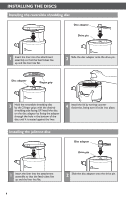
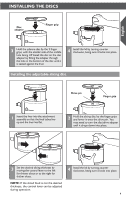
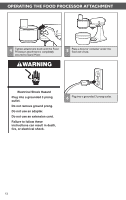
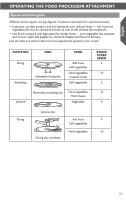
English INSTALLING THE DISCS Disc adapter Finger grip 3 Hold the julienne disc by the 2 finger grips, with the smaller side of the middle hole facing UP. Install the disc on the disc adapter by fitting the adapter through the hole in the bottom of the disc until it is seated against the liner. 4 Install the lid by turning counter clockwise, being sure it locks into place. Installing the adjustable slicing disc Drive pin Finger grip 1 Insert the liner into the attachment assembly so that the feed tubes line up and the liner lies flat. 2 Hold the slicing disc by the finger grips and lower it onto the drive pin. You may need to turn the disc/drive adapter until it drops down into place. 3 Set the desired slicing thickness by moving the control lever to the left for thinner slices or to the right for thicker slices. NOTE: If the sliced food is not the desired thickness, the control lever can be adjusted during operation. 4 Install the lid by turning counter clockwise, being sure it locks into place. 9
-
 1
1 -
2
-
3
-
 4
4 -
 5
5 -
 6
6 -
 7
7 -
 8
8 -
 9
9 -
 10
10 -
 11
11 -
 12
12 -
 13
13 -
 14
14 -
15
-
16
-
17
-
18
-
19
-
20
-
21
-
22
-
23
-
24
-
25
-
26
-
27
-
28
-
29
-
30
-
31
-
32
-
33
-
34
-
35
-
36
-
37
-
38
-
39
-
40
-
41
-
42
-
43
-
44
-
45
-
46
-
47
-
48
-
49
-
50
-
51
-
52
-
53
-
54
-
55
-
56
-
57
-
58
-
59
-
60
-
61
-
62
-
63
-
64
-
65
-
66
-
67
-
68
-
69
-
70
-
71
-
72
-
73
-
74
-
75
-
76
-
77
-
78
-
79
-
80
 |
 |
