Kodak I280 User Guide - Page 61
flatbed from the scanner., You will need to re-attach this panel to the scanner if you remove
 |
View all Kodak I280 manuals
Add to My Manuals
Save this manual to your list of manuals |
Page 61 highlights
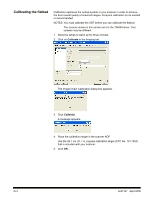
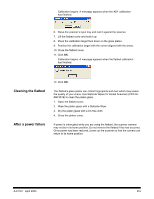
4. Remove the scanner front panel. IMPORTANT: The scanner will not operate if the dockable flatbed is not securely attached. 5. Slide the flatbed close to the opening. 6. Push the flatbed against the scanner until the docking latches click into place. 7. Attach the scanner front panel to the mounting posts on the back of the flatbed for storage. You will need to re-attach this panel to the scanner if you remove the flatbed from the scanner. 8. Power up the scanner. The flatbed is ready to use. NOTE: Lower the input tray when you are going to use the automatic document feeder instead of the flatbed. D-2 A-61167 April 2005
-
 1
1 -
2
-
3
-
4
-
5
-
6
-
7
-
8
-
9
-
10
-
11
-
12
-
13
-
14
-
15
-
16
-
17
-
18
-
19
-
20
-
21
-
22
-
23
-
24
-
25
-
26
-
27
-
28
-
29
-
30
-
31
-
32
-
33
-
34
-
35
-
36
-
37
-
38
-
39
-
40
-
41
-
42
-
43
-
44
-
45
-
46
-
47
-
48
-
49
-
50
-
51
-
52
-
53
-
54
-
55
-
 56
56 -
 57
57 -
 58
58 -
 59
59 -
 60
60 -
 61
61 -
 62
62 -
 63
63 -
 64
64 -
 65
65 -
 66
66 -
67
-
68
-
69
-
70
 |
 |

D-2
A-61167
April 2005
4.
Remove the scanner front panel.
IMPORTANT: The scanner will not operate if the dockable flatbed is not
securely attached.
5.
Slide the flatbed close to the opening.
6.
Push the flatbed against the scanner until the docking latches click
into place.
7.
Attach the scanner front panel to the mounting posts on the back of the
flatbed for storage.
You will need to re-attach this panel to the scanner if you remove the
flatbed from the scanner.
8.
Power up the scanner.
The flatbed is ready to use.
NOTE: Lower the input tray when you are going to use the automatic
document feeder instead of the flatbed.