Kodak Z710 User Manual
Kodak Z710 - EASYSHARE Digital Camera Manual
 |
UPC - 041778197776
View all Kodak Z710 manuals
Add to My Manuals
Save this manual to your list of manuals |
Kodak Z710 manual content summary:
- Kodak Z710 | User Manual - Page 1
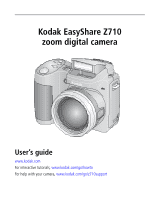
Kodak EasyShare Z710 zoom digital camera User's guide www.kodak.com For interactive tutorials, www.kodak.com/go/howto For help with your camera, www.kodak.com/go/z710support - Kodak Z710 | User Manual - Page 2
Eastman Kodak Company Rochester, New York 14650 © Eastman Kodak Company, 2006 All screen images are simulated. Kodak and EasyShare are trademarks of Eastman Kodak Company. Schneider-Kreuznach and C-Variogon are trademarks of Jos. Schneider Optische Werke GmbH used under license by Eastman Kodak - Kodak Z710 | User Manual - Page 3
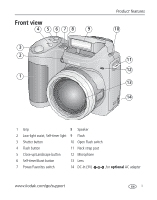
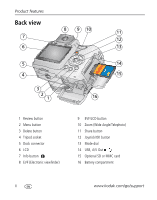
light 9 Flash 3 Shutter button 10 Open Flash switch 4 Flash button 11 Neck strap post 5 Close-up/Landscape button 12 Microphone 6 Self-timer/Burst button 13 Lens 7 Power/Favorites switch 14 DC-In (3V) ,for optional AC adapter www.kodak.com/go/support i - Kodak Z710 | User Manual - Page 4
3 Delete button 4 Tripod socket 5 Dock connector 6 LCD 7 Info button 8 EVF (Electronic viewfinder) 9 EVF/LCD button 10 Zoom (Wide Angle/Telephoto) 11 Share button 12 Joystick/OK button 13 Mode dial 14 USB, A/V Out 15 Optional SD or MMC card 16 Battery compartment ii www.kodak.com/go/support - Kodak Z710 | User Manual - Page 5
Table of contents 1 1 Setting up your camera 1 Installing the software 1 Attaching the lens cap and strap 1 Loading the batteries 2 Turning on the camera 3 Setting the language and date/time 3 Storing pictures on an SD or MMC card 4 2 Taking pictures/videos 5 Taking a picture 5 Using - Kodak Z710 | User Manual - Page 6
7 Getting help 49 Helpful links 49 8 Appendix 51 Camera specifications 51 Storage capacities 55 Important safety instructions 56 Battery life 57 Upgrading your software and firmware 58 Additional care and maintenance 58 Warranty...59 Regulatory compliance 61 iv www.kodak.com/go/support - Kodak Z710 | User Manual - Page 7
: Before connecting any cables, install the software that was included with your camera. For details, see Transferring and printing pictures, page 40. Follow the on-screen instructions. We recommend Complete or Easy Install. Attaching the lens cap and strap 1 2 3 www.kodak.com/go/support 1 - Kodak Z710 | User Manual - Page 8
Setting up your camera Loading the batteries 1 2 CRV3 lithium (non-rechargeable) Ni-MH 2 AA lithium or Ni-MH To replace batteries and extend battery life, see page 57. To recharge rechargeable batteries, see page 58. 2 www.kodak.com/go/support - Kodak Z710 | User Manual - Page 9
Turning on the camera Setting up your camera Setting the language and date/time Language: 1 to change. 2 OK to accept. Date/Time: 1 At the prompt, press OK. 2 to change. for previous/next field. OK to accept. OK To set the language and date/time at a later time, see Date & Time in the - Kodak Z710 | User Manual - Page 10
Setting up your camera Storing pictures on an SD or MMC card Your camera has internal memory. You can purchase SD or MMC cards to store more pictures and videos. (Visit www.kodak.com/go/z710accessories. See page 55 for storage capacities.) NOTE: When using the card for the first time, format it in - Kodak Z710 | User Manual - Page 11
2 Taking pictures/videos Taking a picture 1 2 Press the EVF/LCD button to turn on: • LCD or EVF LCD • EVF (electronic viewfinder) 3 Press the Shutter button halfway to focus and set exposure. When the AF/AE indicator turns green, press the Shutter button completely down. AF/AE indicator: - Kodak Z710 | User Manual - Page 12
focus framing marks (pictures) When using the LCD or EVF as a viewfinder, framing marks indicate the camera focus area. The camera attempts to focus on foreground subjects, even . When you use Focus Zone and set Center Zone, the framing marks are fixed at Center Wide. 6 www.kodak.com/go/support - Kodak Z710 | User Manual - Page 13
recording, press and release the Shutter button again. NOTE: After you take a video, the EVF/LCD displays a quickview for approximately 5 seconds. To play/pause the video during the quickview, press the OK button. The video is saved unless you press the Delete button. www.kodak.com/go/support 7 - Kodak Z710 | User Manual - Page 14
. NOTE: You cannot use digital zoom for video recording. You may notice decreased image quality when using digital zoom. The blue slider on the zoom indicator pauses and turns red when the picture quality reaches the limit for an acceptable 4 x 6-in. (10 x 15 cm) print. 8 www.kodak.com/go/support - Kodak Z710 | User Manual - Page 15
change flash settings, see page 25. To turn off the flash, close it. Flash-to-subject distance Zoom position Flash turn on/off status icons and histogram. In Review, repeatedly press Info button to turn on/off status icons, histogram, and picture/video information. Info www.kodak.com/go/support - Kodak Z710 | User Manual - Page 16
Flash Landscape/ Close-up Date stamp Album name Zoom Histogram PASM Setting Aperture Shutter speed Picture size Pictures/time remaining Storage location AF mode Focus zone Exposure metering White Balance ISO Low battery Camera mode Exposure compensation Capture modes-shutter pressed halfway - Kodak Z710 | User Manual - Page 17
at the 6.3 MP (3:2) picture size are displayed at a 3:2 aspect ratio with a black bar at the top of the screen. A video's duration is displayed at the top of the LCD. Magnifying a picture 1 W/T 2 3 OK Magnify 1X - 8X. View other parts of the picture. Return to 1X. www.kodak.com/go/support 11 - Kodak Z710 | User Manual - Page 18
pictures/videos Viewing multi-up (thumbnails) 1 View multi-up thumbnails. 2 View previous/next row or thumbnail. 3 OK View single picture. What the review icons or Pause Scroll arrows 12 Review mode Protected Picture/video number Image storage location Review mode www.kodak.com/go/support - Kodak Z710 | User Manual - Page 19
1 Press Review. 2 View previous/next. 3 Press Menu. 4 Highlight Protect, then press OK. The picture or video is protected and cannot be deleted. The Protect icon the protected picture or video. Press the Menu button to exit the menu. appears with CAUTION: Formatting internal memory or a card - Kodak Z710 | User Manual - Page 20
camera. To run a slide show on a television or on any external device, see page 15. To save battery power, use an optional Kodak 3-volt AC adapter. (Visit www.kodak.com/go/z710accessories.) Starting the slide show 1 Press the Review setting remains until you change it. 14 www.kodak.com/go/support - Kodak Z710 | User Manual - Page 21
the Video Out setting (NTSC or PAL) is correct. (See Video Out in the table that starts on page 35.) 1 Connect an audio/video cable from the camera A/V Out/USB port to the television video-in port (yellow) and audio-in port (white). See your television user's guide for details. 2 Review pictures and - Kodak Z710 | User Manual - Page 22
histogram in any picture-taking mode or in Review, press the Info button until the histogram appears. NOTE: If a scene is dark or light, you can adjust the exposure compensation (see page 37) before taking the picture. The flash may affect a picture's light and shadow. 16 www.kodak.com/go/support - Kodak Z710 | User Manual - Page 23
memory to a card. Before you copy, make sure that: ■ A card is inserted in the camera. ■ The storage location is set to the location from which you are copying. (See Image Storage in the table that starts on page 32.) Copy pictures or videos: 1 Press the Review returns to the Review menu. ALL-copies - Kodak Z710 | User Manual - Page 24
LCD, your album selection is displayed on the screen. A plus (+) after the album name means more than one album is selected. 6 Press the Menu button to exit the menu. Third-transfer to your computer When you transfer the tagged pictures or videos to your computer, Kodak EasyShare software opens - Kodak Z710 | User Manual - Page 25
album names. First-on your computer Use Kodak EasyShare software to create album names on your computer, then copy up to 32 album names to the camera's internal memory. See EasyShare software Help for details. Second-on your camera 1 Press the Review button, then 2 Press the Menu button. for - Kodak Z710 | User Manual - Page 26
computer, the EasyShare software print screen opens. For details on printing, see EasyShare software Help. For more information on printing from your computer, printer dock, PictBridge enabled printer, or card, see page 42. NOTE: For the best 4 x 6 in. (10 x 15 cm) prints, set the camera to the - Kodak Z710 | User Manual - Page 27
emailing First-on your computer Use Kodak EasyShare software to create an email address book on your computer. Then, copy up to 32 email addresses to the camera's internal memory. For details, see EasyShare software Help. Second-tag pictures/videos on your camera 1 Press the Share button. Press - Kodak Z710 | User Manual - Page 28
enjoy full functionality, load and use the EasyShare software that was packaged with this camera. (See page 40.) 2 Connect the camera to the computer using the USB cable (see page 41) or an EasyShare dock. The first time you transfer pictures, the software helps you make choices about your favorite - Kodak Z710 | User Manual - Page 29
memory are removed. Favorites are restored the next time you transfer pictures to the computer. 4 Press the Menu button to exit the menu. Preventing favorites from transferring to the camera 1 Open the Kodak EasyShare software. Click the My Collection tab. 2 Go to the Albums view. 3 Click the Camera - Kodak Z710 | User Manual - Page 30
. Press picture. for previous/next 2 Press the Share button. 3 Highlight Print or Email, then press the OK button. NOTE: Favorites that were taken on this camera (not imported from another source) are good for prints up to 4 x 6 in. (10 x 15 cm). 24 www - Kodak Z710 | User Manual - Page 31
camera Changing the flash settings 1 Open the flash. 2 Press the flash button repeatedly to scroll through flash modes. The current flash mode is depicted in the LCD " (when light is behind the subject). In low light, hold the camera steady or use a tripod. The flash fires once so the eyes become - Kodak Z710 | User Manual - Page 32
Doing more with your camera Using the self-timer 1 Place camera on a tripod or flat surface. 2 In any Still mode, is taken, press the Self-timer button. (The Self-timer setting remains active.) Use the same procedure to take a video, but: ■ Turn the Mode dial to Video . ■ Press the Shutter button - Kodak Z710 | User Manual - Page 33
quality and ease of use. Subjects that are in motion. Shutter speed is fast. The camera pre-settings are Multi-Pattern Exposure Metering, Multi-Zone Focus. Full-frame portraits of people. Allows the . (See page 7.) P PASM More creative control. (See page 38.) ASM www.kodak.com/go/support 27 - Kodak Z710 | User Manual - Page 34
the Scene mode description turns off, press the OK button. 3 Press the OK button to choose a Scene mode. Use this For SCN mode Camera pre-settings Children Action pictures of low-light Focus conditions. Place the camera on a flat, steady surface or use a tripod. 28 www.kodak.com/go/support - Kodak Z710 | User Manual - Page 35
Doing more with your camera Use this For SCN mode Camera pre-settings Landscape Distant scenery. Flash does not fire. Auto-focus framing marks (page 6) are not available in Landscape Multi-Zone Focus, Red Eye Flash, ISO 64 For information on PASM modes, see page 38. www.kodak.com/go/support 29 - Kodak Z710 | User Manual - Page 36
Take a picture. NOTE: After you take the picture, the camera stays in the Close-up or Landscape setting. To exit, press the Close-up/Landscape button until the icon turns off (or turn off the camera). Close-up pictures Use the Close-up setting to gain sharpness and detail in pictures at close range - Kodak Z710 | User Manual - Page 37
. The camera stops taking pictures when you release the Shutter button, when the pictures are taken, or when there is no more storage space. NOTE: During Quickview, you can delete all pictures in the burst series. To delete selectively, do so in Review (see page 13). www.kodak.com/go/support 31 - Kodak Z710 | User Manual - Page 38
settings remain until you change them; others, until you turn the mode dial or turn off the camera. Some modes offer limited settings. Setting Picture Size Choose a picture resolution. For recommended print sizes, visit www.kodak in a 320 x 240 pixel window (QVGA). 32 www.kodak.com/go/support - Kodak Z710 | User Manual - Page 39
Doing more with your camera Setting Options White Balance Auto (default)-automatically corrects picture is needed. AF Control Continuous AF-uses TTL-AF (Through-The-Lens). Because Choose an auto-focus setting. the camera is always focusing, there is no need to press the Shutter button halfway - Kodak Z710 | User Manual - Page 40
Auto (default)-the camera uses the card if one is in the camera. If not, the camera uses internal memory. Internal Memory-the camera always uses internal memory, even if a card is installed. Setup Menu See Customizing your camera, page 35. Choose additional settings. 34 www.kodak.com/go/support - Kodak Z710 | User Manual - Page 41
zoom. None-digital zoom is disabled. Pause (default)-when the slider on the zoom indicator pauses during digital zoom, the zoom must be released and reactivated. The slider turns red when the picture may not render an acceptable 4 x 6 in. (10 x 15 cm) print. None-no pause. www.kodak.com/go/support - Kodak Z710 | User Manual - Page 42
) Off Auto Power Off 10 minutes Choose amount of inactivity time until 5 minutes camera turns off. 3 minutes (default) 1 minute Date & Time See page 3. Video Out NTSC (default)-used in North America and Choose the regional setting that lets you Japan; most common format. connect the - Kodak Z710 | User Manual - Page 43
. Exposure compensation information appears on the LCD or EVF. (To change exposure compensation in P, A, S, and M modes, see page 38.) 2 To make pictures lighter, press . To make pictures darker, press . The setting remains until you change it or turn off the camera. www.kodak.com/go/support 37 - Kodak Z710 | User Manual - Page 44
of Color for Auto and Scene modes. The settings, including Flash, are maintained for P, A, S, and M modes-even when you change modes or turn off the camera. Use Reset to Default (see the table that starts on page 32) to reset P, A, S, or M mode to its default setting. 38 www.kodak.com/go/support - Kodak Z710 | User Manual - Page 45
determines the depth of field. ■ Smaller f-stop numbers indicate a larger lens opening; good for portraits and low-light conditions. ■ Larger f-stop numbers indicate a smaller lens opening; keeps the main subject sharp; good for landscapes and well-lit conditions. www.kodak.com/go/support 39 - Kodak Z710 | User Manual - Page 46
com/go/register. 5 If prompted, restart the computer. If you turned off anti-virus software, turn it back on. See the anti-virus software manual for details. For information on the software applications included on the EasyShare software CD, see EasyShare software Help. 40 www.kodak.com/go/support - Kodak Z710 | User Manual - Page 47
computer user's guide for details. 3 Plug the other end of the USB cable into the USB port on the camera. The arrow icon on the cable should face you. 4 Turn on the camera. EasyShare software opens on your computer. The software prompts you through the transfer process. NOTE: Visit www.kodak.com - Kodak Z710 | User Manual - Page 48
accessory), plug it into the camera and into an electrical outlet. IMPORTANT: Do not use the AC adapter included with the Kodak EasyShare camera dock or printer dock to power your camera. 3 Connect the USB cable from the camera to the printer. (See your printer user guide for details. See www.kodak - Kodak Z710 | User Manual - Page 49
To transfer pictures to your computer, see page 40. In Favorites mode, the current favorite picture is displayed. Disconnecting the camera from a PictBridge enabled printer 1 Turn off the camera and printer. 2 Disconnect the USB cable from the camera and the printer. www.kodak.com/go/support 43 - Kodak Z710 | User Manual - Page 50
your computer, see EasyShare software Help. Printing from an optional SD or MMC card ■ Automatically print tagged pictures when you insert your card into a printer with an SD/MMC slot. See your printer user's guide for details. ■ Make prints at an SD/MMC-capable Kodak picture maker/picture kiosk - Kodak Z710 | User Manual - Page 51
Camera problems For step-by-step product support, visit www.kodak.com/go/z710support and select Interactive Troubleshooting & Repairs. If Try one or more of the following Camera does not turn on Camera does not turn off and the lens does not retract ■ Insert a new or charged battery - Kodak Z710 | User Manual - Page 52
■ Turn the camera off, then on again. on EVF/LCD ■ Remove memory card from the camera. ■ Remove the battery and wipe the contacts with a clean, dry cloth. ■ Insert a new or charged battery (page 2). ■ Get customer support help (page 49). Memory card not ■ Card may be corrupted. Format card in - Kodak Z710 | User Manual - Page 53
■ Insert a charged battery (page 2). ■ Turn on the camera. ■ Make sure proper USB cable is connected on camera and computer port (page 41). (If using an EasyShare dock, check all cable connections. Make sure the camera is seated on the dock.) ■ Make sure the EasyShare software is installed (page 40 - Kodak Z710 | User Manual - Page 54
■ Clean the lens (page 58). ■ Make sure camera is not in Close-up mode if you are more than 27.6 in. (70 cm) from your subject. ■ Place the camera on a flat, steady surface or use a tripod, especially in high-zoom settings or in low light. Direct printing (PictBridge) problems If Cannot locate - Kodak Z710 | User Manual - Page 55
camera accessories (camera docks, printer www.kodak.com/go/z710accessories docks, lenses, cards, etc.) Download the latest camera firmware and software www.kodak.com/go/z710downloads See online demonstrations of your camera www.kodak.com/go/howto Software Get information on EasyShare software - Kodak Z710 | User Manual - Page 56
Getting help NOTE: If you have questions concerning this product, you may speak with Kodak customer support. Australia Austria Belgium Brazil Canada China Denmark Ireland Finland France Germany Greece Hong Kong 6325 585 781 6231 (toll) +44 131 458 6714 +44 131 458 6962 50 www.kodak.com/go/support - Kodak Z710 | User Manual - Page 57
mm) 201 K pixels Preview (LCD/EVF)-Frame rate: 25.5 fps Taking lens-10X optical zoom, aspheric all-glass lens, f/2.8-3.7 (35 mm equivalent: 38-380 mm) Accessory lens thread-Yes Lens protection-Lens cap Digital zoom-Combined zoom settings up to 50X in 0.2X increments. (Not supported for movie capture - Kodak Z710 | User Manual - Page 58
- Auto: 1/8-1/1600 sec. Shutter priority and Manual mode: 8 - 1/1000 sec. ISO speed 800 (800 available only in 1.9 MP picture size.) Electronic flash-Guide no. 10.6 (@ ISO 100); auto flash with pre-flash SD Card the SD Card Association.) (The SD logo is a trademark of 52 www.kodak.com/go/support - Kodak Z710 | User Manual - Page 59
PAL Power-CRV3; 2-AA lithium; 2-AA Ni-MH; Kodak Ni-MH rechargeable digital camera battery (KAA2HR); 3V AC adapter Communication with computer-USB 2.0 (PIMA 15740 protocol), via USB cable (U-8), EasyShare camera dock or printer dock PictBridge support-Yes Self-timer-2 or 10 seconds, or 2-shot Sound - Kodak Z710 | User Manual - Page 60
Appendix Capture modes Default setting Available settings P, A, S, or M Auto* Auto, Off, Fill Flash, Red Eye Night Auto Auto, Off, Fill Flash, Red Eye Scene modes Children change to Auto or Red Eye in these modes, it becomes the default until you change it. 54 www.kodak.com/go/support - Kodak Z710 | User Manual - Page 61
512 630 970 1490 Video storage capacity Minutes/seconds of video Internal memory 32 MB SD/MMC 64 MB SD/MMC 128 MB SD/MMC VGA (640 x 480) SD/MMC 512 MB SD/MMC 1 GB SD/MMC 15 min. 58 sec. 31 min. 57 sec. 63 min. 54 sec. 30 min. 8 sec. 60 min. 17 sec. less than 80 min. www.kodak.com/go/support - Kodak Z710 | User Manual - Page 62
Appendix Important safety instructions CAUTION: Do not disassemble this product; there are no user-serviceable parts inside. Refer servicing to qualified service personnel. Do not expose this product to liquid, moisture, or extreme temperatures. Kodak AC adapters and battery chargers are intended - Kodak Z710 | User Manual - Page 63
your camera operates dependably, use the replacement batteries listed above. Extending battery life ■ Limit the following activities that quickly deplete battery power: - Reviewing your pictures on the LCD - Using the LCD as a viewfinder - Excessive use of the flash www.kodak.com/go/support 57 - Kodak Z710 | User Manual - Page 64
, and charges the Kodak Ni-MH rechargeable digital camera battery. Kodak 3-volt AC adapter-powers your camera. IMPORTANT: Do not use the AC adapter included with the Kodak EasyShare camera dock or printer dock to power your camera. Upgrading your software and firmware Download the latest versions of - Kodak Z710 | User Manual - Page 65
REPAIR or REPLACE Kodak EasyShare digital cameras and accessories if they fail to function properly during the warranty period, subject to any conditions and/or limitations stated herein. Such repair service will include all labor as well as any necessary adjustments and/or replacement parts. Such - Kodak Z710 | User Manual - Page 66
does not apply to the battery(s) used in digital cameras or accessories. This warranty does not cover circumstances beyond Kodak's control, nor problems caused by failure to follow the operating instructions in the Kodak EasyShare digital cameras and accessories User's Guides. This warranty does not - Kodak Z710 | User Manual - Page 67
may be by negligence or other act. Regulatory compliance FCC compliance and advisory Kodak EasyShare Z710 zoom digital camera This equipment has been tested and found to comply with the limits for a Class B digital device, pursuant to Part 15 of the FCC Rules. These limits are designed to provide - Kodak Z710 | User Manual - Page 68
Appendix Australian C-Tick N137 Canadian DOC statement DOC Class B Compliance-This Class B digital apparatus complies with Canadian ICES-003. Observation des normes-Classe B-Cet appareil numérique for use by a consumer engaging in personal and non-commercial activities. 62 www.kodak.com/go/support - Kodak Z710 | User Manual - Page 69
burst, using, 31 www.kodak.com/go/support button burst, 31 close-up/landscape, i, 30 delete, ii EVF/LCD, ii flash, i, 9 info, ii menu, ii power/favorites, i review, ii, 11 self-timer/burst, i share, ii zoom, ii, 8 C cable audio/video, 15 USB, 41 camera dock, 58 camera sounds, 36 Canadian compliance - Kodak Z710 | User Manual - Page 70
via USB cable, 40 cropping pictures, 15 CRV3 battery, loading, 2 customer support, 50 customizing camera settings, 35 D date & time, 36 date setting, 3 date stamp, 36 DC-in, i delete button, ii deleting from internal memory, 13 from SD/MMC card, 13 protecting pictures, videos, 13 digital zoom, using - Kodak Z710 | User Manual - Page 71
pictures, 11 reviewing videos, 11 lens, i cap, 1 cleaning lens, 58 liveview, 35 loading batteries, 2 SD/MMC card, 4 software, 40 M Macintosh, installing software on, 40 www.kodak.com/go/support maintenance, camera, 58 manner, 29 manual, 38 memory inserting card, 4 storage capacities, 55 menu - Kodak Z710 | User Manual - Page 72
13 reviewing, 11 storage capacity, 55 tagging, 17 taking, modes, 27 transfer via USB cable, 40 portrait, 28 power camera, 3 switch, i printer dock, 42, 58 printing 66 from a card, 44 from computer, 44 optimizing printer, 49 order online, 44 PictBridge, 42 tagged pictures, 44 with EasyShare printer - Kodak Z710 | User Manual - Page 73
, 33 www.kodak.com/go/support setup mode, using, 35 share button, ii sharpness, 34 shutter priority, 38 problems, 46 self-timer delay, 26 speed, 38 slide show problems, 47 running, 14 snow, 28 software installing, 40 upgrading, 58 speaker, i specifications, camera, 51 storage capacity, 55 support - Kodak Z710 | User Manual - Page 74
Index transfer, via USB cable, 40 tripod socket, ii turning camera on and off, 3 U upgrading software, firmware, 58 URLs, Kodak Web sites, 49 USB (universal serial bus) transferring pictures, 40 USB, A/V out, ii V VCCI compliance, 62 video checking settings, 12 copying, 17 date display, 36 deleting,
-
 1
1 -
 2
2 -
 3
3 -
 4
4 -
 5
5 -
 6
6 -
 7
7 -
8
-
9
-
10
-
11
-
12
-
13
-
14
-
15
-
16
-
17
-
18
-
19
-
20
-
21
-
22
-
23
-
24
-
25
-
26
-
27
-
28
-
29
-
30
-
31
-
32
-
33
-
34
-
35
-
36
-
37
-
38
-
39
-
40
-
41
-
42
-
43
-
44
-
45
-
46
-
47
-
48
-
49
-
50
-
51
-
52
-
53
-
54
-
55
-
56
-
57
-
58
-
59
-
60
-
61
-
62
-
63
-
64
-
65
-
66
-
67
-
68
-
69
-
70
-
71
-
72
-
73
-
74
 |
 |
Kodak EasyShare Z710
zoom digital camera
User’s guide
www.kodak.com
For interactive tutorials,
www.kodak.com/go/howto
For help with your camera,
www.kodak.com/go/z710support