Kyocera KM-3035 Scan System Operation Guide (Functions Edition) Rev-9 - Page 210
Brightness, Scan/Connect, Connect, Waiting Scan, Preview, Default, Scan Setup, Close
 |
View all Kyocera KM-3035 manuals
Add to My Manuals
Save this manual to your list of manuals |
Page 210 highlights
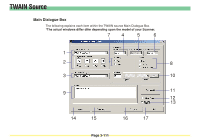
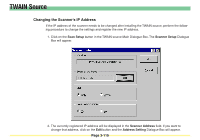
TWAIN Source 10 Brightness You can set Brightness. 11 Scan/Connect button ..... If your computer is successfully connected to the scanner, the Scan button will appear. Once you click this button, the scanning operation will start. If your computer is not connected properly to the scanner, this button will appear as a Connect button to enable you to reconnect to the scanner. * When you perform a high scanning resolution, connection to the scanner may be cancelled. 12 Waiting Scan checkbox If you put a check mark in the Waiting Scan checkbox, the scanner will be in the Scan mode but in an operation-pause state. In this case, you will need to press the Start key on the scanner's operation panel in order to initiate scanning. 13 Preview button (only available in color scanners Click to cheak the overall image so that you can make any adjustments necessary prior to final scanning. 14 Default button Click to return all of the settings in the TWAIN source back to their factory default values. 15 Scan Setup button ......... Click to display the Scanner Setup Dialogue Box in which you can change the scanner' IP address (Refer to page 3-115). switch units of measurement (between inch and metric), or select data compression during scanning Yes or No (Only available in color copiers). 16 Close button Click to save the currently entered settings and close the Main Dialogue Box. 17 Help button Click to display the Help Screen. Page 3-114
-
 1
1 -
2
-
3
-
4
-
5
-
6
-
7
-
8
-
9
-
10
-
11
-
12
-
13
-
14
-
15
-
16
-
17
-
18
-
19
-
20
-
21
-
22
-
23
-
24
-
25
-
26
-
27
-
28
-
29
-
30
-
31
-
32
-
33
-
34
-
35
-
36
-
37
-
38
-
39
-
40
-
41
-
42
-
43
-
44
-
45
-
46
-
47
-
48
-
49
-
50
-
51
-
52
-
53
-
54
-
55
-
56
-
57
-
58
-
59
-
60
-
61
-
62
-
63
-
64
-
65
-
66
-
67
-
68
-
69
-
70
-
71
-
72
-
73
-
74
-
75
-
76
-
77
-
78
-
79
-
80
-
81
-
82
-
83
-
84
-
85
-
86
-
87
-
88
-
89
-
90
-
91
-
92
-
93
-
94
-
95
-
96
-
97
-
98
-
99
-
100
-
101
-
102
-
103
-
104
-
105
-
106
-
107
-
108
-
109
-
110
-
111
-
112
-
113
-
114
-
115
-
116
-
117
-
118
-
119
-
120
-
121
-
122
-
123
-
124
-
125
-
126
-
127
-
128
-
129
-
130
-
131
-
132
-
133
-
134
-
135
-
136
-
137
-
138
-
139
-
140
-
141
-
142
-
143
-
144
-
145
-
146
-
147
-
148
-
149
-
150
-
151
-
152
-
153
-
154
-
155
-
156
-
157
-
158
-
159
-
160
-
161
-
162
-
163
-
164
-
165
-
166
-
167
-
168
-
169
-
170
-
171
-
172
-
173
-
174
-
175
-
176
-
177
-
178
-
179
-
180
-
181
-
182
-
183
-
184
-
185
-
186
-
187
-
188
-
189
-
190
-
191
-
192
-
193
-
194
-
195
-
196
-
197
-
198
-
199
-
200
-
201
-
202
-
203
-
204
-
 205
205 -
 206
206 -
 207
207 -
 208
208 -
 209
209 -
 210
210 -
 211
211 -
 212
212 -
 213
213 -
 214
214 -
 215
215 -
216
-
217
-
218
-
219
-
220
-
221
-
222
-
223
-
224
-
225
-
226
-
227
-
228
-
229
-
230
-
231
-
232
-
233
-
234
-
235
-
236
-
237
-
238
-
239
-
240
-
241
-
242
-
243
-
244
-
245
-
246
-
247
-
248
-
249
-
250
-
251
-
252
-
253
-
254
-
255
-
256
-
257
-
258
-
259
-
260
 |
 |
