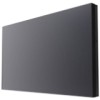
LG 47WV30 Owners Manual - Page 2
Contents, Assembling And Prepar, Remote Control, Using The Monitor Set, Entertainment
 |
View all LG 47WV30 manuals
Add to My Manuals
Save this manual to your list of manuals |
Page 2 highlights
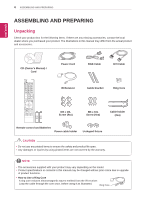
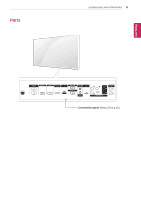
2 TABLE OF CONTENTS ENEGNLGISH CONTENTS 4 ASSEMBLING AND PREPAR- ING 4 Unpacking 5 Parts 6 To install Portrait 6 Removing L-brackets before Installation 7 HANDLE 7 - Moving the device in a vertical position 7 - Moving the device in a horizontal posi- tion 8 STORAGE METHOD FOR PANEL PRO- TECTION 8 - Correct Method 8 - Incorrect Method 9 Installing on a wall 10 EXTERNAL EQUIPMENT SETUP 10 - IR RECEIVER 11 Tiling Displays 11 - How to Join Sets - Installing Set 1 12 - How to Join Sets - Installing Set 2 13 - How to Join Sets - Installing Set 3 14 - How to Join Sets - Installing Set 4 15 Inserting the Cable Holder 16 REMOTE CONTROL 18 Displaying the device name connected to an input port 19 Picture ID 20 USING THE MONITOR SET 20 Connecting to a PC 20 - RGB connection 21 - DVI to DVI connection 21 - HDMI connection 22 - Audio connection 22 - IR Receiver connection 23 Adjusting the screen 23 - Selecting an image mode 23 - Customizing image options 24 - Customizing PC display options 24 Adjusting the sound 24 - Selecting an sound mode 25 - Customizing sound options 25 Using additional options 25 - Adjusting aspect ratio 27 ENTERTAINMENT 27 - Connecting to a wired network 28 - Network Status 29 - Connecting USB storage devices 30 - Browsing files 31 - Viewing movies 35 - Viewing photos 37 - Listening to music 39 - DivX registration code 41 CUSTOMIZING SETTINGS 41 Accessing main menus 42 - PICTURE settings 44 - AUDIO settings 45 - TIME settings 46 - OPTION settings 48 - NETWORK settings 49 MAKING CONNECTIONS 50 Connecting to a HD receiver, DVD or VCR player 50 - HDMI connection 50 - DVI - HDMI connection 51 - AV connection 51 Connecting to a USB 51 Connecting to the LAN
-
 1
1 -
 2
2 -
 3
3 -
 4
4 -
 5
5 -
 6
6 -
 7
7 -
 8
8 -
9
-
10
-
11
-
12
-
13
-
14
-
15
-
16
-
17
-
18
-
19
-
20
-
21
-
22
-
23
-
24
-
25
-
26
-
27
-
28
-
29
-
30
-
31
-
32
-
33
-
34
-
35
-
36
-
37
-
38
-
39
-
40
-
41
-
42
-
43
-
44
-
45
-
46
-
47
-
48
-
49
-
50
-
51
-
52
-
53
-
54
-
55
-
56
-
57
-
58
-
59
-
60
-
61
-
62
-
63
-
64
-
65
-
66
-
67
 |
 |
