LG E2360V-PN Owner's Manual
LG E2360V-PN Manual
 |
View all LG E2360V-PN manuals
Add to My Manuals
Save this manual to your list of manuals |
LG E2360V-PN manual content summary:
- LG E2360V-PN | Owner's Manual - Page 1
ENGLISH OWNER'S MANUAL LED LCD MONITOR Please read this manual carefully before operating your set and retain it for future reference. LED LCD MONITOR MODELS E1960S/E1960T E2060S/E2060T E2260S/E2260T/E2260V E2360S/E2360T/E2360V www.lg.com - LG E2360V-PN | Owner's Manual - Page 2
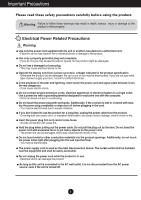
right after plugging into the wall input terminal. - You may be electrocuted. The power supply cord is used as the main disconnection device. The socket-outlet shall be installed near the equipment and shall be easily accessible. Do not unplug the power cord while the product is in use. - Electrical - LG E2360V-PN | Owner's Manual - Page 3
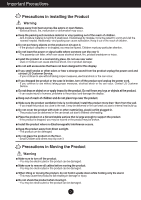
strange sound from the product unplug the power cord and contact LG Customer Service. - If you continue to use than 10cm from the wall. - If you install the product too close to the wall, it may be flat and stable surface that is large enough to support the product. - If the product is dropped, - LG E2360V-PN | Owner's Manual - Page 4
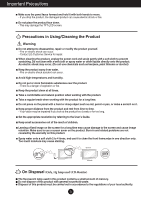
may damage the TFT-LCD screen. Precautions in Using/Cleaning the Product Warning Do not attempt to disassemble, repair or modify the product yourself. - Fire or electric shock can occur. - Contact LG Customer Service for repair. When cleaning the product, unplug the power cord and scrub gently with - LG E2360V-PN | Owner's Manual - Page 5
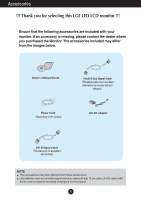
. The accessories included may differ from the images below. Owner's Manual/Cards 15-pin D-Sub Signal Cable (This signal cable may have been attached to the monitor before it shipped.) Power Cord (Depending on the country) AC-DC adapter DVI-D Signal Cable (This feature is not available in - LG E2360V-PN | Owner's Manual - Page 6
Connecting the Display Monitor Before setting up the monitor, ensure that the power to the monitor, the computer system, and other attached devices is turned off. Connecting the stand 1. Place the monitor face down on the cushion or soft cloth. 2. Assemble the Stand Base into the Stand Body in the - LG E2360V-PN | Owner's Manual - Page 7
product upside down holding only the stand base. The product may fall and get damaged or injure your foot. Before setting up the monitor, ensure that the power to the monitor, the computer system, and other attached devices is turned off. Positioning your display Adjust the position of the panel in - LG E2360V-PN | Owner's Manual - Page 8
E1960S/E2060S/E2260S/E2360S Connecting the Monitor to a Computer 1. Before setting up the monitor, ensure that the power to the monitor, the computer system, and other attached devices is turned off. 2. Connect signal input cable 1 and power cord 2 in order, then tighten the screw of the signal - LG E2360V-PN | Owner's Manual - Page 9
E1960T/E2060T/E2260T/E2360T Connecting the Monitor to a Computer 1. Before setting up the monitor, ensure that the power to the monitor, the computer system, and other attached devices is turned off. 2. Connect signal input cable 1 and power cord 2 in order, then tighten the screw of the signal - LG E2360V-PN | Owner's Manual - Page 10
Connecting the Display Monitor E2260V/E2360V Connecting the Monitor to a Computer 1. Before setting up the monitor, ensure that the power to the monitor, the computer system, and other attached devices is turned off. 2. Connect signal input cable 1 and power cord 2 in order, then tighten the screw - LG E2360V-PN | Owner's Manual - Page 11
Connecting the Display Monitor E2260V/E2360V 3. Press the power button on the front panel to turn the power on. When monitor power is turned on, the 'Self Image Setting Function' is executed automatically. Power Button NOTE ' Self Image Setting Function'? This function provides the user with - LG E2360V-PN | Owner's Manual - Page 12
Use this button to enter or exit from the On Screen Display. OSD LOCKED/UNLOCKED This function allows you to lock the current control settings, so that they cannot be inadvertently changed to avoid inadvertently changing. Press and hold the MENU button for several seconds. The message "OSD LOCKED - LG E2360V-PN | Owner's Manual - Page 13
Mode) This will automatically adjust your display image to the ideal settings for the current screen resolution size (display mode). The best display On Screen Display). Power Button & Power Indicator Use this button to turn the display on or off. The power indicator stays light blue if the display - LG E2360V-PN | Owner's Manual - Page 14
Control Panel Functions E1960T/E2060T/E2260T/E2360T/E2260V/E2360V Front Panel Controls MENU Button Use this button to enter or exit from the On Screen Display. OSD LOCKED/UNLOCKED This function allows you to lock the current control settings, so that they cannot be inadvertently changed to avoid - LG E2360V-PN | Owner's Manual - Page 15
E2060T : 1600 x 900 E2260T/E2360T : 1920 x 1080 E2260V/E2360V : 1920 x 1080 INPUT Button (SOURCE Hot key) When two setting is D-Sub. EXIT Button Exit the OSD(On Screen Display). Power Button & Power Indicator Use this button to turn the display on or off. The power indicator stays light blue - LG E2360V-PN | Owner's Manual - Page 16
On Screen Display OSD Control Adjustment E1960S/E2060S/E2260S/E2360S Screen Adjustment Making adjustments to the image size, position and operating parameters of the display is quick and easy with the On Screen Display Control system. A short example is given below to familiarize you with the use of - LG E2360V-PN | Owner's Manual - Page 17
On Screen Display OSD Control Adjustment E1960T/E2060T/E2260T/E2360T Screen Adjustment Making adjustments to the image size, position and operating parameters of the display is quick and easy with the On Screen Display Control system. A short example is given below to familiarize you with the use of - LG E2360V-PN | Owner's Manual - Page 18
On Screen Display OSD Control Adjustment E2260V/E2360V Screen Adjustment Making adjustments to the image size, position and operating parameters of the display is quick and easy with the On Screen Display Control - LG E2360V-PN | Owner's Manual - Page 19
all the On Screen Display OSD control, adjustment, and setting menus. D-SUB : D-SUB(Analog signal) input DVI-D : DVI-D(Digital signal) input HDMI : HDMI signal Main menu Sub-menu Supported input Description PICTURE BRIGHTNESS CONTRAST SHARPNESS BLACK LEVEL D-SUB DVI-D HDMI HDMI To adjust the - LG E2360V-PN | Owner's Manual - Page 20
. Menu Name Icons Submenus Move to the upper menu Adjust (Decrease/Increase) Select another sub-menu Exit Button Tip NOTE OSD menu languages on the monitor may differ from the manual. 19 - LG E2360V-PN | Owner's Manual - Page 21
an item using the OSD system. Listed below are the icons, icon names, and icon descriptions of the all items shown on the Menu. E2260V/E2360V Press the MENU Button, then the main menu of the OSD appears. Menu Name Icons Submenus Move to the upper menu Adjust (Decrease/Increase) Select - LG E2360V-PN | Owner's Manual - Page 22
E1960T/E2060T/E2260T/E2360T BRIGHTNESS To adjust the brightness of the screen. E2260V/E2360V D-SUB/DVI-D input CONTRAST To adjust the contrast of the screen. SHARPNESS To adjust the clearness of the screen. BLACK LEVEL You can set the offset level. If you select 'HIGH', the screen will be bright - LG E2360V-PN | Owner's Manual - Page 23
white. • 8500K to 9300K: Slightly bluish white. RED Set your own red color levels. GREEN Set your own green color levels. BLUE Set your own blue color levels. E2260V/E2360V PRESET Mode GAMMA Set your own gamma value. : 0 / 1 / 2 On the monitor, high gamma values display whitish images and low - LG E2360V-PN | Owner's Manual - Page 24
SUB input HORIZONTAL To move image left and right. VERTICAL To move image up and down. E2260V/E2360V D-SUB input HDMI input CLOCK PHASE OVERSCAN To minimize any vertical bars or stripes visible on the ) : Move to the upper menu : Decrease : Increase : Select another sub-menu EXIT : Exit 23 - LG E2360V-PN | Owner's Manual - Page 25
On Screen Display OSD Selection and Adjustment Main menu Sub menu Description E2260V/E2360V HDMI input VOLUME To adjust the volume of headphone/ Earphone. (Only for HDMI input) : Move to the upper menu : Decrease : Increase : Mute EXIT : Exit 24 - LG E2360V-PN | Owner's Manual - Page 26
DVI-D input WHITE BALANCE E2260V/E2360V D-SUB input FACTORY RESET To choose the language in which the control names are displayed. Use this function to set the power indicator on the front side of the monitor to ON or OFF. If you set OFF, it will go off. If you set ON at any time, the - LG E2360V-PN | Owner's Manual - Page 27
OSD system. Listed below are the icons, icon names, and icon descriptions of the all items shown on the Menu. E1960T/E2060T/E2260T/E2360T E2260V/E2360V E1960S/E2060S/E2260S/E2360S Press the MODE Button, then the main menu of the OSD appears. Menu Name Icons Submenus Move to the upper menu - LG E2360V-PN | Owner's Manual - Page 28
On Screen Display OSD Selection and Adjustment Main menu Sub menu E1960S/E2060S/E2260S/E2360S E1960T/E2060T/E2260T/E2360T Description NORMAL Select this when you want to use the product in the most general using environment. MOVIE Select this when you are watching a video or movie. INTERNET - LG E2360V-PN | Owner's Manual - Page 29
On Screen Display OSD Selection and Adjustment Main menu E2260V/E2360V Sub menu Description D-SUB/DVI-D input NORMAL Select this when you want to use the product in the most general using environment. HDMI input D-SUB/ - LG E2360V-PN | Owner's Manual - Page 30
On Screen Display OSD Selection and Adjustment Main menu D-SUB/DVI-D input Sub menu Description INTERNET Select this when you are working on the document (Word etc.) HDMI input GAME Select this when you are playing a game. D-SUB/DVI-D input HDMI input DEMO This is used for advertising in - LG E2360V-PN | Owner's Manual - Page 31
mode according to input image signal. ORIGINAL Change the input image signal ratio to original. * This function works only if input resolution is lower than monitor ratio (16:9). : Move to the upper menu , : Move EXIT : Exit 30 - LG E2360V-PN | Owner's Manual - Page 32
and smoother. SEPIA This menu changes the screen to be Sepia tone (brown color). MONOCH This menu changed the screen to be -ROME Gray tone(black-and-white Picture) . : Move to the upper menu , : Move EXIT : Exit 31 - LG E2360V-PN | Owner's Manual - Page 33
Troubleshooting Check the following before calling for service. No image appears G Is the power cord of the • Check and see if the power cord is connected display connected? properly to the power outlet. G Is the power indicator • Press the Power button. light on? G Is the power manual settings - LG E2360V-PN | Owner's Manual - Page 34
Troubleshooting Display image is incorrect G Display Position is incorrect. • Press the AUTO button to automatically adjust your display image to the ideal setting. If the results are unsatisfactory, adjust the image position using the H position and V position icon in the on screen display. G - LG E2360V-PN | Owner's Manual - Page 35
, Plug&Play (VESA DDC) monitor found" message? G Have you installed the display driver? • Be sure to install the display driver from the display driver CD (or diskette) that comes with your display. Or, you can also download the driver from our web site: http://www.lg.com. • Make sure to check - LG E2360V-PN | Owner's Manual - Page 36
Temperature 10 ˚C to 35 ˚C Humidity 10 % to 80 % non-Condensing Storage Conditions Temperature Humidity -20 ˚C to 60 ˚C 5 % to 90 % non-Condensing Stand Base Power Cord Attached ( ), Detached ( O ) Wall-outlet type NOTE Information in this manual subject to change without notice. 35 - LG E2360V-PN | Owner's Manual - Page 37
Transistor) LCD (Liquid Crystal Display) Panel Anti-Glare coating 47.0 cm visible diagonal (18.5 inch) VESA 1360 x 768 @60 Hz VESA 1360 x 768 @60 Hz DDC 2B(Digital),DDC2AB(Analog) Power Consumption Power Cord Attached ( ), Detached ( O ) Wall-outlet type NOTE Information in this manual - LG E2360V-PN | Owner's Manual - Page 38
Temperature 10 ˚C to 35 ˚C Humidity 10 % to 80 % non-Condensing Storage Conditions Temperature Humidity -20 ˚C to 60 ˚C 5 % to 90 % non-Condensing Stand Base Power Cord Attached ( ), Detached ( O ) Wall-outlet type NOTE Information in this manual subject to change without notice. 37 - LG E2360V-PN | Owner's Manual - Page 39
VESA 1600 x 900 @ 60 Hz VESA 1600 x 900 @ 60 Hz Plug&Play DDC 2B(Digital),DDC2AB(Analog) Power Consumption On Mode Sleep Mode Off Mode : 21 W(Typ.) ≤ 1 W ≤ 0.5 W Dimensions & Weight With Stand Width 47.40 cm (18.66 inch Power Cord Wall-outlet type NOTE Information in this manual - LG E2360V-PN | Owner's Manual - Page 40
) LCD (Liquid Crystal Display) Panel Anti-Glare coating 54.6 cm visible diagonal (21.5 inch) Max Recommend VESA 1920 x 1080 @60 Hz VESA 1920 x 1080 @60 Hz Plug&Play DDC 2AB Power Consumption On Power Cord Attached ( ), Detached ( O ) Wall-outlet type NOTE Information in this manual - LG E2360V-PN | Owner's Manual - Page 41
Temperature 10 ˚C to 35 ˚C Humidity 10 % to 80 % non-Condensing Storage Conditions Temperature Humidity -20 ˚C to 60 ˚C 5 % to 90 % non-Condensing Stand Base Power Cord Attached ( ), Detached ( O ) Wall-outlet type NOTE Information in this manual subject to change without notice. 40 - LG E2360V-PN | Owner's Manual - Page 42
Conditions Stand Base Power Cord Operating Conditions Temperature 10 ˚C to 35 ˚C Humidity 10 % to 80 % non-Condensing Storage Conditions Temperature -20 ˚C to 60 ˚C Humidity 5 % to 90 % non-Condensing Attached ( ), Detached ( O ) Wall-outlet type NOTE Information in this manual subject to - LG E2360V-PN | Owner's Manual - Page 43
Temperature 10 ˚C to 35 ˚C Humidity 10 % to 80 % non-Condensing Storage Conditions Temperature Humidity -20 ˚C to 60 ˚C 5 % to 90 % non-Condensing Stand Base Power Cord Attached ( ), Detached ( O ) Wall-outlet type NOTE Information in this manual subject to change without notice. 42 - LG E2360V-PN | Owner's Manual - Page 44
VESA 1920 x 1080 @60 Hz VESA 1920 x 1080 @60 Hz Plug&Play Power Consumption Dimensions & Weight DDC 2B(Digital),DDC2AB(Analog) On Mode Sleep Mode Off Mode : 30 W(Typ.) ≤ 1 W ≤ 0.5 W With Stand Width 54.23 cm (21.35 inch ) Power Cord Wall-outlet type NOTE Information in this manual subject - LG E2360V-PN | Owner's Manual - Page 45
E2360V Display TFT (Thin Film Transistor) LCD (Liquid Crystal Display) Panel Anti-Glare coating 58.4 cm visible diagonal (23.0 inch) % non-Condensing Stand Base Power Cord Attached ( ), Detached ( O ) Wall-outlet type NOTE Information in this manual subject to change without notice. - LG E2360V-PN | Owner's Manual - Page 46
37.879 60 46.875 75 48.363 60 60.123 75 67.500 75 60.000 60 *Recommend Mode E2260S/E2360S/E2260T/E2360T/E2260V/E2360V Display Modes (Resolution) 1 720 x 400 2 640 x 480 3 640 x 480 4 800 x 600 5 800 x 600 6 1024 x 768 7 1024 x 768 8 1152 x 864 9 1280 x 1024 10 1280 x 1024 11 - LG E2360V-PN | Owner's Manual - Page 47
/E2360V Display Modes (Resolution) 1 480p 2 576p 3 720p 4 720p 5 1080i 6 1080i 7 1080p 8 1080p Horizontal Freq. (kHz) 31.50 31.25 37.50 45.00 28.12 33.75 56.25 67.50 Vertical Freq. (Hz) 60 50 50 60 50 60 50 60 Indicator MODE On Mode Sleep Mode Off Mode LED Color Light Blue - LG E2360V-PN | Owner's Manual - Page 48
Keep the User's Guide (CD) in an accessible place for future reference. See the attached label on the unit. You will be asked to provide this information should the unit ever need service. Call (800) 243-0000 or visit lgusa.com for help. MODEL SERIAL ENERGY STAR is a set of power-saving guidelines
-
 1
1 -
 2
2 -
 3
3 -
 4
4 -
 5
5 -
 6
6 -
 7
7 -
8
-
9
-
10
-
11
-
12
-
13
-
14
-
15
-
16
-
17
-
18
-
19
-
20
-
21
-
22
-
23
-
24
-
25
-
26
-
27
-
28
-
29
-
30
-
31
-
32
-
33
-
34
-
35
-
36
-
37
-
38
-
39
-
40
-
41
-
42
-
43
-
44
-
45
-
46
-
47
-
48
 |
 |

OWNER’S MANUAL
LED LCD MONITOR
LED LCD MONITOR MODELS
E1960S/E1960T
E2060S/E2060T
E2260S/E2260T/E2260V
E2360S/E2360T/E2360V
www.lg.com
Please read this manual carefully before operating
your set and retain it for future reference.
ENGLISH