LG GH22LP20 Owner's Manual (English) - Page 7
Installing the Drive - jumper
 |
UPC - 048231302227
View all LG GH22LP20 manuals
Add to My Manuals
Save this manual to your list of manuals |
Page 7 highlights
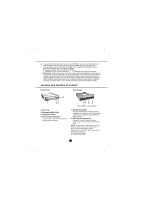
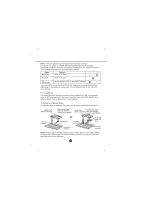
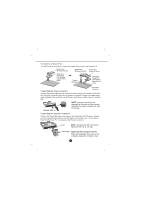
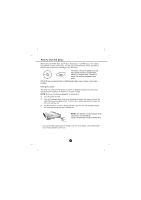
Installing the Drive Before installing the drive, please note the following points. ■ You will need the following: • A screw driver of a suitable size to fit the securing screws for the drive unit. • The manual for the computer, so you can find the mounting positions for the IDE controller cable. ■ Turn off all peripheral appliances of the computer and the computer itself, and disconnect their power cords from the wall sockets. ■ Discharge any static electricity on your person by touching the computer covers, etc. Removing the Computer Cover Make sure all peripheral devices of the computer and the computer itself are turned off, and then remove the cover. Refer to the manual for the computer for details about removing the cover. NOTE : There may be sharp edges inside the computer so take care to avoid injury. Mounting the Drive 1. Remove the 51/4″ drive bay panel from the computer. Refer to the manual for the computer for details. 2. Insert the drive unit into the bay. Do not apply excessive pressure to the cables inside the computer. 3. Secure the drive with the screws. If there is not enough space behind the drive, connect the IDE and other cables before securing the drive. NOTE : This is a general installation guide. If your PC hardware appears READ WRITE READ WRITE different, please consult your hardware manual for installing peripheral devices. Jumper Setup Before installation, set the jumper connector on the rear panel. The drive can be connected as the Master or Slave on an EIDE (ATAPI) interface. When several (up to four) EIDE devices are connected, each must be set in a unique way. Specific knowledge of hardware and software is necessary to install the drive. SL: Slave MA: Master NOTE : If two peripheral devices with the same settings are both connected to the Primary or to the Secondary EIDE bus, the host computer may fail to run or may malfunction. Careful attention is necessary. CS: Cable Select (CSEL) 4
-
 1
1 -
 2
2 -
 3
3 -
 4
4 -
 5
5 -
 6
6 -
 7
7 -
 8
8 -
 9
9 -
 10
10 -
 11
11 -
 12
12 -
13
-
14
 |
 |
