LG LTCS20020W Owners Manual - Page 10
Reversing and Reinst, WARNING
 |
View all LG LTCS20020W manuals
Add to My Manuals
Save this manual to your list of manuals |
Page 10 highlights
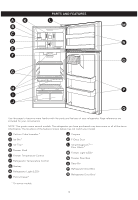
REFRIGERATOR INSTALLATION 2. Reversing and Reinstalling Refrigerator Door Using a ¼" socket wrench, loosen and remove Hinge Pin from the Middle Hinge Bracket. Remove washer underneath the middle hinge and set aside. NOTE: At this point the door will be loose. Slightly lift the door and remove it. Using a 3/8'' socket wrench with a 2-Inch extension and screwdriver, loosen the two bolts and one screw, and remove the Bottom Hinge from right side of the housing. Remove the Decorative Caps on the bottom of the refrigerator housing. You will need these holes for the Bottom Hinge. Loosen and remove the two bolts and use the Phillips head screwdriver to remove the Middle Hinge Bracket from the refrigerator housing. Set parts aside. Remove the washer from the Bottom Hinge Pin. Using a ¼" socket wrench, loosen and remove the Hinge Pin from the Bottom Hinge. Reattach the Hinge Pin to the opposite side of the hinge. NOTE: This is easier to do while the hinge is still attached. Move the Bottom Hinge to the left side of the housing, keeping the same orientation, and reattach with the two bolts and one screw. The flat screw must be placed on the exterior side of the hinge. Move the Decorative Bolt to the hole on the lower right side of the housing. Leveler Turn the refrigerator door upside down on a nonscratching surface. Loosen the two screws to remove the Bottom Hinge Pin Insert Bracket with the Hingr Pin Insert. WARNING:If you reinstall or replace doors, move the leveler to the opposite side. NOTE:The leveler is only present on some models. 9
-
 1
1 -
2
-
3
-
4
-
 5
5 -
 6
6 -
 7
7 -
 8
8 -
 9
9 -
 10
10 -
 11
11 -
 12
12 -
 13
13 -
 14
14 -
 15
15 -
16
-
17
-
18
-
19
-
20
-
21
-
22
-
23
-
24
-
25
-
26
-
27
-
28
-
29
-
30
-
31
-
32
-
33
-
34
-
35
-
36
-
37
-
38
-
39
-
40
-
41
-
42
-
43
-
44
-
45
-
46
-
47
-
48
-
49
-
50
-
51
-
52
-
53
-
54
-
55
-
56
-
57
-
58
-
59
-
60
-
61
-
62
-
63
-
64
-
65
-
66
-
67
-
68
-
69
-
70
-
71
-
72
-
73
-
74
-
75
-
76
-
77
-
78
-
79
-
80
-
81
-
82
-
83
-
84
-
85
-
86
-
87
-
88
-
89
-
90
-
91
-
92
-
93
-
94
-
95
-
96
-
97
-
98
-
99
-
100
 |
 |
