LG LTCS20020W Owners Manual - Page 9
Refrigerator Installation, Warning, Caution
 |
View all LG LTCS20020W manuals
Add to My Manuals
Save this manual to your list of manuals |
Page 9 highlights
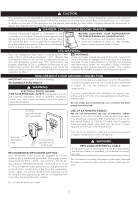
REFRIGERATOR INSTALLATION HOW TO REVERSE AND INSTALL THE REFRIGERATOR DOORS (on some models) You may find it more convenient to have the doors converted from the left opening type (factory installed) to the right opening type. Directions refer to the right side as the side on your right as you face the unit. CAUTION Door reversal must be done by an authorized installer or service person. If it is not, the doors will not be covered by the warranty. REVERSIBLE DOORS MODELS LTCS20220* LTCS24223* LTNS20220* GT66BP* GT58BP* LTWS24223* LTCS20020* LT57BPSX LTCS20030* LTCS20040* TOOLS YOU MIGHT NEED OR USE m Hex Socket Wrench Phillips Screwdriver No. 2 Flat Head Screwdriver WARNING ELECTRICAL SHOCK HAZARD Before you begin, either unplug the refrigerator or turn off the power at the circuit breaker or fuse box. Remove food and any door rack from the refrigerator. Failure to do so could result in death or serious injury. 1. Removing Freezer Door Gently pry off the top hinge cover with a flat head screwdriver and remove. Move the Hinge Pin Insert Bracket to the other side of the door, keeping the same orientation, and move the Hinge Pin Insert into the hole on the left side of the bracket. Hinge Pin Insert Hinge Pin Insert Bracket Using 10mm or 3/8 inch socket wrench, remove the three bolts and lift off the top hinge. Set parts aside Reverse the Door Closer/Stop by flipping it over. Place it on top of the Hinge Pin Insert Bracket, and tighten both down with the screw. Slightly lift up the refrigerator door and remove it. Middle Hinge Bracket Hinge Pin Pry off the cover on the top left side of the refrigerator to uncover the screw holes. Set the freezer door and top hinge parts to the side and remove the refrigerator door. Cover (on top of refrigerator) Turn the freezer door upside down on a non-scratch surface. Loosen the screw to remove the Door Closer/Stop and Hinge Pin Insert. 8
-
 1
1 -
2
-
3
-
 4
4 -
 5
5 -
 6
6 -
 7
7 -
 8
8 -
 9
9 -
 10
10 -
 11
11 -
 12
12 -
 13
13 -
 14
14 -
15
-
16
-
17
-
18
-
19
-
20
-
21
-
22
-
23
-
24
-
25
-
26
-
27
-
28
-
29
-
30
-
31
-
32
-
33
-
34
-
35
-
36
-
37
-
38
-
39
-
40
-
41
-
42
-
43
-
44
-
45
-
46
-
47
-
48
-
49
-
50
-
51
-
52
-
53
-
54
-
55
-
56
-
57
-
58
-
59
-
60
-
61
-
62
-
63
-
64
-
65
-
66
-
67
-
68
-
69
-
70
-
71
-
72
-
73
-
74
-
75
-
76
-
77
-
78
-
79
-
80
-
81
-
82
-
83
-
84
-
85
-
86
-
87
-
88
-
89
-
90
-
91
-
92
-
93
-
94
-
95
-
96
-
97
-
98
-
99
-
100
 |
 |
