Lenovo 41U3074 User Guide - Page 14
Installing, mouse, Enter, Installation, Windows, Start-->Settings-->Control, Panel, Mouse, - thinkpad
 |
UPC - 882861702572
View all Lenovo 41U3074 manuals
Add to My Manuals
Save this manual to your list of manuals |
Page 14 highlights
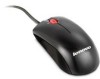
To install the mouse using the Windows NT Workstation operating system, do the following: 1. Turn off your computer. 2. Remove any mouse that is connected to the PS/2 connector. 3. Insert the mouse with the PS/2 adapter into the mouse connector on the computer. 4. Restart the computer. Installing the mouse in USB mode To install the mouse using the USB connector in Microsoft Windows 2000 Professional, do the following: 1. Insert the USB (rectangular) connector from the mouse into the USB connector on the computer. 2. In the Add New Hardware Wizard window, press the Enter key. 3. In the What do you want Windows to do? window, select Search for the best driver for your device. 4. Press the Enter key. 5. In the Windows will search for new drivers window, press the Enter key. Your computer will display the location of the driver. 6. Press the Enter key. The Windows has finished installing the software that your new hardware device requires window opens. 7. Press the Enter key to complete the installation. See "Using the mouse" for further information. USB Installation (Windows XP) To install the mouse in USB mode in a computer using Windows XP do the following: Note: Do not connect the mouse to a USB connector on a ThinkPad or other mobile computer until you see the Windows XP desktop. 1. Connect the mouse USB connector to the computer USB connector. 2. The New Hardware Found window will open stating, Windows is installing the software for your new hardware. Windows XP will automatically install the proper device drivers to operate your new mouse. Using the Mouse The 800 DPI Optical 3-Button ScrollPoint PS/2 and USB Mouse has multiple functions and features such as Zoom and Auto-scrolling, which help you to increase your productivity. You can also assign frequently used functions or shortcuts to the mouse buttons by using the tabs in the Mouse Suite Software. To start the Mouse Suite Software: 1. Click Start-->Settings-->Control Panel. 2. The Control Panel window opens. Double-click the Mouse icon. (If you have already enabled Show Mouse Icon in the system tray option in the Mouse Suite properties of the Control Panel, double-click the Mouse icon in the Windows System Tray located in the lower right-hand corner of your screen.) By default the mouse buttons are assigned various functions, such as primary Mouse Button, Context Menu, and Quick/Auto scroll. You can customize or change these button functions. To customize the function of each button, do the following: 1. Open the Mouse Suite Control Panel. 2. Click the Buttons tab. 3. On the Mouse Image, click the button you want to assign a new function, or select a button from the Button list. The selected button will be displayed in the Button list and highlighted on the mouse image. 2-2 Combined Mouse User's Guide
-
 1
1 -
2
-
3
-
4
-
5
-
6
-
7
-
8
-
 9
9 -
 10
10 -
 11
11 -
 12
12 -
 13
13 -
 14
14 -
 15
15 -
 16
16 -
 17
17 -
 18
18 -
 19
19 -
20
-
21
-
22
-
23
-
24
-
25
-
26
-
27
-
28
-
29
-
30
-
31
-
32
-
33
-
34
-
35
-
36
-
37
-
38
-
39
-
40
-
41
-
42
 |
 |
