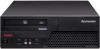
Lenovo 8910ARU User Manual
Lenovo 8910ARU Manual
 |
View all Lenovo 8910ARU manuals
Add to My Manuals
Save this manual to your list of manuals |
Lenovo 8910ARU manual content summary:
- Lenovo 8910ARU | User Manual - Page 1
- Lenovo 8910ARU | User Manual - Page 2
- Lenovo 8910ARU | User Manual - Page 3
ThinkCentre User Guide - Lenovo 8910ARU | User Manual - Page 4
this information and the product it supports, be sure to read and understand the ThinkCentre Safety and Warranty Guide and "Notices," on page 69. Third Edition (October 2009) © Copyright Lenovo 2009. LENOVO products, data, computer software, and services have been developed exclusively at private - Lenovo 8910ARU | User Manual - Page 5
63 Information resources 63 Online Books folder 63 Lenovo ThinkVantage Tools 63 ThinkVantage Productivity Center 64 Lenovo Welcome 64 Access Help 64 Safety and Warranty 64 Lenovo Web site (http://www.lenovo.com). . . 65 Help and service 65 Using the documentation and diagnostic programs 65 - Lenovo 8910ARU | User Manual - Page 6
Appendix. Notices 69 Television output notice 70 European conformance CE mark 70 Trademarks 70 Index 71 iv User Guide - Lenovo 8910ARU | User Manual - Page 7
reduces the risk of personal injury and or damage to your product. If you no longer have a copy of the ThinkCentre Safety and Warranty Guide, you can obtain a Portable Document Format (PDF) version from the Lenovo® Support Web site at: http://www.lenovo.com/support © Copyright Lenovo 2009 v - Lenovo 8910ARU | User Manual - Page 8
vi User Guide - Lenovo 8910ARU | User Manual - Page 9
This section provides an overview of the computer features. System information The following information covers dual-core processor v Internal cache (size varies by model type) Memory v Supports up to four double data rate 3 dual inline memory modules (DDR3 DIMMs) Internal © Copyright Lenovo 2009 1 - Lenovo 8910ARU | User Manual - Page 10
2 User Guide Audio subsystem v High Definition (HD) with ADI 1882 Audio Codec v Audio line-in connector, audio line-out connector, and microphone connector on the rear panel v - Lenovo 8910ARU | User Manual - Page 11
computer might come with preinstalled software programs. If it does, an operating system, device drivers to support built-in features, and other support Additional operating systems might be identified by Lenovo as compatible with your computer following the publication of this booklet. Corrections - Lenovo 8910ARU | User Manual - Page 12
Specifications This section lists the physical specifications for your computer. Dimensions Width: 317 mm (12.48 inches) Height: 99 mm (3.90 inches) Depth: 355 mm (13.98 inches) 200 V ac Maximum: 240 V ac Input frequency range: 50 to 60 Hz Voltage-selection switch setting: 230 V ac 4 User Guide - Lenovo 8910ARU | User Manual - Page 13
and reduce the cost associated with maintaining your computer. Software programs provided with your computer might vary depending on your model type and preinstalled operating system. Lenovo ThinkVantage Tools: The Lenovo ThinkVantage® Tools program guides you to a host of information sources and - Lenovo 8910ARU | User Manual - Page 14
keyboard is available with select computers or can be purchased for computers that support this option. Lenovo ThinkVantage Toolbox The Lenovo ThinkVantage Toolbox program helps you maintain your computer, improve computing security, diagnose computer problems, get familiar with the innovative - Lenovo 8910ARU | User Manual - Page 15
Locations Locating connectors on the front of your computer Figure 1 shows the locations of the connectors on the front of your computer. Note: Not all computer models have the following connectors. Figure 1. Front connector locations 1 USB connector 2 Microphone connector 3 Headphone connector 4 - Lenovo 8910ARU | User Manual - Page 16
the connectors on the rear of your computer. Some connectors on the rear of your computer are color-coded to help you determine where to connect the cables on your computer. Figure 2. Rear connector locations 1 Serial connector 15 PCI Express x16 graphics card slot 16 PCI card slot 8 User Guide - Lenovo 8910ARU | User Manual - Page 17
between the audio line-out connector of the device and the audio line-in connector of the computer. Audio line-out connector Used to send audio signals from the computer to external devices, such as powered stereo speakers (speakers with built-in amplifiers), headphones, multimedia keyboards, or - Lenovo 8910ARU | User Manual - Page 18
Locating components Figure 3 shows the locations of the various components in your computer. To open the computer cover, see "Opening the computer cover" on page 14. Figure 3. Component locations 1 Hard disk drive (some models) 2 Microprocessor, heat sink and fan assembly 3 Internal speaker (some - Lenovo 8910ARU | User Manual - Page 19
Locating parts on the system board Figure 4 shows the locations of the parts on the system board. Figure 4. System board parts locations 1 PCI card slot 2 PCI Express x16 graphics card slot 3 Battery 4 Internal speaker connector 5 Cover presence switch connector (Intrusion switch connector) (some - Lenovo 8910ARU | User Manual - Page 20
12 User Guide - Lenovo 8910ARU | User Manual - Page 21
the "Important safety information" in the ThinkCentre Safety and Warranty Guide that came with your computer. To obtain a copy of the ThinkCentre Safety and Warranty Guide, go to: http://www.lenovo.com/support Note: Use only computer parts provided by Lenovo. © Copyright Lenovo 2009 13 - Lenovo 8910ARU | User Manual - Page 22
"Important safety information" in the ThinkCentre Safety and Warranty Guide that came with your computer. To obtain a copy of the ThinkCentre Safety and Warranty Guide, go to: http://www.lenovo.com/support This section provides instructions on how to open the computer cover. CAUTION: Turn off the - Lenovo 8910ARU | User Manual - Page 23
5. Press the buttons on the sides of the computer and pivot the computer cover upward to open. Figure 5. Opening the computer cover Chapter 2. Installing options and replacing hardware 15 - Lenovo 8910ARU | User Manual - Page 24
the "Important safety information" in the ThinkCentre Safety and Warranty Guide that came with your computer. To obtain a copy of the ThinkCentre Safety and Warranty Guide, go to: http://www.lenovo.com/support 16 User Guide This section provides instructions on how to install or replace a memory - Lenovo 8910ARU | User Manual - Page 25
To install or replace a memory module: 1. Open the computer cover. See "Opening the computer cover" on page 14. 2. Pivot the optical drive bay assembly upward to access the memory slots. See "Accessing the system board components and drives" on - Lenovo 8910ARU | User Manual - Page 26
and understanding the "Important safety information" in the ThinkCentre Safety and Warranty Guide that came with your computer. To obtain a copy of the ThinkCentre Safety and Warranty Guide, go to: http://www.lenovo.com/support This section provides instructions on how to install or replace a PCI - Lenovo 8910ARU | User Manual - Page 27
To install or replace a PCI card: 1. Open the computer cover. See "Opening the computer cover" on page 14. 2. Rotate the card retainer to the open position. If you are installing a PCI card, remove the appropriate slot cover. If you - Lenovo 8910ARU | User Manual - Page 28
instructions on how to install the internal drives. Internal drives are devices that your computer uses to read and store data. You can add drives to your computer to increase storage capacity and enable your computer computer manual, the bays are referred to as bay 1, bay 2, and so on. - Lenovo 8910ARU | User Manual - Page 29
disk drive (requires a Universal Adapter Bracket, 5.25 to 3.5-inch)* 5.25-inch hard disk drive * You can obtain a Universal Adapter Bracket, 5.25 to 3.5-inch from a local computer retailer or by contacting the Customer Support Center. Chapter 2. Installing options and replacing hardware 21 - Lenovo 8910ARU | User Manual - Page 30
and understanding the "Important safety information" in the ThinkCentre Safety and Warranty Guide that came with your computer. To obtain a copy of the ThinkCentre Safety and Warranty Guide, go to: http://www.lenovo.com/support This section provides instructions on how to install a drive in bay - Lenovo 8910ARU | User Manual - Page 31
5. Slide the drive into the bay until it locks into position. Figure 14. Installing a drive in bay 2 6. Pivot the optical drive bay assembly upward to gain access to the cable connections and connect the signal cable and the power cable for the drive. 7. Continue at "Connecting a SATA drive." - Lenovo 8910ARU | User Manual - Page 32
and understanding the "Important safety information" in the ThinkCentre Safety and Warranty Guide that came with your computer. To obtain a copy of the ThinkCentre Safety and Warranty Guide, go to: http://www.lenovo.com/support This section provides instructions on how to replace the hard disk drive - Lenovo 8910ARU | User Manual - Page 33
4. Push the blue handle of the hard disk drive bracket inwards to release the two clips 1 that secure the hard disk drive to the chassis and then pivot the hard disk drive upwards. Figure 16. Removing the hard disk drive 5. Disconnect the signal cable and the power cable from the hard disk drive and - Lenovo 8910ARU | User Manual - Page 34
on the blue handle of the hard disk drive bracket snap into position. 10. Go to "Completing the parts replacement" on page 36. 26 User Guide - Lenovo 8910ARU | User Manual - Page 35
understanding the "Important safety information" in the ThinkCentre Safety and Warranty Guide that came with your computer. To obtain a copy of the ThinkCentre Safety and Warranty Guide, go to: http://www.lenovo.com/support This section provides instructions on how to replace the optical drive. To - Lenovo 8910ARU | User Manual - Page 36
understanding the "Important safety information" in the ThinkCentre Safety and Warranty Guide that came with your computer. To obtain a copy of the ThinkCentre Safety and Warranty Guide, go to: http://www.lenovo.com/support 28 User Guide Your computer has a special type of memory that maintains - Lenovo 8910ARU | User Manual - Page 37
for the first time after replacing the battery, an error message might be displayed. This is normal after replacing the battery. 8. Turn on the computer and all attached devices. 9. Use the Setup Utility program to set the date, time, and any passwords. See Chapter 4, "Using the Setup Utility," on - Lenovo 8910ARU | User Manual - Page 38
and understanding the "Important safety information" in the ThinkCentre Safety and Warranty Guide that came with your computer. To obtain a copy of the ThinkCentre Safety and Warranty Guide, go to: http://www.lenovo.com/support This section provides instructions on how to replace the power supply - Lenovo 8910ARU | User Manual - Page 39
assembly cables from the cable clips and ties in the chassis. 7. Slide the power supply assembly away from the chassis and remove it from the computer. Figure 25. Removing the power supply assembly Chapter 2. Installing options and replacing hardware 31 - Lenovo 8910ARU | User Manual - Page 40
and understanding the "Important safety information" in the ThinkCentre Safety and Warranty Guide that came with your computer. To obtain a copy of the ThinkCentre Safety and Warranty Guide, go to: http://www.lenovo.com/support This section provides instructions on how to replace the heat sink and - Lenovo 8910ARU | User Manual - Page 41
4. Remove the heat sink and fan assembly from the system board by pivoting the lever 1 that secures the heat sink and fan assembly until it is fully in the up position. Note: It helps to remove the hard disk drive before this step. See "Replacing the hard disk drive" on page 24. Figure 26. Removing - Lenovo 8910ARU | User Manual - Page 42
and understanding the "Important safety information" in the ThinkCentre Safety and Warranty Guide that came with your computer. To obtain a copy of the ThinkCentre Safety and Warranty Guide, go to: http://www.lenovo.com/support This section provides instructions on how to replace the card reader. To - Lenovo 8910ARU | User Manual - Page 43
understanding the "Important safety information" in the ThinkCentre Safety and Warranty Guide that came with your computer. To obtain a copy of the ThinkCentre Safety and Warranty Guide, go to: http://www.lenovo.com/support This section provides instructions on how to replace the mouse. To replace - Lenovo 8910ARU | User Manual - Page 44
outlets. 3. Locate the connector for the mouse. Note: Your mouse might be connected to a standard mouse connector 1 or a USB connector 2 . Depending on where your mouse is connected, see "Locating connectors on the rear of your computer computer computer cover and reconnect cables to your computer - Lenovo 8910ARU | User Manual - Page 45
that are not preinstalled at: http://www.lenovo.com/support Installation instructions are provided in readme files with the device-driver files. Installing security features To help prevent hardware theft and unauthorized access to your computer, several security options are available. In addition - Lenovo 8910ARU | User Manual - Page 46
computer cover. This is the same type of lock used with many notebook computers. You can order a security cable directly from Lenovo by searching on Kensington at: http://www.lenovo.com/support clearing CMOS) This section contains instructions on erasing some lost or forgotten passwords, such as a - Lenovo 8910ARU | User Manual - Page 47
11. Reinstall the hard disk drive if removed. 12. Lower the optical drive bay assembly and reconnect any cables that were disconnected. 13. Close the computer cover and connect the power cord. See "Completing the parts replacement" on page 36. Chapter 2. Installing options and replacing hardware 39 - Lenovo 8910ARU | User Manual - Page 48
40 User Guide - Lenovo 8910ARU | User Manual - Page 49
device drivers v Setting a rescue device in the startup sequence v Solving recovery problems Notes: the computer to another area, sell the computer, recycle the computer, or put the computer in Programs → Lenovo ThinkVantage Tools → Factory Recovery Disks. Then, follow the instructions on the - Lenovo 8910ARU | User Manual - Page 50
instructions on the screen. After restoring the computer to the factory default settings, you might have to reinstall some software programs or device drivers. See "Installing or reinstalling device drivers computer. 3. Repeatedly press and release the F12 key when turning on the computer computer - Lenovo 8910ARU | User Manual - Page 51
provides instructions on how to perform a recovery operation using the Rescue and Recovery program on different operating systems. v To perform a recovery operation using the Rescue and Recovery program on Windows 7, do the following: 1. From the Windows desktop, click Start → All Programs → Lenovo - Lenovo 8910ARU | User Manual - Page 52
the computer is turned off. 2. Repeatedly press and release the F11 key when turning on the computer. problems" on page 48. 5. Do one of the following: v To rescue files from your hard disk drive or from a backup, click Rescue files and follow the instructions the instructions on the screen. For more - Lenovo 8910ARU | User Manual - Page 53
. Creating rescue media This section provides instructions on how to create rescue media on different operating systems. v To create a rescue medium on Windows 7, do the following: 1. From the Windows desktop, click Start → All Programs → Lenovo ThinkVantage Tools → Enhanced Backup and Restore - Lenovo 8910ARU | User Manual - Page 54
. To create a recovery repair diskette, do the following: 1. Turn on the computer, and make sure that your computer has Internet access. 2. Follow the instructions on the Web site at: http://www.lenovo.com/think/support/site.wss/document.do?lndocid=MIGR-54483 3. After the recovery repair diskette is - Lenovo 8910ARU | User Manual - Page 55
have a problem with the computer hard disk drive (usually drive C:) in the SWTOOLS\DRIVERS folder. The latest device drivers for factory-installed devices are also available at http://www.lenovo.com/ support. Other device drivers install the device driver. Follow the instructions to complete the - Lenovo 8910ARU | User Manual - Page 56
use an external device, you must first turn off your computer before connecting the external device. For more information on the Chapter 4, "Using the Setup Utility," on page 49. Solving recovery problems If you are unable to access the Rescue and Recovery workspace or the safe place. 48 User Guide - Lenovo 8910ARU | User Manual - Page 57
of your computer, regardless of computer is already on when you start this procedure, turn off the computer. 2. Repeatedly press and release the F1 key when turning on the computer your computer. Viewing access to your computer and data. See your computer. However, using passwords improves computing - Lenovo 8910ARU | User Manual - Page 58
When a Power-On Password is set, the computer cannot be used until a valid password is for maintaining the settings of several computers, you might want to set an program main menu, select Security → Set Passwords. 3. Follow the instructions displayed on the right side of the screen to set, change, - Lenovo 8910ARU | User Manual - Page 59
the Setup Utility. Note: If you do not want to save the settings, select Exit the Setup Utility without saving. Selecting a startup device If your computer does not start up from a device such as the disc, diskette, or hard disk drive as expected, do one of the following to select the - Lenovo 8910ARU | User Manual - Page 60
want to save the new settings, select Save Settings or Save and exit the Setup Utility. Otherwise, your changes will not be saved. 52 User Guide - Lenovo 8910ARU | User Manual - Page 61
bootable CD/DVD image (known as an ISO image) of the diagnostics program to support computers without a diskette drive. Go to: http://www.lenovo.com Updating (flashing) BIOS from a disc This section provides instructions on how to update (flash) the BIOS from a disc. System BIOS program updates are - Lenovo 8910ARU | User Manual - Page 62
Go to http://www.lenovo.com/support. 2. Do the drivers. c. Select BIOS in the Refine results field to easily locate all the BIOS related links. d. Click the BIOS update link. e. Click the TXT file that contains the instructions outlets, and open the computer cover. Refer to "Opening the computer - Lenovo 8910ARU | User Manual - Page 63
(pin 1 and pin 2). 14. Reconnect any cables that were disconnected and reinstall the hard disk drive if removed. 15. Close the computer cover and reconnect the power cords for the computer and monitor to electrical outlets. Refer to "Completing the parts replacement" on page 36. 16. Turn on the - Lenovo 8910ARU | User Manual - Page 64
56 User Guide - Lenovo 8910ARU | User Manual - Page 65
"Connecting your computer" in the ThinkCentre Safety and Warranty Guide. If you cannot correct the problem, have the computer serviced. Refer to the safety and warranty information that is provided with your computer for a list of service and support telephone numbers. © Copyright Lenovo 2009 57 - Lenovo 8910ARU | User Manual - Page 66
multiple times before the operating system starts. Verify that no keys are stuck down. If you cannot correct the problem, have the computer serviced. Refer to the safety and warranty information that is provided with your computer for a list of service and support telephone numbers. 58 User Guide - Lenovo 8910ARU | User Manual - Page 67
symptoms and solutions for computer problems, access the Lenovo troubleshooting center, update system drivers, and review system information. To run the Lenovo System Toolbox, click Start → All Programs → Lenovo Services → Lenovo System Toolbox. Follow the instructions on the screen. For additional - Lenovo 8910ARU | User Manual - Page 68
ISO image) of the diagnostic program from: http://www.lenovo.com/support 2. Use any CD/DVD burning software to create a diagnostic disc with the ISO image. Running the diagnostic program from a diagnostic disc This section provides instructions on how to run the diagnostic program from a diagnostic - Lenovo 8910ARU | User Manual - Page 69
computer computer to access the diagnostic program. 3. Follow the instructions on mouse This section provides instructions on how to clean 1. Turn off your computer. 2. Disconnect the mouse cable from the computer. 3. Turn the mouse cable to the computer. 6. Turn your computer back on. Non-optical - Lenovo 8910ARU | User Manual - Page 70
Retainer ring 2 Ball 3 Plastic rollers 4 Ball cage 1. Turn off your computer. 2. Disconnect the mouse cable from the computer. 3. Turn the mouse upside down. Twist the retainer ring 1 to the locked position. 11. Reconnect the mouse cable to the computer. 12. Turn your computer back on. 62 User Guide - Lenovo 8910ARU | User Manual - Page 71
an internal hard disk drive and preinstalled software from Lenovo. The Online Books folder preinstalled on your computer contains the ThinkCentre User Guide, which provides information about your computer to help you set up, use, and maintain your computer. It requires no Internet access to view the - Lenovo 8910ARU | User Manual - Page 72
, or use the Search tab to find a particular word or phrase. Safety and Warranty The ThinkCentre Safety and Warranty Guide that is provided with your computer contains information on safety, setup, warranty, and notices. Read and understand all safety information before using this product. 64 User - Lenovo 8910ARU | User Manual - Page 73
device drivers and software updates for your computer model. v Access the online manuals for your products. v Access the Lenovo Statement of Limited Warranty. v Access troubleshooting and support information for your computer model and other supported products. v Find the service and support phone - Lenovo 8910ARU | User Manual - Page 74
proof of purchase to obtain warranty service. For a list of the Lenovo Support phone numbers for your country or region, go to http://www.lenovo.com/support and click Support phone list or refer to the ThinkCentre Safety and Warranty Guide that is provided with your computer. Note: Phone numbers are - Lenovo 8910ARU | User Manual - Page 75
and after the warranty period, you can purchase additional services, such as support for hardware, operating systems, and application programs; network setup and configuration; upgraded or extended hardware repair services; and custom installations. Service availability and service name might vary - Lenovo 8910ARU | User Manual - Page 76
68 User Guide - Lenovo 8910ARU | User Manual - Page 77
of any other product, program, or service. Lenovo may have patents or pending patent applications support applications where malfunction may result in injury or death to persons. The information contained in this document does not affect or change Lenovo product specifications or warranties - Lenovo 8910ARU | User Manual - Page 78
terms are trademarks of Lenovo in the United States, other countries, or both: Lenovo Rescue and Recovery The Lenovo logo ThinkCentre ThinkVantage Microsoft, Windows, , other countries, or both. Other company, product, or service names may be trademarks or service marks of others. 70 User Guide - Lenovo 8910ARU | User Manual - Page 79
, handling static-sensitive 13 diagnostics programs, using 65 diagnostics, troubleshooting 57 diskette, creating and using a recovery repair 46 DisplayPort connector 9 documentation, using 65 drivers, device 37 © Copyright Lenovo 2009 drives bays 21 internal 20 specifications 21 E environment - Lenovo 8910ARU | User Manual - Page 80
63 opening computer cover 14 support center 65 getting 63 services other 66 purchasing additional 67 setting password 50 rescue device 48 settings changing 49 viewing 49 Setup Utility 49 Setup Utility program, starting 49 Setup Utility, exiting 52 software recovering 41 solving recovery problems - Lenovo 8910ARU | User Manual - Page 81
70 troubleshooting, basic 57 troubleshooting, diagnostics services 66 passwords 49 recovery repair diskette, creating and using 46 rescue media, creating and 45 Setup Utility 49 V VGA monitor connector 9 video subsystem 1 viewing and changing settings 49 W warranty information 64 Web site, Lenovo - Lenovo 8910ARU | User Manual - Page 82
74 User Guide - Lenovo 8910ARU | User Manual - Page 83
- Lenovo 8910ARU | User Manual - Page 84
Part Number: 53Y9876 Printed in USA (1P) P/N: 53Y9876
-
 1
1 -
 2
2 -
 3
3 -
 4
4 -
 5
5 -
 6
6 -
 7
7 -
8
-
9
-
10
-
11
-
12
-
13
-
14
-
15
-
16
-
17
-
18
-
19
-
20
-
21
-
22
-
23
-
24
-
25
-
26
-
27
-
28
-
29
-
30
-
31
-
32
-
33
-
34
-
35
-
36
-
37
-
38
-
39
-
40
-
41
-
42
-
43
-
44
-
45
-
46
-
47
-
48
-
49
-
50
-
51
-
52
-
53
-
54
-
55
-
56
-
57
-
58
-
59
-
60
-
61
-
62
-
63
-
64
-
65
-
66
-
67
-
68
-
69
-
70
-
71
-
72
-
73
-
74
-
75
-
76
-
77
-
78
-
79
-
80
-
81
-
82
-
83
-
84
 |
 |
