Lenovo B475e User Guide - Lenovo B475e, B575e - Page 61
Removing the optical drive
 |
View all Lenovo B475e manuals
Add to My Manuals
Save this manual to your list of manuals |
Page 61 highlights
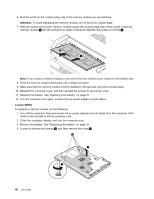
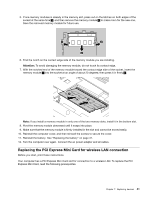
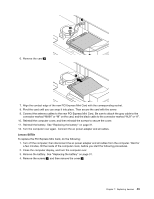
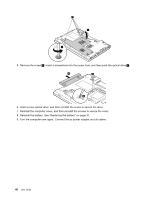
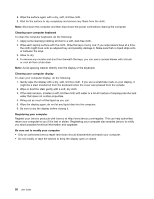
11. Reinstall the battery. See "Replacing the battery" on page 31. 12. Turn the computer over again. Connect the ac power adapter and all cables. Removing the optical drive Before you start, print these instructions. To remove the optical drive, refer to the instructions for the computer: • "Lenovo B475e" on page 45 • "Lenovo B575e" on page 45 Lenovo B475e To replace the optical drive, do the following: 1. Turn off the computer; then disconnect the ac power adapter and all cables from the computer. Wait three to five minutes to let the computer cool. 2. Close the computer display, and turn the computer over. 3. Remove the battery. See "Replacing the battery" on page 31. 4. Remove the screw 1 that secures the optical drive. Insert a screwdriver into the screw hole, and then push the optical drive 2 . 2 1 2 5. Insert a new optical drive, and then reinstall the screw to secure the drive. 6. Reinstall the computer cover, and then reinstall the screws to secure the cover. 7. Reinstall the battery. See "Replacing the battery" on page 31. 8. Turn the computer over again. Connect the ac power adapter and all cables. Lenovo B575e To replace the optical drive, do the following: 1. Turn off the computer; then disconnect the ac power adapter and all cables from the computer. Wait three to five minutes to let the computer cool. 2. Close the computer display, and turn the computer over. 3. Remove the battery. See "Replacing the battery" on page 31. 4. Remove the screws 1 , and then remove the cover 2 . Chapter 7. Replacing devices 45
-
 1
1 -
2
-
3
-
4
-
5
-
6
-
7
-
8
-
9
-
10
-
11
-
12
-
13
-
14
-
15
-
16
-
17
-
18
-
19
-
20
-
21
-
22
-
23
-
24
-
25
-
26
-
27
-
28
-
29
-
30
-
31
-
32
-
33
-
34
-
35
-
36
-
37
-
38
-
39
-
40
-
41
-
42
-
43
-
44
-
45
-
46
-
47
-
48
-
49
-
50
-
51
-
52
-
53
-
54
-
55
-
 56
56 -
 57
57 -
 58
58 -
 59
59 -
 60
60 -
 61
61 -
 62
62 -
 63
63 -
 64
64 -
 65
65 -
 66
66 -
67
-
68
-
69
-
70
-
71
-
72
-
73
-
74
-
75
-
76
-
77
-
78
-
79
-
80
-
81
-
82
-
83
-
84
-
85
-
86
-
87
-
88
 |
 |
