Lenovo P825 Lenovo Digital Photo Frame P825 User's Guide
Lenovo P825 Manual
 |
View all Lenovo P825 manuals
Add to My Manuals
Save this manual to your list of manuals |
Lenovo P825 manual content summary:
- Lenovo P825 | Lenovo Digital Photo Frame P825 User's Guide - Page 1
Lenovo Digital Photo Frame P825 User's Guide Ver 1.0 - Lenovo P825 | Lenovo Digital Photo Frame P825 User's Guide - Page 2
Lenovo Digital Photo Frame P710 Statement 2 1. Precautions...3 2. Know the DPF ...4 2.1 Product Presentation ...4 2.2 Use the Remote Control 5 2.3 Connection ...5 2.4 Connecting Photo ...22 7.3 Music...22 7.4 Movie ...23 7.5 Alarm...24 7.6 System...27 8. Others...36 9. Trouble Shooting...37 1 - Lenovo P825 | Lenovo Digital Photo Frame P825 User's Guide - Page 3
Lenovo Digital Photo Frame P710 Statement Thank you for choosing Lenovo products. Please read the information included in the product package thoroughly and carefully before use. Lenovo (Beijing) Ltd. WILL NOT BE LIABLE for any damages caused by your failure to follow the instructions herein or by - Lenovo P825 | Lenovo Digital Photo Frame P825 User's Guide - Page 4
Lenovo Digital Photo Frame P710 Product Accessories 1. Digital Photo Frame 2. Stand 3. Remote Control (battery included) 4. Power Supply Adapter 5. USB Cable 6. CD (Guide) 7. Quick Start Guide 8. Safety Guide 1. Precautions In order to better protect your product, please read the followings - Lenovo P825 | Lenovo Digital Photo Frame P825 User's Guide - Page 5
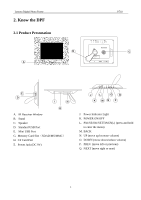
Lenovo Digital Photo Frame 2. Know the DPF 2.1 Product Presentation A P710 SETTINGS POWER UP DOWN PREV. NEXT B CF SD/MS/MMC DC 9V C E D USB USB I H G A. IR Receiver Window B. Stand C. Speaker D. - Lenovo P825 | Lenovo Digital Photo Frame P825 User's Guide - Page 6
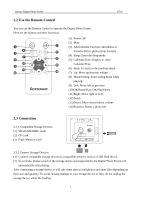
Lenovo Digital Photo Frame P710 2.2 Use the Remote Control You can use the Remote Control to operate the Digital Photo Frame. Here are the a minute, photos saved on the storage device and supported by the Digital Photo Frame will automatically start playing. After connecting a storage device - Lenovo P825 | Lenovo Digital Photo Frame P825 User's Guide - Page 7
Lenovo Digital Photo Frame P710 2.4 Connecting to PC with USB Cable The Digital Photo Frame supports Windows 2000/XP/Vista operating systems. (1) Connect the adapter to the Digital Photo Frame. (2) Use the USB cable to connect the Digital Photo Frame (Mini USB port) with your computer. (3) Press - Lenovo P825 | Lenovo Digital Photo Frame P825 User's Guide - Page 8
. 4. Play Photos After power on, plug in storage device to the Digital Photo Frame. If there are available photos on the storage device, the Digital Photo Frame will automatically start playing. Note: This Digital Photo Frame supports JPG format. How to Select Photos and Play: (1) Press BACK to - Lenovo P825 | Lenovo Digital Photo Frame P825 User's Guide - Page 9
Lenovo Digital Photo Frame P710 4.1 Copy While playing photos, press the menu button on the Remote Control or press and hold OK button on the machine to enter the - Lenovo P825 | Lenovo Digital Photo Frame P825 User's Guide - Page 10
Lenovo Digital Photo Frame P710 (5) After successfully completed copying, a prompt will appear as Please keep your original photos for further printing or editing. (6) The length of time the Digital Photo Frame takes to complete the copying task depends on the quantity and the size of your file - Lenovo P825 | Lenovo Digital Photo Frame P825 User's Guide - Page 11
Lenovo Digital Photo Frame P710 (1) Select Delete One or Delete All: Delete the current photo (Delete OK to start deleting. Select Cancel to quit deleting. (5) The length of time the Digital Photo Frame takes to complete the deleting task depends on the quantity and the size of your file(s). - Lenovo P825 | Lenovo Digital Photo Frame P825 User's Guide - Page 12
Lenovo Digital Photo Frame P710 4.4 Play Mode While playing photos, press the menu button on the Remote Control or press and hold OK button on the machine to enter - Lenovo P825 | Lenovo Digital Photo Frame P825 User's Guide - Page 13
Lenovo Digital Photo Frame P710 (1) Use UP/DOWN buttons to select your desired play mode. (2) Press OK again to complete the play settings. (3) Press BACK to exit. 12 - Lenovo P825 | Lenovo Digital Photo Frame P825 User's Guide - Page 14
Lenovo Digital Photo Frame P710 4.5 Slideshow with Music While playing photos, press the menu button on the Remote Control or press and hold OK button on the machine to - Lenovo P825 | Lenovo Digital Photo Frame P825 User's Guide - Page 15
Lenovo Digital Photo Frame P710 4.7 Slideshow Interval While playing photos, press the menu button on the Remote Control or press and hold OK button on the machine to enter - Lenovo P825 | Lenovo Digital Photo Frame P825 User's Guide - Page 16
Lenovo Digital Photo Frame P710 4.8 Transition Effect While playing photos, press if only music files are saved on the storage device, the Digital Photo Frame will automatically start playing music. Note: The Digital Photo Frame supports music files in WMA and MP3 formats. How to Select Music - Lenovo P825 | Lenovo Digital Photo Frame P825 User's Guide - Page 17
Lenovo Digital Photo Frame P710 (4) Select the music you want to play. Press OK to Copying Files! (4) Select and press OK button. (5) Start copying. (6) The length of time the Digital Photo Frame takes to complete the copying task depends on the quantity and the size of your file(s). 5.2 Delete - Lenovo P825 | Lenovo Digital Photo Frame P825 User's Guide - Page 18
to exit. 6. Play Movies After power on, if only movie files are saved on the storage device, the Digital Photo Frame will automatically start playing the movie. Note: The Digital Photo Frame supports Motion JPEG, as well as MPEG-1, MPEG-2, MPEG-4 formats with extension names of avi, mpg, and mpeg - Lenovo P825 | Lenovo Digital Photo Frame P825 User's Guide - Page 19
Lenovo Digital Photo Frame P710 6.1 Copy While playing a movie, press the menu button on the Remote Control or press and hold OK button on the machine to enter the - Lenovo P825 | Lenovo Digital Photo Frame P825 User's Guide - Page 20
Lenovo Digital Photo Frame P710 (2) Select the target storage device. (3) Press OK to confirm the copy, a prompt will appear as follows: Do not Remove Memory Card While Copying Files! (4) Select and press OK button to start copying. (5) The length of time the Digital Photo Frame takes to - Lenovo P825 | Lenovo Digital Photo Frame P825 User's Guide - Page 21
Lenovo Digital Photo Frame P710 Options include Delete One and Delete All. (1) Select Delete One or press OK to start deleting. Select Cancel to quit deleting. (5) The length of time the Digital Photo Frame takes to complete the deleting task depends on the quantity and the size of your file(s). - Lenovo P825 | Lenovo Digital Photo Frame P825 User's Guide - Page 22
Lenovo Digital Photo Frame P710 7. Settings Press BACK button to enter the main menu. Use LEFT/RIGHT buttons to select Settings option. Available options in Settings: System, Alarm, Storage, - Lenovo P825 | Lenovo Digital Photo Frame P825 User's Guide - Page 23
Lenovo Digital Photo Frame P710 7.2 Photo Enter the Photo menu settings, options include: Play mode, Slideshow with music, Ratio, Slideshow Interval and Transition Effect. All the settings follow the same way in photo menu setting. 22 - Lenovo P825 | Lenovo Digital Photo Frame P825 User's Guide - Page 24
Lenovo Digital Photo Frame P710 7.3 Music Enter the music menu settings from here. The option is Play Mode. All the settings follow the same way in photo menu setting. 7.4 - Lenovo P825 | Lenovo Digital Photo Frame P825 User's Guide - Page 25
Lenovo Digital Photo Frame P710 7.5 Alarm Options include: Active, Time, Snooze, Sound, Frequency, Volume. 7.5.1 Active (1) Enter the Active option. Select Yes to enable the alarm. Select No to disable the alarm. (2) After selecting an option, press OK to complete the alarm setting. 24 - Lenovo P825 | Lenovo Digital Photo Frame P825 User's Guide - Page 26
Lenovo Digital Photo Frame P710 7.5.2 Time (1) Enter the Time option, set up alarm time. (2) Set up hours and minutes. Press LEFT/RIGHT buttons to change hour and minute settings. (3) - Lenovo P825 | Lenovo Digital Photo Frame P825 User's Guide - Page 27
Lenovo Digital Photo Frame P710 7.5.4 Sound Set up Alarm Tone. Options are as follows: Melody 1, Melody 2 and Melody 3. (1) Select tone setting. (2) Press OK to complete the alarm tone setting. 7.5.5 - Lenovo P825 | Lenovo Digital Photo Frame P825 User's Guide - Page 28
Lenovo Digital Photo Frame P710 7.5.6 Volume Set up volume. Options include: Loud, Medium, Low and Mute. (1) Select alarm volume. (2) Press OK to complete the alarm volume setting. 7.6 System Options - Lenovo P825 | Lenovo Digital Photo Frame P825 User's Guide - Page 29
Lenovo Digital Photo Frame P710 7.6.1 Date and Time Enter the System menu and select Date and Time. Press OK to confirm. Options include: Date, Time, Time Format, Clock Style - Lenovo P825 | Lenovo Digital Photo Frame P825 User's Guide - Page 30
Lenovo Digital Photo Frame P710 Time (1) Select the Time option, press OK to enter the time setting. (2) Press LEFT/RIGHT buttons to select hours or minutes. Press UP/DOWN - Lenovo P825 | Lenovo Digital Photo Frame P825 User's Guide - Page 31
Lenovo Digital Photo Frame P710 Clock Style (1) Select the Clock Style option and press OK to enter the Clock Style setting. (2) Options include: Digital and Analogue. (3) After setting up, press OK to complete the clock style setting. Display (1) Select the Display option and press OK to - Lenovo P825 | Lenovo Digital Photo Frame P825 User's Guide - Page 32
Lenovo Digital Photo Frame P710 7.6.2 Contrast Set the screen contrast. (1) Enter System and select Contrast. Press OK to enter. (2) Options include: Sharp, Normal and Soft. (3) After setting up, press - Lenovo P825 | Lenovo Digital Photo Frame P825 User's Guide - Page 33
Lenovo Digital Photo Frame P710 7.6.4 Smart Sleep Set up smart sleep. Enter System and select Smart Sleep. Options include Active, Sleep, Wake Up, and Frequency. Set up automatic power - Lenovo P825 | Lenovo Digital Photo Frame P825 User's Guide - Page 34
Lenovo Digital Photo Frame P710 Sleep Set up the sleep time. (1) Select Sleep and press OK to enter. (2) Press LEFT/RIGHT buttons to select hours and minutes. (3) Press UP/ - Lenovo P825 | Lenovo Digital Photo Frame P825 User's Guide - Page 35
Lenovo Digital Photo Frame P710 Frequency Set up Smart Sleep frequency. (1) Select Frequency and press OK to enter. (2) Options include: Once, Everyday, Weekday, Except Sunday. (3) Select your desired frequency, - Lenovo P825 | Lenovo Digital Photo Frame P825 User's Guide - Page 36
Lenovo Digital Photo Frame P710 (3) After selecting, press OK to complete the interface language settings. 7.6.6 System Information Display the memory related information and software version. (1) Enter System and select - Lenovo P825 | Lenovo Digital Photo Frame P825 User's Guide - Page 37
Lenovo Digital Photo Frame P710 7.6.7 Reset Restore factory default settings. (1) Enter System and select Reset. Press OK to enter. (2) Options include: Yes and No. (3) After selecting, press OK to - Lenovo P825 | Lenovo Digital Photo Frame P825 User's Guide - Page 38
Lenovo Digital Photo Frame P710 9. Trouble Shooting Q1 The Digital Photo Frame does not turn on. A1: Check whether the power adapter properly connected the Digital Photo Frame is supported by your Digital Photo Frame. Make sure the memory card is properly inserted. Q4: The Digital Photo Frame can - Lenovo P825 | Lenovo Digital Photo Frame P825 User's Guide - Page 39
Lenovo Digital Photo Frame P710 Q8: The Remote Control does not respond. A8: Please make be in various formats. Make sure both the audio and video types in the movie files are supported by the Digital Photo Frame. Q12. System date and time is unusual A12. Please check whether you've set the Date
-
 1
1 -
 2
2 -
 3
3 -
 4
4 -
 5
5 -
 6
6 -
 7
7 -
8
-
9
-
10
-
11
-
12
-
13
-
14
-
15
-
16
-
17
-
18
-
19
-
20
-
21
-
22
-
23
-
24
-
25
-
26
-
27
-
28
-
29
-
30
-
31
-
32
-
33
-
34
-
35
-
36
-
37
-
38
-
39
 |
 |

Lenovo Digital Photo Frame
P825
User's Guide
Ver 1.0