Lenovo P825 Lenovo Digital Photo Frame P825 User's Guide - Page 6
Use the Remote Control, 2.3 Connection, OK/Pause/Play: OK/Play/Pause
 |
View all Lenovo P825 manuals
Add to My Manuals
Save this manual to your list of manuals |
Page 6 highlights
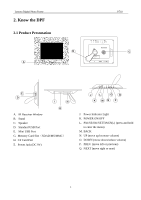
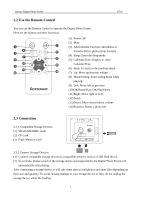
Lenovo Digital Photo Frame P710 2.2 Use the Remote Control You can use the Remote Control to operate the Digital Photo Frame. Here are the buttons and their functions: (1) Power Off (2) Mute (3) Add to/Delete Favorite: add photos to Favorite/Delete photos from Favorite (4) Sleep: Enter the sleep mode (5) Calendar/Time: Display or close Calendar/Time (6) Back: Go back to the previous menu (7) Up: Move up/increase volume (8) Menu/Setting: Enter setting menu while playing (9) Left: Move left or previous (10) OK/Pause/Play: OK/Play/Pause (11) Right: Move right or next (12) Zoom (13) Down: Move down/reduce volume (14) Rotation: Rotate a photo left 2.3 Connection 2.3.1 Compatible Storage Devices (1) SD/xD/MS/MMC cards (2) CF Card (3) Flash Memory Card NEXT PREV. DOWN UP CF SD/MS/MMC DC 9V SETTINGS POWER 2.3.2 Connect Storage Devices (1) Connect compatible storage devices (a compatible memory card or a USB flash drive). (2) In a minute, photos saved on the storage device and supported by the Digital Photo Frame will automatically start playing. After connecting a storage device, it will take some time to load photos and other files depending on their size and quantity. To avoid causing damage to your storage device or files, do not unplug the storage device while file loading. 5
-
 1
1 -
 2
2 -
 3
3 -
 4
4 -
 5
5 -
 6
6 -
 7
7 -
 8
8 -
 9
9 -
 10
10 -
 11
11 -
 12
12 -
13
-
14
-
15
-
16
-
17
-
18
-
19
-
20
-
21
-
22
-
23
-
24
-
25
-
26
-
27
-
28
-
29
-
30
-
31
-
32
-
33
-
34
-
35
-
36
-
37
-
38
-
39
 |
 |
