Lenovo PC 300PL Installing Options in your PC - 6862, 6275 - Page 79
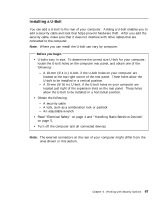
Refer to Adapters and the Riser Card, and Installing a Drive in Bay 1
 |
View all Lenovo PC 300PL manuals
Add to My Manuals
Save this manual to your list of manuals |
Page 79 highlights
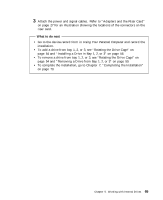
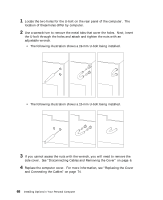
3 Attach the power and signal cables. Refer to "Adapters and the Riser Card" on page 27 for an illustration showing the locations of the connectors on the riser card. What to do next Go to the device-record form in Using Your Personal Computer and record the installation. To add a drive from bay 1, 2, or 3, see "Rotating the Drive Cage" on page 54 and "Installing a Drive in Bay 1, 2, or 3" on page 56. To remove a drive from bay 1, 2, or 3, see "Rotating the Drive Cage" on page 54 and "Removing a Drive from Bay 1, 2, or 3" on page 59. To complete the installation, go to Chapter 7, "Completing the Installation" on page 73. Chapter 5. Working with Internal Drives 65
-
 1
1 -
2
-
3
-
4
-
5
-
6
-
7
-
8
-
9
-
10
-
11
-
12
-
13
-
14
-
15
-
16
-
17
-
18
-
19
-
20
-
21
-
22
-
23
-
24
-
25
-
26
-
27
-
28
-
29
-
30
-
31
-
32
-
33
-
34
-
35
-
36
-
37
-
38
-
39
-
40
-
41
-
42
-
43
-
44
-
45
-
46
-
47
-
48
-
49
-
50
-
51
-
52
-
53
-
54
-
55
-
56
-
57
-
58
-
59
-
60
-
61
-
62
-
63
-
64
-
65
-
66
-
67
-
68
-
69
-
70
-
71
-
72
-
73
-
 74
74 -
 75
75 -
 76
76 -
 77
77 -
 78
78 -
 79
79 -
 80
80 -
 81
81 -
 82
82 -
 83
83 -
 84
84 -
85
-
86
-
87
-
88
-
89
-
90
-
91
-
92
-
93
-
94
-
95
-
96
-
97
-
98
-
99
-
100
-
101
-
102
-
103
-
104
-
105
-
106
-
107
-
108
 |
 |

3
Attach the power and signal cables.
Refer to “Adapters and the Riser Card”
on page
27 for an illustration showing the locations of the connectors on the
riser card.
What to do next
±
Go to the device-record form in
Using Your Personal Computer
and record the
installation.
±
To add a drive from bay 1, 2, or 3, see “Rotating the Drive Cage” on
page
54 and “Installing a Drive in Bay 1, 2, or 3” on page
56.
±
To remove a drive from bay 1, 2, or 3, see “Rotating the Drive Cage” on
page
54 and “Removing a Drive from Bay 1, 2, or 3” on page
59.
±
To complete the installation, go to Chapter
7, “Completing the Installation”
on page
73.
Chapter
5.
Working with Internal Drives
65