Lenovo PC 300PL Installing Options in your PC300PL - 6592 - Page 71
Installing and Removing Drives in Bays 5 and 6
 |
View all Lenovo PC 300PL manuals
Add to My Manuals
Save this manual to your list of manuals |
Page 71 highlights
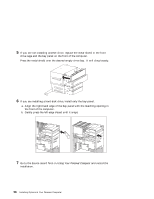
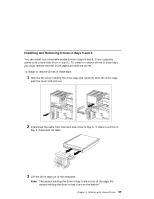
Installing and Removing Drives in Bays 5 and 6 You can install non-removable-media drives in bays 5 and 6. (Your computer comes with a hard disk drive in bay 6.) To install or remove drives in these bays, you must remove the rear drive cage that holds the drives. To install or remove drives in these bays: 1 Remove the screw holding the drive cage and carefully slide the drive cage past the cover lock and out. 2 Disconnect the cable from the hard disk drive in bay 6. If there is a drive in bay 5, disconnect its cable. 3 Lift the drive cage out of the computer. Note: The screws holding the drive in bay 5 are on top of the cage; the screws holding the drive in bay 6 are on the bottom. Chapter 5. Working with Internal Drives 57
-
 1
1 -
2
-
3
-
4
-
5
-
6
-
7
-
8
-
9
-
10
-
11
-
12
-
13
-
14
-
15
-
16
-
17
-
18
-
19
-
20
-
21
-
22
-
23
-
24
-
25
-
26
-
27
-
28
-
29
-
30
-
31
-
32
-
33
-
34
-
35
-
36
-
37
-
38
-
39
-
40
-
41
-
42
-
43
-
44
-
45
-
46
-
47
-
48
-
49
-
50
-
51
-
52
-
53
-
54
-
55
-
56
-
57
-
58
-
59
-
60
-
61
-
62
-
63
-
64
-
65
-
 66
66 -
 67
67 -
 68
68 -
 69
69 -
 70
70 -
 71
71 -
 72
72 -
 73
73 -
 74
74 -
 75
75 -
 76
76 -
77
-
78
-
79
-
80
-
81
-
82
-
83
-
84
-
85
-
86
-
87
-
88
-
89
-
90
-
91
-
92
-
93
-
94
-
95
-
96
-
97
-
98
-
99
-
100
 |
 |
Installing and Removing Drives in Bays 5 and 6
You can install non-removable-media drives in bays 5 and 6.
(Your computer
comes with a hard disk drive in bay 6.)
To install or remove drives in these bays,
you must remove the rear drive cage that holds the drives.
To install or remove drives in these bays:
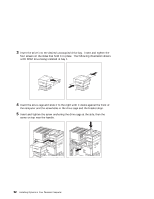
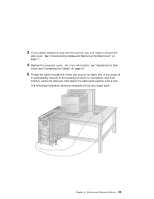
1
Remove the screw holding the drive cage and carefully slide the drive cage
past the cover lock and out.
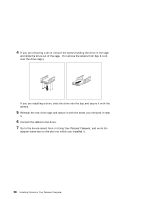
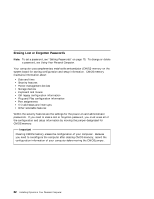
2
Disconnect the cable from the hard disk drive in bay 6.
If there is a drive in
bay 5, disconnect its cable.
3
Lift the drive cage out of the computer.
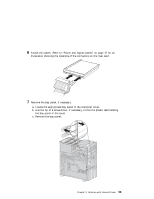
Note:
The screws holding the drive in bay 5 are on top of the cage; the
screws holding the drive in bay 6 are on the bottom.
Chapter
5.
Working with Internal Drives
57