Lenovo Storage S3200 (Multilingual) Getting Started Guide - Lenovo Storage S32 - Page 1
Lenovo Storage S3200 Manual
 |
View all Lenovo Storage S3200 manuals
Add to My Manuals
Save this manual to your list of manuals |
Page 1 highlights
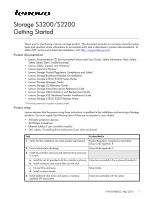
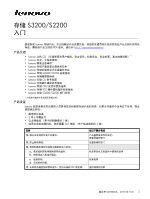
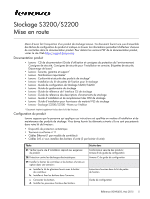
Storage S3200/S2200 Getting Started Thank you for purchasing a Lenovo storage product. This document provides an overview of product setup tasks and specifies where information to accomplish each task is described in product documentation. To obtain PDF versions of product documentation, visit http://support.lenovo.com. Product documentation • Lenovo Documentation CD (Environmental Notices and User Guide, Safety Information, Rack Safety, Safety Labels, Basic Troubleshooting)* • Lenovo Safety, Support and Warranty* • Lenovo Important Notices* • Lenovo Storage Product Regulatory Compliance and Safety* • Lenovo Storage Rackmount Bracket Kit Installation • Lenovo Storage S3200/S2200 Setup Guide • Lenovo Storage Manager Guide • Lenovo Storage CLI Reference Guide • Lenovo Storage Event Descriptions Reference Guide • Lenovo Storage CRU Installation and Replacement Guide • Lenovo Storage VSS Hardware Provider Installation Guide • Lenovo Storage S3200/S2200 Release Notes * Printed document also included in product shipkit. Product setup Lenovo assumes that the person using these instructions is qualified in the installation and servicing of storage products. You must supply the following items if they are not present in your shipkit: • Antistatic protection devices • #2 Phillips screwdriver • Ethernet cables (1 per controller module) • SAS cables, if installing drive enclosures (2 per drive enclosure) Task As described in 1. Verify that the installation site meets product requirements. Product Regulatory Compliance and Safety; Setup Guide appendix B 2. Prevent electrostatic discharge. Setup Guide appendix C 3. Install the controller enclosure and optional drive enclosures in a rack: a. Install the rail kit provided with the controller enclosure. Instructions provided in the rackmount bracket kit b. Install enclosures and secure them into the rack. c. Connect the enclosures. d. Install enclosure bezels. Setup Guide 4. Install additional disk drives and options, including qualified SFP transceivers. Instructions provided with the option P/N 00WE605, May 2015 1
-
 1
1 -
 2
2 -
 3
3 -
 4
4 -
 5
5 -
 6
6 -
 7
7 -
8
-
9
-
10
-
11
-
12
-
13
-
14
-
15
-
16
-
17
-
18
-
19
-
20
-
21
-
22
-
23
-
24
-
25
-
26
 |
 |