Lenovo ThinkPad A20p TP A20 - User's Reference Supplement Guide html format - Page 8
Using the DVI monitor
 |
View all Lenovo ThinkPad A20p manuals
Add to My Manuals
Save this manual to your list of manuals |
Page 8 highlights
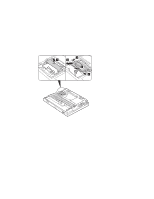
Using the DVI monitor If you have a model A20p computer, you can use either of the following Digital Visual Interface (DVI) monitors through the DVI connector of an expansion unit-either a ThinkPad Dock or a ThinkPad Port Replicator: IBM T85D 18-inch TFT LCD Digital Color Monitor (DVI model) IBM T55D 15-inch TFT LCD Digital Color Monitor (DVI model) Note: Before you attach the DVI monitor, make sure that the computer is attached to the expansion unit and the system works properly. To attach the DVI monitor, do as follows: 1 Turn off the computer. 2 Insert a small flathead screwdriver or a similar tool into the slot at the upper left of the cover on the DVI connector, and pry the cover off. 3 Connect the DVI monitor to the DVI connector on the rear of the expansion unit, and then connect the monitor to an electrical outlet. 4 Turn on the DVI monitor and the computer. The system starts. If the computer output does not appear on the DVI monitor, do the following: 1 Click Start → Settings → Control Panel. 2 Double-click Display. The Display Properties window opens. 3 Click the Settings tab. 4 Click Advanced... 5 Click the Displays tab. The FPD option appears. 6 Click the button on the left side of the FPD button. The FPD option is enabled. 7 Click Apply. The computer output appears on the DVI monitor. 8
-
 1
1 -
2
-
 3
3 -
 4
4 -
 5
5 -
 6
6 -
 7
7 -
 8
8 -
 9
9 -
 10
10 -
 11
11 -
 12
12 -
 13
13 -
14
-
15
-
16
 |
 |
