Lenovo ThinkPad X30 English - Setup Guide for ThinkPad X30 - Page 7
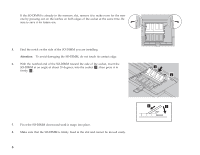
To make sure that the SO-DIMM is installed correctly, do as follows, Attention - memory upgrade
 |
View all Lenovo ThinkPad X30 manuals
Add to My Manuals
Save this manual to your list of manuals |
Page 7 highlights
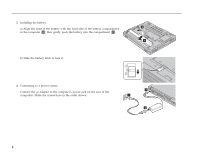
9. Replace the memory slot cover by aligning the back side of the cover first and then tightening the screws. Attention: When you have added or upgraded an SO-DIMM, do not use your computer until you have closed the memory slot cover. Never use the computer with the cover open. 10. Put the battery back in place, turn the computer over again, and reconnect the cables. To make sure that the SO-DIMM is installed correctly, do as follows: 1. Turn the computer on. 2. While the "Press F1 for IBM BIOS Setup Utility" message is displayed at the lower-left area of the screen, press the F1 key. The IBM BIOS Setup Utility screen appears. The "Installed memory" item shows the total amount of memory installed in your computer. For example, if your computer has 128 MB of memory and you install a 128-MB SO-DIMM in it, the quantity shown in "Installed memory" should be 256MB. 7
-
 1
1 -
 2
2 -
 3
3 -
 4
4 -
 5
5 -
 6
6 -
 7
7 -
 8
8
 |
 |