Lexmark 12N0009 Quick Reference Guide - Page 22
paper in the fuser area or, If there is no jammed
 |
UPC - 734646560092
View all Lexmark 12N0009 manuals
Add to My Manuals
Save this manual to your list of manuals |
Page 22 highlights
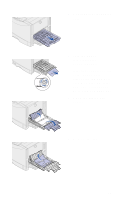
Warning! Do not use pointed objects to remove the paper. They may damage the transfer belt. Note: The paper may be covered with unfused toner, which can stain garments. Transfer belt Transfer belt 5 Remove any paper on the transfer belt. If the paper source was the multipurpose feeder, check the area between the multipurpose feeder and the transfer belt. 6 Check the fuser area and top cover for additional jams. If there is no jammed paper in the fuser area or top cover, go to step 12 on page 22. If jammed paper is present, continue with step 7 on page 20. 7 Lift the fuser pressure release lever. Release lever 20
-
 1
1 -
2
-
3
-
4
-
5
-
6
-
7
-
8
-
9
-
10
-
11
-
12
-
13
-
14
-
15
-
16
-
 17
17 -
 18
18 -
 19
19 -
 20
20 -
 21
21 -
 22
22 -
 23
23 -
 24
24 -
 25
25 -
 26
26 -
 27
27 -
28
-
29
-
30
-
31
-
32
-
33
-
34
-
35
-
36
-
37
-
38
 |
 |

20
Warning!
Do not use pointed
objects to remove the paper.
They may damage the
transfer belt.
Note:
The paper may be
covered with unfused toner,
which can stain garments.
5
Remove any paper on
the transfer belt.
If the paper source was
the multipurpose feeder,
check the area between
the multipurpose feeder
and the transfer belt.
6
Check the fuser area and
top cover for additional
jams.
If there is no jammed
paper in the fuser area or
top cover, go to step 12
on page 22. If jammed
paper is present,
continue with step 7 on
page 20.
7
Lift the fuser pressure
release lever.
Transfer belt
Transfer belt
Release lever