Lexmark 12N0009 Quick Reference Guide - Page 35
–244 Paper Jam Check Tray 1–4, capacity feeder, pull
 |
UPC - 734646560092
View all Lexmark 12N0009 manuals
Add to My Manuals
Save this manual to your list of manuals |
Page 35 highlights
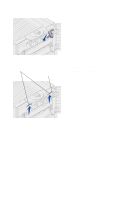
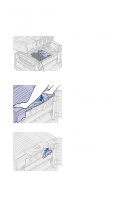
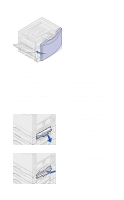
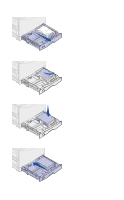
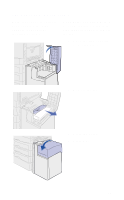
10 Close the front door. 11 Press Go. 241-244 Paper Jam Check Tray 1-4 Note: Although tray 1 is shown, you can use the same procedure to clear any of the 241-244 or Check Tray 1-4 messages. Paper jam messages 241-244 and Check Tray 1-4 indicate a jam in one of the paper trays. (See the illustration on page 17 for tray numbering.) To remove the jam: 1 If you have a high capacity feeder, pull the feeder away from the printer. 2 Open the jam access door for the paper tray indicated on the display. 3 Remove the jam. 4 Close the jam access door. 33
-
 1
1 -
2
-
3
-
4
-
5
-
6
-
7
-
8
-
9
-
10
-
11
-
12
-
13
-
14
-
15
-
16
-
17
-
18
-
19
-
20
-
21
-
22
-
23
-
24
-
25
-
26
-
27
-
28
-
29
-
 30
30 -
 31
31 -
 32
32 -
 33
33 -
 34
34 -
 35
35 -
 36
36 -
 37
37 -
 38
38
 |
 |

33
10
Close the front door.
11
Press
Go
.
241–244 Paper Jam Check Tray 1–4
Note:
Although tray 1 is
shown, you can use the
same procedure to clear any
of the
241–244
or
Check
Tray 1–4
messages.
Paper jam messages
241–244
and
Check Tray 1–4
indicate a
jam in one of the paper trays.
(See the illustration on page 17
for tray numbering.) To remove
the jam:
1
If you have a high
capacity feeder, pull the
feeder away from the
printer.
2
Open the jam access
door for the paper tray
indicated on the display.
3
Remove the jam.
4
Close the jam access
door.