Lexmark 2470m Getting Started
Lexmark 2470m - X Color Inkjet Manual
 |
UPC - 734646077842
View all Lexmark 2470m manuals
Add to My Manuals
Save this manual to your list of manuals |
Lexmark 2470m manual content summary:
- Lexmark 2470m | Getting Started - Page 1
cartridge - Ordering supplies - Recycling Lexmark products • Troubleshooting - Print, copy, scan, and fax troubleshooting - Jams and misfeeds troubleshooting - Error messages troubleshooting • Notices Contents Setup troubleshooting 3 Removing and reinstalling the software 3 Checking the printer - Lexmark 2470m | Getting Started - Page 2
© 2006 Lexmark International, Inc. All rights reserved. Printed in China UNITED STATES GOVERNMENT RIGHTS This software and any accompanying documentation provided under this agreement are commercial computer software and documentation developed exclusively at private expense. Federal Communications - Lexmark 2470m | Getting Started - Page 3
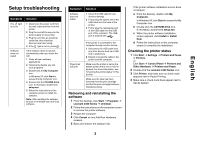
from the print cartridge and that the print cartridge has been installed properly. Removing and reinstalling the software 1 From the desktop, click Start Æ Programs Æ Lexmark 2400 Series Æ Uninstall. 2 Follow the instructions on the computer screen to remove the printer software. 3 Restart the - Lexmark 2470m | Getting Started - Page 4
the All-In-One Center to preview the scan on the computer screen. • Initiate scan-back alignment if the button is held down for three seconds. • Turn the printer on or off. • Cancel a print job. • Reset the printer. Note: If the power light blinks, see "Error messages" in the User's Guide on the CD - Lexmark 2470m | Getting Started - Page 5
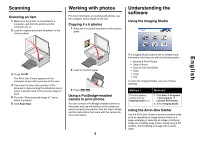
Click Scan Now. 2 Load 4 x 6 photo paper. 3 Press . Using a PictBridge-enabled camera to print photos You can connect a PictBridge-enabled camera to the printer and use the buttons on the camera to select and print your photos. See the User's Guide and the instructions that came with the camera - Lexmark 2470m | Getting Started - Page 6
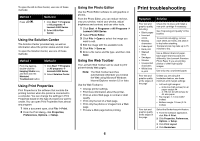
, and then click the Maintain/ Troubleshoot button. Method 2 1 Click Start Æ Programs or All programs Æ Lexmark 2400 Series. 2 Select Solution Center. Using Print Properties Print Properties is the software that controls the printing function when the printer is connected to a computer. You can - Lexmark 2470m | Getting Started - Page 7
. 6 Click Print. An alignment page prints. 7 Follow the instructions on the computer screen. Cleaning the print cartridge nozzles 1 Load paper. 2 From the desktop, double-click the Imaging Studio icon. 3 Click the Maintain/Troubleshoot button. 4 Click Maintenance. 5 Click Clean to fix horizontal - Lexmark 2470m | Getting Started - Page 8
period. For products no longer covered by a Lexmark warranty, technical support may not be available or only be available for a fee. Extent of limited warranty We do not warrant uninterrupted or error-free operation of any product. Warranty service does not include repair of failures caused by - Lexmark 2470m | Getting Started - Page 9
is designed to process monthly) • Failure to have installed a maintenance kit as specified (if applicable) • Use of printing media outside of Lexmark specifications • Use of other than Lexmark supplies (such as toner cartridges, inkjet cartridges, and ribbons), except where such mandatory use of
-
 1
1 -
 2
2 -
 3
3 -
 4
4 -
 5
5 -
 6
6 -
 7
7 -
8
-
9
 |
 |

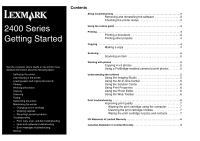
Contents
Setup troubleshooting
. . . . . . . . . . . . . . . . . . . . . . . . . . . . . . . . . . . . . . . . . . . . . . . . . .3
Removing and reinstalling the software . . . . . . . . . . . . . . . .3
Checking the printer status
. . . . . . . . . . . . . . . . . . . . . . . . .3
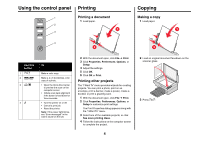
Using the control panel . . . . . . . . . . . . . . . . . . . . . . . . . . . . . . . . . . . . . . . . . . . . . . . . . .4
Printing . . . . . . . . . . . . . . . . . . . . . . . . . . . . . . . . . . . . . . . . . . . . . . . . . . . . . . . . . . . . . . .4
Printing a document . . . . . . . . . . . . . . . . . . . . . . . . . . . . . . .4
Printing other projects
. . . . . . . . . . . . . . . . . . . . . . . . . . . . .4
Copying
. . . . . . . . . . . . . . . . . . . . . . . . . . . . . . . . . . . . . . . . . . . . . . . . . . . . . . . . . . . . . .4
Making a copy
. . . . . . . . . . . . . . . . . . . . . . . . . . . . . . . . . . .4
Scanning . . . . . . . . . . . . . . . . . . . . . . . . . . . . . . . . . . . . . . . . . . . . . . . . . . . . . . . . . . . . . .5
Scanning an item . . . . . . . . . . . . . . . . . . . . . . . . . . . . . . . . .5
Working with photos . . . . . . . . . . . . . . . . . . . . . . . . . . . . . . . . . . . . . . . . . . . . . . . . . . . .5
Copying 4 x 6 photos . . . . . . . . . . . . . . . . . . . . . . . . . . . . . . 5
Using a PictBridge-enabled camera to print photos . . . . . . .5
Understanding the software . . . . . . . . . . . . . . . . . . . . . . . . . . . . . . . . . . . . . . . . . . . . . .5
Using the Imaging Studio . . . . . . . . . . . . . . . . . . . . . . . . . . .5
Using the All-In-One Center . . . . . . . . . . . . . . . . . . . . . . . . .5
Using the Solution Center
. . . . . . . . . . . . . . . . . . . . . . . . . .6
Using Print Properties
. . . . . . . . . . . . . . . . . . . . . . . . . . . . .6
Using the Photo Editor . . . . . . . . . . . . . . . . . . . . . . . . . . . . .6
Using the Web Toolbar
. . . . . . . . . . . . . . . . . . . . . . . . . . . .6
Print troubleshooting
. . . . . . . . . . . . . . . . . . . . . . . . . . . . . . . . . . . . . . . . . . . . . . . . . . .6
Improving print quality
. . . . . . . . . . . . . . . . . . . . . . . . . . . . .7
Aligning the print cartridge using the computer
. . . . . . . .7
Cleaning the print cartridge nozzles . . . . . . . . . . . . . . . . .7
Wiping the print cartridge nozzles and contacts
. . . . . . .7
US Statement of Limited Warranty . . . . . . . . . . . . . . . . . . . . . . . . . . . . . . . . . . . . . . . . .8
Canadian Statement of Limited Warranty . . . . . . . . . . . . . . . . . . . . . . . . . . . . . . . . . . .9
See the complete
User’s Guide
on the CD for more
detailed information about the following tasks:
•
Setting up the printer
•
Learning about the printer
•
Loading paper and original documents
•
Printing
•
Working with photos
•
Copying
•
Scanning
•
Faxing
•
Networking the printer
•
Maintaining the printer
–
Changing a print cartridge
–
Ordering supplies
–
Recycling Lexmark products
•
Troubleshooting
–
Print, copy, scan, and fax troubleshooting
–
Jams and misfeeds troubleshooting
–
Error messages troubleshooting
•
Notices
2400 Series
Getting Started