Lexmark 752e Setup Guide - Page 50
Parallel, Serial, View Documentation
 |
View all Lexmark 752e manuals
Add to My Manuals
Save this manual to your list of manuals |
Page 50 highlights
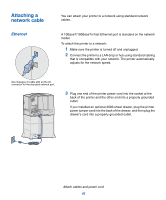
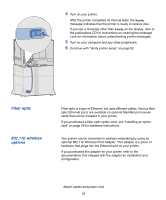
Parallel Serial A parallel port is standard on the base model and is available on an option card for network models. See "Installing an option card" on page 28 for more information. If you install an optional Parallel Interface Card in any of the network models, you need a 1284 A-C parallel cable, such as Lexmark part number 11K4078 (6 ft). To attach the printer to a computer: 1 Connect the printer to the computer using a parallel cable. 2 Plug one end of the printer power cord into the socket at the back of the printer and the other end into a properly grounded outlet. (See the illustration on Page 40.) 3 Turn on your printer. 4 Go on to "Install drivers for local printing" on page 44. If you have installed an optional Serial Interface Card, you can locally attach the printer with a serial cable. With serial printing, data is transferred one bit at a time. Although serial printing is usually slower than parallel printing, it is the preferred option when there is a great deal of distance between your printer and computer or a parallel interface is not available. A serial port requires a compatible serial cable such as Lexmark part number 1038693 (50 ft). To attach the printer to a computer: 1 Connect the printer to the computer using a serial cable. 2 Plug one end of the printer power cord into the socket at the back of the printer and the other end into a properly grounded outlet. (See the illustration on Page 40.) 3 Turn on your printer. 4 Launch the drivers CD and click View Documentation for instructions to set up for serial printing. Attach cables and power cord 41
-
 1
1 -
2
-
3
-
4
-
5
-
6
-
7
-
8
-
9
-
10
-
11
-
12
-
13
-
14
-
15
-
16
-
17
-
18
-
19
-
20
-
21
-
22
-
23
-
24
-
25
-
26
-
27
-
28
-
29
-
30
-
31
-
32
-
33
-
34
-
35
-
36
-
37
-
38
-
39
-
40
-
41
-
42
-
43
-
44
-
 45
45 -
 46
46 -
 47
47 -
 48
48 -
 49
49 -
 50
50 -
 51
51 -
 52
52 -
 53
53 -
 54
54 -
 55
55 -
56
-
57
-
58
-
59
-
60
-
61
-
62
-
63
-
64
-
65
-
66
-
67
-
68
-
69
-
70
-
71
-
72
-
73
 |
 |
