Lexmark C4342 Quick Reference - Page 7
Identifying jam locations, Paper jam in trays
 |
View all Lexmark C4342 manuals
Add to My Manuals
Save this manual to your list of manuals |
Page 7 highlights
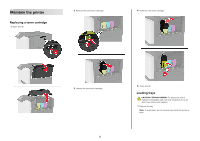
• Store paper according to manufacturer recommendations. Identifying jam locations Notes: • When Jam Assist is set to On, the printer flushes blank pages or pages with partial prints after a jammed page is cleared. Check your printed output for blank pages. • When Jam Recovery is set to On or Auto, the printer reprints the jammed pages. Paper jam in trays 1 Remove the tray. Jam locations 1 Standard bin 2 Door A 3 Trays 4 Multipurpose feeder 7 Warning-Potential Damage: A sensor inside the optional tray is easily damaged by static electricity. Touch a metal surface before removing the jammed paper in the tray. 2 Remove the jammed paper. Note: Make sure that all paper fragments are removed.
-
 1
1 -
 2
2 -
 3
3 -
 4
4 -
 5
5 -
 6
6 -
 7
7 -
 8
8 -
 9
9 -
 10
10
 |
 |

•
Store paper according to manufacturer recommendations.
Identifying jam locations
Notes:
•
When Jam Assist is set to On, the printer flushes blank
pages or pages with partial prints after a jammed page is
cleared. Check your printed output for blank pages.
•
When Jam Recovery is set to On or Auto, the printer reprints
the jammed pages.
Jam locations
1
Standard bin
2
Door A
3
Trays
4
Multipurpose feeder
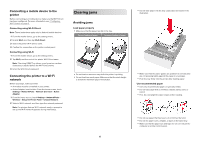
Paper jam in trays
1
Remove the tray.
Warning—Potential Damage:
A sensor inside the optional
tray is easily damaged by static electricity. Touch a metal
surface before removing the jammed paper in the tray.
2
Remove the jammed paper.
Note:
Make sure that all paper fragments are removed.
7