Lexmark C540 Maintenance Guide
Lexmark C540 Manual
 |
View all Lexmark C540 manuals
Add to My Manuals
Save this manual to your list of manuals |
Lexmark C540 manual content summary:
- Lexmark C540 | Maintenance Guide - Page 1
Lexmark™ C54x Maintenance Guide July 2009 www.lexmark.com - Lexmark C540 | Maintenance Guide - Page 2
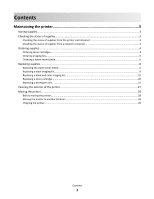
Ordering imaging kits...5 Ordering a waste toner bottle...6 Replacing supplies...6 Replacing the waste toner bottle...6 Replacing a black imaging kit...9 Replacing a black and color imaging kit...15 Replacing a toner cartridge...20 Replacing a developer unit...22 Cleaning the exterior of the printer - Lexmark C540 | Maintenance Guide - Page 3
supply item is needed or when maintenance is required. Checking the status of supplies from the printer control panel You can check the status of printer supplies by printing a menu settings page: 1 Make sure the printer is on and Ready appears. 2 From the printer control panel, press . 3 Press the - Lexmark C540 | Maintenance Guide - Page 4
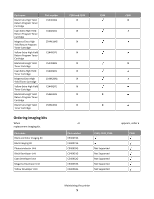
Yield Toner Cartridge Cyan High Yield Toner Cartridge Magenta High Yield Toner Cartridge Yellow High Yield Toner Cartridge Part number C540A1KG C540A1CG C540A1MG C540A1YG C540H1KG C540H1CG C540H1MG C540H1YG C540H2KG C540H2CG C540H2MG C540H2YG C540 and C543 C544 C546 Maintaining the printer 4 - Lexmark C540 | Maintenance Guide - Page 5
Cartridge Black Extra High Yield Toner Cartridge Part number C544X1KG C544X1CG C544X1MG C544X1YG C544X2KG C544X2CG C544X2MG C544X2YG C546U1KG C546U2KG C540 and C543 X X X X X X X X X X C544 X X C546 X X Ordering imaging kits When Replace black and color imaging kit or Replace black imaging kit - Lexmark C540 | Maintenance Guide - Page 6
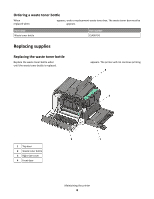
toner box. The waste toner box must be replaced when 82 Replace Waste Toner appears. Part name Waste toner bottle Part number C540X75G Replacing supplies Replacing the waste toner bottle Replace the waste toner bottle when 82 Replace waste toner appears. The printer will not continue printing - Lexmark C540 | Maintenance Guide - Page 7
1 Unpack the replacement waste toner bottle. 2 Grasp the front door at the side handholds, and then pull it toward you. CAUTION-HOT SURFACE: The inside of the printer might be hot. To reduce the risk of injury from a hot component, allow the surface to cool before touching. 3 Open the top door. 4 - Lexmark C540 | Maintenance Guide - Page 8
5 Press the green levers on each side of the waste toner bottle, and then remove it. 6 Place the waste toner bottle in the enclosed packaging. For more information, see the User's Guide. 7 Insert the new waste toner bottle. 8 Replace the right side cover. Maintaining the printer 8 - Lexmark C540 | Maintenance Guide - Page 9
the top door. 10 Close the front door. Replacing a black imaging kit Replace the black imaging kit when Imaging Kit appears. 1 Grasp the front door at the side handholds, and then pull it toward you. CAUTION-HOT SURFACE: The inside of the printer might be hot. To reduce the risk of injury from a hot - Lexmark C540 | Maintenance Guide - Page 10
2 Open the top door. 3 Remove the toner cartridges by lifting the handles, and then gently pulling away from the imaging kit. 4 Remove the right side cover. Maintaining the printer 10 - Lexmark C540 | Maintenance Guide - Page 11
the green levers on each side of the waste toner bottle, and then remove it. 6 Lift the blue levers on the imaging kit, and then pull it toward you. 7 Press down on the blue levers, grasp the green handles on the sides, and then pull the imaging kit out. Warning-Potential Damage: Do not touch the - Lexmark C540 | Maintenance Guide - Page 12
Remove the yellow, cyan, and magenta developer units. 9 Unpack the replacement black imaging kit. Leave the packaging on the black developer unit. 10 Gently shake the black magenta developer units. Note: Make sure each developer unit is inserted into a matching color slot. Maintaining the printer 12 - Lexmark C540 | Maintenance Guide - Page 13
14 Place the used black imaging kit in the enclosed package. For more information, see Recycling Lexmark Products. 15 Align and insert the imaging kit. 16 Rotate the blue levers down until the imaging kit drops into place. 17 Replace the waste toner bottle. Maintaining the printer 13 - Lexmark C540 | Maintenance Guide - Page 14
18 Replace the right side cover. 19 Replace the toner cartridges. 20 Close the top door. Maintaining the printer 14 - Lexmark C540 | Maintenance Guide - Page 15
21 Close the front door. Replacing a black and color imaging kit Replace the black and color imaging kit when Imaging Kit appears. 1 Grasp the front door at the side handholds, and then pull it toward you to open it. CAUTION-HOT SURFACE: The inside of the printer might be hot. To reduce the risk of - Lexmark C540 | Maintenance Guide - Page 16
3 Remove the toner cartridges by lifting the handles, and then gently pulling away from the imaging kit. 4 Remove the right side cover. 5 Press the green levers on each side of the waste toner bottle, and remove it. Maintaining the printer 16 - Lexmark C540 | Maintenance Guide - Page 17
and then pull the imaging kit out. Warning-Potential Damage: Do not touch the underside of the imaging kit. This could damage the imaging kit. 8 Unpack the replacement black and color imaging kit. Leave the packaging the yellow, cyan, magenta, and black developer units. Maintaining the printer 17 - Lexmark C540 | Maintenance Guide - Page 18
12 Place the used black and color imaging kit in the enclosed package. For more information, see the User's Guide. 13 Align and insert the imaging kit. 14 Replace the waste toner bottle. Maintaining the printer 18 - Lexmark C540 | Maintenance Guide - Page 19
15 Replace the right side cover. 16 Replace the toner cartridges. 17 Close the top door. Maintaining the printer 19 - Lexmark C540 | Maintenance Guide - Page 20
: Damage caused by use of a non-Lexmark toner cartridge is not covered under warranty. Note: Degraded print quality may result from using non-Lexmark toner cartridges. 1 Make sure the printer is on and Ready or 88 Replace Cartridge appears. 2 Unpack the new cartridge, and set it near the - Lexmark C540 | Maintenance Guide - Page 21
4 Remove the toner cartridge by lifting the handle, and then gently pulling away from the imaging kit. 5 Align the new toner cartridge, and then press down until it is all the way into the slot. Maintaining the printer 21 - Lexmark C540 | Maintenance Guide - Page 22
the top door. Replacing a developer unit Replace a developer unit when a print quality defect occurs or when damage occurs to the printer. Note: When a developer unit is replaced, you must manually calibrate the color. For more information, see colormisregistration-topic. 1 Grasp the front door at - Lexmark C540 | Maintenance Guide - Page 23
3 Remove the toner cartridges by lifting the handles and then gently pulling away from the imaging kit. 4 Remove the right side cover. 5 Press the green levers on each side of the waste toner bottle, and then remove it. Maintaining the printer 23 - Lexmark C540 | Maintenance Guide - Page 24
-Potential Damage: Do not touch the underside of the imaging kit. This could damage the imaging kit. 8 Remove the used developer unit. 9 Place the used developer in the enclosed package. For more information, see recycling-lexmark- products-topic. 10 Unpack the replacement developer unit. Leave - Lexmark C540 | Maintenance Guide - Page 25
12 Remove the red shipping cover from the developer unit. 13 Insert the developer unit. 14 Align and insert the imaging kit. Maintaining the printer 25 - Lexmark C540 | Maintenance Guide - Page 26
15 Replace the waste toner bottle. 16 Replace the right side cover. Maintaining the printer 26 - Lexmark C540 | Maintenance Guide - Page 27
the toner cartridges. 18 Close the top door. 19 Close the front door. Cleaning the exterior of the printer 1 Make sure that the printer is turned off and unplugged from the wall outlet. CAUTION-SHOCK HAZARD: To avoid the risk of electric shock when cleaning the exterior of the printer, unplug - Lexmark C540 | Maintenance Guide - Page 28
: Using a damp cloth to clean the interior may cause damage to your printer. 5 Make sure the standard exit tray is dry before beginning a new print job. Moving the printer Before moving the printer CAUTION-POTENTIAL INJURY: The printer weight is greater than 18 kg (40 lb) and requires two or more
-
 1
1 -
 2
2 -
 3
3 -
 4
4 -
 5
5 -
 6
6 -
 7
7 -
8
-
9
-
10
-
11
-
12
-
13
-
14
-
15
-
16
-
17
-
18
-
19
-
20
-
21
-
22
-
23
-
24
-
25
-
26
-
27
-
28
 |
 |

Lexmark™ C54x Maintenance Guide
July 2009
www.lexmark.com