Lexmark E240 User's Guide
Lexmark E240 Manual
 |
View all Lexmark E240 manuals
Add to My Manuals
Save this manual to your list of manuals |
Lexmark E240 manual content summary:
- Lexmark E240 | User's Guide - Page 1
E240, E240n User's Guide June 2005 Lexmark and Lexmark with diamond design are trademarks of Lexmark International, Inc., registered in the United States and/or other countries. © 2005 Lexmark International, Inc. All rights reserved. 740 West New Circle Road Lexington, Kentucky 40550 - Lexmark E240 | User's Guide - Page 2
and Eire, call +44 (0)8704 440 044. In other countries, contact your point of purchase. References in this publication to products, programs, or services do not imply that the manufacturer intends to make these available in all countries in which it operates. Any reference to a product, program, or - Lexmark E240 | User's Guide - Page 3
additional details. To obtain source code files for the Lexmark modified GNU licensed software, launch the drivers CD that shipped with your a lightning storm. • Refer service or repairs, other than those described in the operating instructions, to a professional service person. • This product is - Lexmark E240 | User's Guide - Page 4
Director of Lexmark Technology & Services Lexmark International, Inc. 740 West Director of Manufacturing and Technical Support, Lexmark International, S. A., products in countries of the European Union. We encourage the recycling of used in any area, including a residential area. Mode Printing - Lexmark E240 | User's Guide - Page 5
and 240 minutes. servicer in your area contact Lexmark on the World Wide Web at http://support.lexmark.com. Remote technical support guides, manuals, instructions or guidance • Unsuitable physical or operating environment • Maintenance by anyone other than Lexmark or a Lexmark authorized servicer - Lexmark E240 | User's Guide - Page 6
LIMITED IN DURATION TO THE WARRANTY PERIOD. NO WARRANTIES, EXPRESS OR IMPLIED, WILL APPLY AFTER THIS PERIOD. ALL INFORMATION, SPECIFICATIONS, PRICES, AND SERVICES ARE SUBJECT TO CHANGE AT ANY TIME WITHOUT NOTICE. Limitation of liability Your sole remedy under this limited warranty is set forth in - Lexmark E240 | User's Guide - Page 7
printer software 13 Windows ...13 Installing printer software using the drivers CD 13 Installing printer software through the Add Printer Wizard 13 Macintosh ...14 Creating a queue in Print Center / Printer Setup Utility (Mac OS X 14 UNIX/Linux ...15 Chapter 3: Installing software for network - Lexmark E240 | User's Guide - Page 8
How to load the 250-sheet and 550-sheet trays 28 Extending the tray for legal or folio size paper 30 How to load the manual feeder 32 How to use the rear exit 32 How to clear paper jams 34 Chapter 5: Printing tasks 37 How to - Lexmark E240 | User's Guide - Page 9
of the operator panel 52 Understanding the operator panel lights 53 Secondary errors ...55 Operator panel codes ...57 Primary codes ...58 Secondary error codes 70 Chapter 8: Understanding the printer configuration menus 80 Printing the Printer Settings Configuration sheet 80 Configuration - Lexmark E240 | User's Guide - Page 10
Recognizing the operator panel light sequences 91 How to change a toner cartridge 92 Recycling Lexmark products 95 How to change a photoconductor kit 96 Chapter 11: Troubleshooting 99 General problems ...99 Print quality problems 101 How to clean the printhead lens 105 Index ...108 10 - Lexmark E240 | User's Guide - Page 11
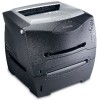
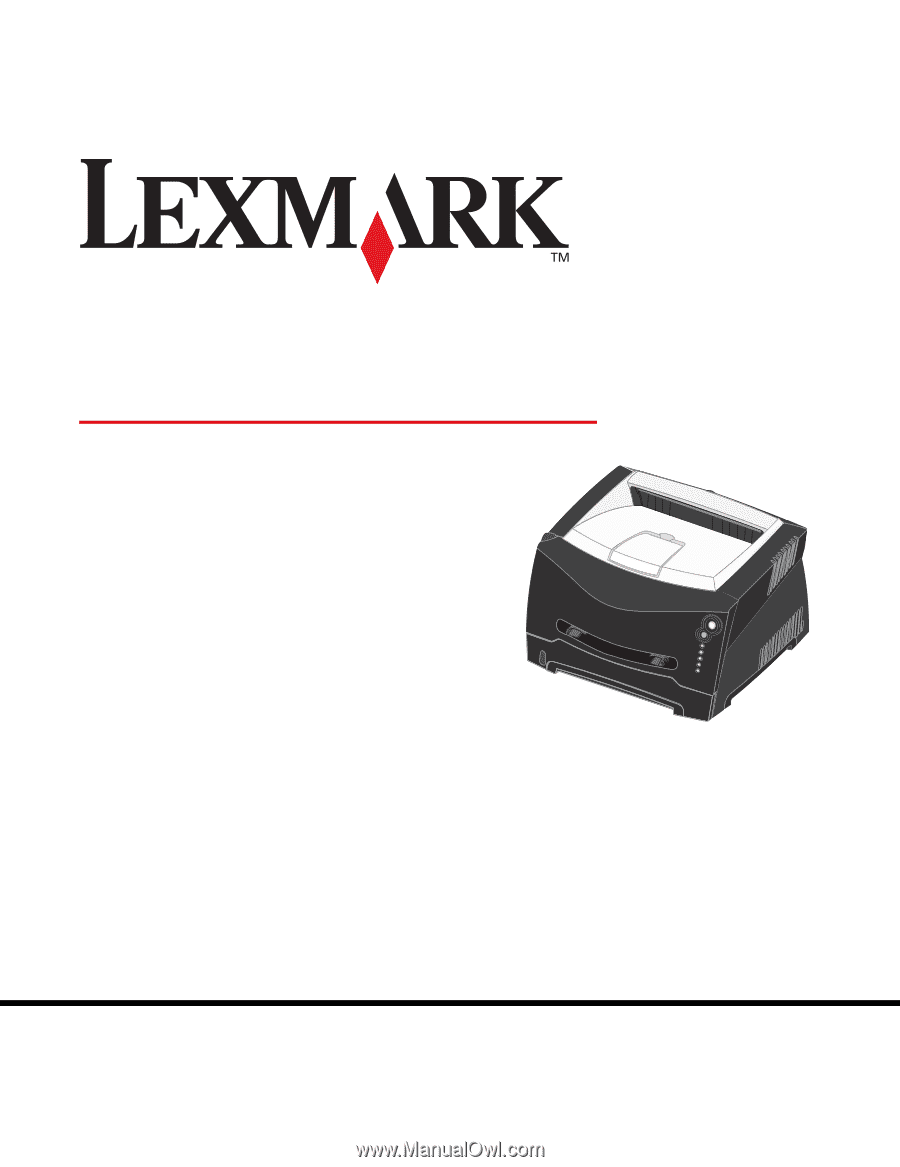
1 Printer overview 150-sheet output bin Paper support Front cover Manual feeder 250-sheet tray Optional 550-sheet drawer 11 Operator panel Rear paper exit Power button Dust cover - Lexmark E240 | User's Guide - Page 12
PC Kit Load Paper Paper Jam Error • Press and release Continue to resume printing. • Press and release Continue twice quickly to display a secondary error code. • Press and release Cancel to cancel the job currently printing. • Press and hold Cancel until all of the lights come on to reset - Lexmark E240 | User's Guide - Page 13
• Windows NT 4.x (USB not supported) 1 Insert the drivers CD. If the CD does not launch automatically, click Start Æ Run, and type D:\Setup.exe in the Run dialog (where D is the letter of the CD-ROM drive). 2 Select the Local install path, and follow the instructions - Lexmark E240 | User's Guide - Page 14
Utility. 5 Click Finish to complete the installation. Use the printer driver to make changes to settings for individual print jobs, which will override .lexmark.com. Creating a queue in Print Center / Printer Setup Utility (Mac OS X) 1 Install a PostScript Printer Description (PPD) file on the - Lexmark E240 | User's Guide - Page 15
a desktop printer icon (Mac OS 9.x) 1 Install a Guide in each package gives detailed instructions for installing and using Lexmark printers in UNIX and Linux environments. All the printer driver packages support local printing using a parallel connection. The driver package for Sun Solaris supports - Lexmark E240 | User's Guide - Page 16
"shared" so that other network computers can print to it. Server Printer Clients Installing software for direct printing 1 Launch the drivers CD. 2 Follow the instructions on the screen. Select the Suggested path to accept the defaults. Select Custom to choose the software that is installed. The - Lexmark E240 | User's Guide - Page 17
on the network. 3 Connect other network computers to the printer. Installing software on the computer attached to the printer 1 Launch the drivers CD. 2 Follow the instructions on the screen. 3 Connect the USB cable to the printer. Once Plug and Play is finished, a printer object will be created - Lexmark E240 | User's Guide - Page 18
and-print method Note: Point and print may not be supported in some 64 bit environments. Refer to the Lexmark manually assign an IP address to the printer. An easy way to do this is to use the IP Setup Utility. Detailed instructions about installing and using this utility are located on the drivers - Lexmark E240 | User's Guide - Page 19
be active or your network cable may be malfunctioning. Consult your network support person for a solution, and then print another network setup page to verify . Mac OS X Step 1: Install a custom PPD file 1 Install a PostScript Printer Description (PPD) file on the computer. a Insert the drivers CD - Lexmark E240 | User's Guide - Page 20
the Printer Address box. 6 Choose Lexmark the printer manufacturer from the "Printer Model" pop-up menu. 7 Select the new printer from the list, and click a printer driver package for each supported UNIX and Linux platform. The User's Guide in each package gives detailed instructions for installing - Lexmark E240 | User's Guide - Page 21
information about installing a network printer in a UNIX or Linux environment, launch the drivers CD, and click View Documentation. NetWare The printer supports Novell Distributed Print Services (NDPS/iPrint). For the latest information about installing a network printer in a NetWare environment - Lexmark E240 | User's Guide - Page 22
your printer by properly loading the trays. Never mix media types within a tray. Source Tray 1 (250-sheet tray) Tray 2 (550-sheet tray) Manual feeder Sizes A4, A5, JIS B5, letter, legal, executive, folio, statement, Universal‡ A4, A5, JIS B5, letter, legal, executive, folio, statement, Universal - Lexmark E240 | User's Guide - Page 23
paper feeder (Tray 1) and a single-sheet manual feeder. Use Tray 1 for most print jobs. Use the manual feeder for a single piece of paper, transparency, stock, or index cards. 150-sheet output bin Paper support Front cover Manual feeder 250-sheet tray Operator panel Optional 550-sheet drawer - Lexmark E240 | User's Guide - Page 24
problems. For best print quality, try a sample of the paper or other media you are considering before buying large quantities. See the Card Stock & Label Guide ) should be fed through the optional 550-sheet tray or the manual feeder. • The laser printing process heats paper to high temperatures of - Lexmark E240 | User's Guide - Page 25
Tips on choosing the right print media - Have any exposed adhesive when the flap is in the sealed position • Use envelopes that can withstand temperatures of 170°C (338°F) without: - sealing - excessive curling - wrinkling - releasing hazardous emissions If you have any doubts about the envelopes - Lexmark E240 | User's Guide - Page 26
and supplies Storing paper Use the following guidelines to avoid paper feeding problems and uneven print quality. • Store paper in an environment where top of paper packages. Storing supplies Choose a cool, clean storage area for your printer supplies. Store supplies right side up in their original - Lexmark E240 | User's Guide - Page 27
before you load it. • Do not exceed the maximum stack height. • Push all trays firmly into the printer after loading them. • Make sure the guides in the trays are positioned snug against the paper or specialty media. • Do not remove paper trays while a job is printing. Wait for a Load Paper - Lexmark E240 | User's Guide - Page 28
sheet trays How to load the 250-sheet and 550-sheet trays Follow these instructions to load paper in the 250-sheet tray and 550-sheet tray. 1 Extending the tray for legal or folio size paper on page 30 for instructions. 2 Prepare a stack of paper for loading by flexing and fanning it back and forth - Lexmark E240 | User's Guide - Page 29
with the logo should be placed at the front of the tray. Make sure the paper is below the max fill line on the side guides. Overloading may cause jams. 4 Slide the two side guides and the back guide until they fit snugly against the stack of paper. 5 Insert the tray. 29 - Lexmark E240 | User's Guide - Page 30
How to load the 250-sheet and 550-sheet trays 6 Extend the paper support on the output bin. Extending the tray for legal or folio size paper To load legal or folio size paper, you need to extend the - Lexmark E240 | User's Guide - Page 31
How to load the 250-sheet and 550-sheet trays Attaching the dust cover The dust cover helps protect the paper tray from the environment as well as keep the tray from being knocked out of position while it is extended. Attach the dust cover to the back of the printer by aligning the tabs on the cover - Lexmark E240 | User's Guide - Page 32
of the manual feeder, but only to the point where its leading edge can contact the paper guides. Otherwise, with the flap side down and with the stamp area as shown. • Hold transparencies by the edges, the sheet entering first. • If you experience problems with paper feed, turn the paper over. How - Lexmark E240 | User's Guide - Page 33
How to use the rear exit To use the rear exit, open the rear exit door. When the rear exit door is open, all print media comes out the rear exit. When closed, all media is sent to the output bin on top of the printer. 33 - Lexmark E240 | User's Guide - Page 34
and Continue lights come on. Press and release Continue twice quickly to display the specific secondary error paper jam light sequence. See Secondary error codes on page 70 for more information. We recommend that you clear the entire paper path when a paper jam occurs. To clear a paper jam - Lexmark E240 | User's Guide - Page 35
. Warning: Do not leave the print cartridge assembly exposed to direct light for an extended period of time. Extended light exposure can cause print quality problems. 3 Remove any jams in the area behind the print cartridge assembly. Warning: Fuser or - Lexmark E240 | User's Guide - Page 36
flap at the front of the printer, and remove any jams beneath the flap. 5 Open the rear exit, and remove any jams. Warning: Fuser or area may be hot. 6 After you have cleared the jams, reinstall the print cartridge assembly, make sure all printer covers and trays are closed, and then - Lexmark E240 | User's Guide - Page 37
manual feeder, see What types of print media can be loaded? on page 22. When using the manual Manual Feeder light sequence, at which point you should load the media. To manually the printer driver settings. 3 Click the Paper tab. 4 Select Manual paper from Manual Feeder light sequence. 8 Place a sheet - Lexmark E240 | User's Guide - Page 38
face up, with the top of the sheet first. • If you experience problems with paper feed, turn the paper over. 9 Adjust the paper guides to the print media width. 10 Hold both sides of the print media close to the manual feeder, and push it into the printer until it automatically engages. There - Lexmark E240 | User's Guide - Page 39
of sheet Front of sheet Landscape Back of sheet Front of sheet To manually duplex a print job: 1 From the computers software application, select File , Printer, or Setup, depending on the application) to view the printer driver settings. 3 From the Page Layout tab, select 2-sided printing. 4 - Lexmark E240 | User's Guide - Page 40
How to print on both sides of the paper (manual duplex) 8 Click OK. 9 Click OK on the Print window. The printer prints every other page of the document already-printed side up and the top of the page toward the front of the tray. Note: Manual duplex is not available on a Macintosh computer. 40 - Lexmark E240 | User's Guide - Page 41
computer software application, select File Æ Print. 2 Click Properties (or Options, Printer, or Setup, depending on the application) to view the printer driver settings. 3 From the Page Layout tab, select the number of images per sheet (from the Multipage printing section) and the orientation you - Lexmark E240 | User's Guide - Page 42
From the computer software application, select File Æ Print. 2 Click Properties (or Options, Printer, or Setup, depending on the application) to view the printer driver settings. 3 From the Page Layout tab, click More Page Layout Options. 4 Click Booklet. If your print job is large, you may want to - Lexmark E240 | User's Guide - Page 43
the computer software application, select File Æ Print. 2 Click Properties (or Options, Printer, or Setup, depending on the application) to view the printer driver settings. 3 From the Page Layout tab, click More Page Layout Options. 4 Click Poster. 5 Select the poster size you want by choosing the - Lexmark E240 | User's Guide - Page 44
Manual feeder-Load the letterhead paper Manual Feeder light sequence (see How to manually feed a print job on page 37). 2 From the computer software application, select File Æ Print. 3 Click Properties (or Options, Printer, or Setup, depending on the application) to view the printer driver driver driver - Lexmark E240 | User's Guide - Page 45
software application, select File Æ Print. 2 Click Properties (or Options, Printer, or Setup, depending on the application) to view the printer driver settings. 3 Click the Other Options tab. 4 Click Watermark. 5 Select which pages receive the watermark. 6 Select the watermark to use. 7 Select - Lexmark E240 | User's Guide - Page 46
jobs appears in the printer window. 2 Select the print job you want to cancel. 3 Click the trash can button. Canceling a job from a computer running Mac OS X When you send a job to print, the printer icon for your selected printer appears in the dock. 1 Open Applications Æ Utilities, and then double - Lexmark E240 | User's Guide - Page 47
6 How to install options How to access the system board To install memory, you must access the printer system board. CAUTION: Turn the printer off, and unplug the power cord before continuing. 1 Open the front cover by pressing the button on the left side of the printer and lowering the cover. 47 - Lexmark E240 | User's Guide - Page 48
How to access the system board 2 Open the rear exit. 3 Open the side cover by pressing the two detents on the front right side of the machine and swinging the cover back. 48 - Lexmark E240 | User's Guide - Page 49
How to add a memory card How to add a memory card The system board has one connector for an optional memory card. The printer can support up to 64MB of additional memory (for a total of 80MB) for the Lexmark E240 and up to 128MB (for a total of 160MB) for the Lexmark - Lexmark E240 | User's Guide - Page 50
a 550-sheet drawer Your printer supports one optional drawer that lets you manually. Note: If you have not installed your printer driver yet, follow the appropriate instructions under Software and network tasks. After you have installed a printer driver, return here to complete these instructions - Lexmark E240 | User's Guide - Page 51
Recognizing installed options 3 Click File Æ Properties. 4 Click the Install Options tab. 5 Add the appropriate options to your configuration:550-Sheet Tray-Select the option you installed from the Available options list, and click Add. • Memory Card-Increase the printer memory to the appropriate - Lexmark E240 | User's Guide - Page 52
PC Kit Load Paper Paper Jam Error • Press and release Continue to resume printing. • Press and release Continue twice quickly to display a secondary error code. • Press and release Cancel to cancel the job currently printing. • Press and hold Cancel until all of the lights come on to reset - Lexmark E240 | User's Guide - Page 53
indicate printer conditions such as printer status, intervention, or service. The following tables show the most common light sequences. Click / Resolution reduced Not ready (printer is offline) Close door Load media Load manual feeder Print side two of a duplex job Toner low Page: 58 59 59 - Lexmark E240 | User's Guide - Page 54
photoconductor (printer hard stop) Unsupported print cartridge Change cartridge invalid refill Cartridge region mismatch Programming engine code / Programming system code Cancel job / Reset printer Service error Printer error * Paper jam printer error * 66 = Slow blink 66 67 67 Empty = Off 68 - Lexmark E240 | User's Guide - Page 55
Paper Jam and Continue lights are both on, a paper jam secondary error has occurred. Press and release Continue twice quickly to display the secondary error code light sequence. The following table shows what these light sequences mean and where to go for help. 55 - Lexmark E240 | User's Guide - Page 56
Understanding the operator panel lights = On = Blinking Paper jam codes Empty = Off Printer condition Paper jam at the input sensor * Paper jam in the manual feeder Paper jams as it exits the tray into the printer Paper jams as a printed job exits the printer Paper jam in Tray 1 Paper jam - Lexmark E240 | User's Guide - Page 57
Off Printer condition Network interface errors Error communicating with the host computer Host interface disabled Memory full Short paper Invalid engine code Invalid network code Page: 76 78 78 79 79 Continue Ready Toner Low / Replace PC Kit Load Paper Paper Jam Error Below are explanations - Lexmark E240 | User's Guide - Page 58
Operator panel codes Primary codes Ready / Power Saver Light sequence: • Ready-On What this light sequence means: • The printer is ready to receive and process data. • The printer is in - Lexmark E240 | User's Guide - Page 59
Operator panel codes Busy Light sequence: • Ready-Blink What this light sequence means: • The . What you can do: • Advanced users can use Hex Trace to help troubleshoot printing problems. After resolving the problem, turn off the printer to exit Hex Trace. • Press and hold Cancel to reset - Lexmark E240 | User's Guide - Page 60
Operator panel codes Waiting Light sequence: • Continue-On • Ready-On What this light sequence means: The printer is waiting until a print timeout occurs, or until it receives additional - Lexmark E240 | User's Guide - Page 61
Operator panel codes Not ready Light sequence: • Continue-On What this light sequence means: The printer is not ready to receive or process data, or the printer ports - Lexmark E240 | User's Guide - Page 62
Operator panel codes Load media Light sequence: • Continue-On • Load Paper-On correctly in tray 1 or the optional 550-sheet tray. • Press Cancel to cancel the print job. Load manual feeder Light sequence: • Continue-On • Load Paper-Blink What this light sequence means: The printer prompts - Lexmark E240 | User's Guide - Page 63
Operator panel codes Print side two of a duplex job Light sequence: • Continue-Blink • Load Paper-On What this light sequence means: Print the other side of your duplex print job. What you can do: • Reinsert your print job in tray 1 using the instructions in the driver pop-up menu to orient - Lexmark E240 | User's Guide - Page 64
Operator panel codes Photoconductor kit life warning Light sequence: • Continue-On • Toner Low/Replace PC Kit-Blink What this light sequence means: The photoconductor is almost full and - Lexmark E240 | User's Guide - Page 65
Operator panel codes Replace photoconductor (printer hard stop) Light sequence: • Continue-On • Toner Low/Replace PC Kit-Blink • Error-Blink What this light sequence means: The photoconductor kit - Lexmark E240 | User's Guide - Page 66
Operator panel codes Change invalid toner cartridge Light sequence: • Toner Low/Replace PC Kit-On • Error-Blink What this light sequence means: The toner cartridge you are using - Lexmark E240 | User's Guide - Page 67
flash. What you can do: Wait for the message to clear. When the printer has finished programming the code, it performs a soft reset. Cancel job / Reset printer Light sequence: • Continue-On • Ready-On • Toner Low/Replace PC Kit-On • Load Paper-On • Paper Jam- - Lexmark E240 | User's Guide - Page 68
service error and printing has stopped. What you can do: Turn the printer off and back on. If the lights are still blinking, contact Lexmark Customer Support Continue twice quickly to see the secondary error code. See Secondary error codes on page 70 for more information. • Press Continue to - Lexmark E240 | User's Guide - Page 69
this light sequence means: The printer has a paper jam. What you can do: • Press Continue twice quickly to see the secondary error code. See Secondary error codes on page 70 for more information. • Press Continue to resume printing once all the jammed pages are cleared from the paper path - Lexmark E240 | User's Guide - Page 70
Operator panel codes Secondary error codes • When the Error and Continue lights are both on, a secondary error has occurred. • When the Paper Jam has occurred. Press and release Continue errors on page 55. twice quickly to display the secondary error code light sequence. See Secondary 70 - Lexmark E240 | User's Guide - Page 71
Operator panel codes Paper jam at the input sensor Light sequence: • Continue-On • Ready-On • Paper Jam-On What this light sequence means: A paper jam has occurred at the input sensor, which can be either after the paper leaves the tray and enters the printer or in the manual feeder. What you can - Lexmark E240 | User's Guide - Page 72
Operator panel codes Paper jams as it exits the tray into the printer Light sequence: • Continue-On • Toner Low/Replace PC Kit-On • Paper Jam-On What this - Lexmark E240 | User's Guide - Page 73
Operator panel codes Paper jam in Tray 1 Light sequence: • Continue-On • Toner Low/Replace PC Kit-On • Load Paper-On • Paper Jam-On What this light sequence means: A - Lexmark E240 | User's Guide - Page 74
Operator panel codes Complex page Light sequence: • Continue-On • Ready-On • Error-On What this light sequence means: The page may not print correctly because the print information - Lexmark E240 | User's Guide - Page 75
Operator panel codes Insufficient collation area Light sequence: • Continue-On • Toner Low/Replace PC Kit-On • Error-On What this light sequence means: The printer memory does not have the free - Lexmark E240 | User's Guide - Page 76
Operator panel codes Font error Light sequence: • Continue-On • Toner Low/Replace PC Kit-Blink • Error-On What this light sequence means: The printer has received a request for a - Lexmark E240 | User's Guide - Page 77
Operator panel codes Error communicating with the host computer Light sequence: • Continue-On • Paper Jam-Blink • Error-On What this light sequence means: The printer has lost the - Lexmark E240 | User's Guide - Page 78
Operator panel codes Memory full Light sequence: • Continue-On • Ready-On • Toner Low/Replace PC data. This occurs when the printer does not know the media size loaded in the tray, or there is a problem feeding the media. What you can do: • Make sure the print media you loaded is large enough. • - Lexmark E240 | User's Guide - Page 79
• Load Paper-On • Error-On What this light sequence means: The engine code has not been programmed, or the programmed code is not valid. What you can do: Download valid engine code to the internal print server. Invalid network code Light sequence: • Ready-On • Load Paper-Blink • Error-On What this - Lexmark E240 | User's Guide - Page 80
menus Printing the Printer Settings Configuration sheet To help resolve printing problems or to change printer configuration settings, advanced users can print the Printer Settings Configuration sheet for instructions on advancing through the configuration menus to select and save new - Lexmark E240 | User's Guide - Page 81
Configuration menus overview Configuration menus overview Menus are represented by Ready , Toner Low/Replace PC Kit , Load Paper , and Paper Jam light sequences. Menu items and their settings are indicated by Error and Continue light sequences. • Press and release Cancel to advance through - Lexmark E240 | User's Guide - Page 82
printer status information simultaneously. • Auto* Mac Binary PS Configure the printer to You can disable this setting to set the speed manually. • Auto*-The printer detects current network speed is set to Fastbytes (if your computer supports Fastbytes), or receive information at a normal - Lexmark E240 | User's Guide - Page 83
* • On USB menu Use the USB menu to change printer settings on jobs sent through a Universal Serial Bus (USB) port. Setting NPA Mode Mac Binary PS * Factory default Use this setting to Values Send print jobs to the printer and query printer status information simultaneously. • Off • On • Auto - Lexmark E240 | User's Guide - Page 84
Utilities menu Use the Utilities menu to troubleshoot printer problems. Setting Reset Factory Defaults Reset Photoconductor Counter Hex Trace, turn off the printer. • Off* • On Help isolate print quality problems, such as streaking. When you select this setting, three pages print to help you - Lexmark E240 | User's Guide - Page 85
Status is "Connected." If Status is "Not Connected," your LAN drop may not be active or your network cable may be malfunctioning. Consult your network support person for a solution, and then print another network setup page to verify that you are connected to your network. How to print a test page - Lexmark E240 | User's Guide - Page 86
network is not using DHCP, then you must manually assign an IP address to the printer. An easy way to do this is to use the Print Server TCP/IP Setup Utility. Detailed instructions about installing and using this utility are located on the drivers CD that shipped with your printer. Launch the - Lexmark E240 | User's Guide - Page 87
a network model, your printer as current memory and engine code levels. If you have Documentation on the drivers CD for instructions on installing and Per supported sources † Per custom type number ‡ Per supported media Recovery • Page Protect • Print Area • Display Language • Toner Alarm USB Settings - Lexmark E240 | User's Guide - Page 88
10 Supplies information What supplies do I need and how do I order them? There are only two supply items that have to be replaced on a regular basis: the toner cartridge and the photoconductor kit, which together comprise the print cartridge assembly. The photoconductor kit typically lasts up to 30 - Lexmark E240 | User's Guide - Page 89
pages2 2,000 standard pages2 Storing supplies Choose a cool, clean storage area for your printer supplies. Store supplies right side up in their original drafts, conserve toner by changing the Toner Darkness setting in your printer driver. The settings range from 1 (very light) to 10 (very dark - Lexmark E240 | User's Guide - Page 90
How to know when you need new supplies How to know when you need new supplies The following sections describe ways to determine when new supplies are needed. Checking the toner and photoconductor levels You can determine approximately how much toner is left in your cartridge and how full the - Lexmark E240 | User's Guide - Page 91
How to know when you need new supplies Recognizing the operator panel light sequences The operator panel displays certain light sequences to let you know when the toner level is low or when it's time to replace the photoconductor kit. Printer condition For more information, see page: Continue - Lexmark E240 | User's Guide - Page 92
How to change a toner cartridge How to change a toner cartridge 1 Open the front cover by pressing the button on the left side of the printer and lowering the cover. 92 - Lexmark E240 | User's Guide - Page 93
How to change a toner cartridge 2 Remove the toner cartridge: a Press the button on the base of the print cartridge assembly. b Pull the toner cartridge up and out using the handle. a b 3 Unpack the new toner cartridge. Note: You can use the packing material from the new cartridge to ship the old - Lexmark E240 | User's Guide - Page 94
How to change a toner cartridge 5 Install the new toner cartridge by aligning the white rollers on the toner cartridge with the white arrows on the tracks of the photoconductor and pushing the toner cartridge in as far as it will go. The cartridge clicks into place when correctly installed. 6 Close - Lexmark E240 | User's Guide - Page 95
Recycling Lexmark products Recycling Lexmark products To return Lexmark products to Lexmark for recycling: 1 Visit our Web site: www.lexmark.com/recycle 2 Follow the instructions on the computer screen. 95 - Lexmark E240 | User's Guide - Page 96
the toner cartridge or the new photoconductor kit exposed to direct light for an extended period of time. Extended light exposure can cause print quality problems. 1 Open the front cover by pressing the button on the left side of the printer and lowering the cover. 96 - Lexmark E240 | User's Guide - Page 97
How to change a photoconductor kit 2 Pull the print cartridge assembly out of the printer by pulling on the toner cartridge handle. Note: Do not press the button on the print cartridge assembly. Place the print cartridge assembly on a flat, clean surface. 3 Remove the toner cartridge: a Press the - Lexmark E240 | User's Guide - Page 98
6 Install the print cartridge assembly into the printer by aligning the green arrows on the guides of the print cartridge assembly with the green arrows on the tracks in the printer and information about resetting the imaging drum counter, see the instruction sheet that shipped with the new kit. 98 - Lexmark E240 | User's Guide - Page 99
11 Troubleshooting General problems Problem / Question What do the blinking lights mean? Why am I missing rougher setting. Sometimes toner does not adhere well to smooth-textured envelopes. From your printer driver, select Custom 6-Rough Env from the Paper Type menu. To change Custom 6 back - Lexmark E240 | User's Guide - Page 100
to print slower when using the manual feeder. I want to manually duplex card stock, but I'm having trouble getting it to feed. Paper stacks manual feeder. The problem is that when the printer tries to manually duplex a print job, it always prints side 2 from Tray 1. However, Tray 1 does not support - Lexmark E240 | User's Guide - Page 101
life. Use the following table to find solutions to print quality problems. Symptom White lines ABCDE ABCDE ABCDE Cause • The printhead lens feeding from another tray or the manual feeder. • Replace the toner cartridge. *To replace the fuser, call a service technician. †This setting can be - Lexmark E240 | User's Guide - Page 102
Print quality problems Symptom Print irregularities ABCDE ABCDE ABCDE Cause • Paper has different Toner Darkness† setting from the printer driver before sending the job to print. • Replace the toner cartridge. *To replace the fuser, call a service technician. †This setting can be changed using - Lexmark E240 | User's Guide - Page 103
snug against the sides of the paper. • Move the manual feeders guides so that they are snug against the sides of the paper. Blank pages The toner cartridge is defective or empty. Replace the toner cartridge. *To replace the fuser, call a service technician. †This setting can be changed using the - Lexmark E240 | User's Guide - Page 104
Print quality problems Symptom Cause Solution Solid black pages • The toner cartridge is defective. • Your printer requires servicing. • Replace the toner cartridge. • Call for service. Paper curls badly once it prints and The Paper Weight setting is wrong for Change Paper Weight† to Smooth. - Lexmark E240 | User's Guide - Page 105
Print quality problems How to clean the printhead lens You can solve some print quality problems by cleaning the printhead lens. 1 Turn the printer off. 2 Open the front cover by pressing the button on the left side of the printer and lowering the cover. 105 - Lexmark E240 | User's Guide - Page 106
Print quality problems 3 Remove the print cartridge assembly out of the printer by pulling on the toner cartridge handle. Note: Do not press the leave the print cartridge assembly exposed to direct light for an extended period of time. Extended light exposure can cause print quality problems. 106 - Lexmark E240 | User's Guide - Page 107
Print quality problems 4 Locate the glass printhead lens, which is located within the recessed area in the top of the printer. Printhead Install the print cartridge assembly into the printer by aligning the arrows on the guides of the print cartridge assembly with the arrows on the tracks in the - Lexmark E240 | User's Guide - Page 108
80 Setup Auto CR after LF 83 Auto LF after CR 83 USB MAC Binary PS 83 NPA Mode 83 Utilities Hex Trace 84 Print Quality Test 66, 67, 68, 69, 71, 72, 73, 79 secondary error codes 70 See also operator panel, secondary error codes extending trays 30 F FCC statement 3 folio 30 H Hex Trace (Utilities - Lexmark E240 | User's Guide - Page 109
Manual duplex 63 Not ready 61 Offline 61 Photoconductor kit near full 64 Print side two 63 Printer error 68 Programming engine code 67 Programming system code 67 Ready/Power Saver 58 Replace photoconductor kit 64, 65 Resetting printer 67 Restoring factory defaults 67 secondary error codes 70 Service - Lexmark E240 | User's Guide - Page 110
collation area 75 Insufficient printer memory 74 Invalid engine code 79 Invalid network code 79 manual feeder 71 Paper jam in Tray 1 73 Paper jam in Tray 2 73 Paper jams as a printed job exits the tray 72 Paper jams as it exits the tray into the printer 72 PPDS font error 76 Short paper 78 service
-
 1
1 -
 2
2 -
 3
3 -
 4
4 -
 5
5 -
 6
6 -
 7
7 -
8
-
9
-
10
-
11
-
12
-
13
-
14
-
15
-
16
-
17
-
18
-
19
-
20
-
21
-
22
-
23
-
24
-
25
-
26
-
27
-
28
-
29
-
30
-
31
-
32
-
33
-
34
-
35
-
36
-
37
-
38
-
39
-
40
-
41
-
42
-
43
-
44
-
45
-
46
-
47
-
48
-
49
-
50
-
51
-
52
-
53
-
54
-
55
-
56
-
57
-
58
-
59
-
60
-
61
-
62
-
63
-
64
-
65
-
66
-
67
-
68
-
69
-
70
-
71
-
72
-
73
-
74
-
75
-
76
-
77
-
78
-
79
-
80
-
81
-
82
-
83
-
84
-
85
-
86
-
87
-
88
-
89
-
90
-
91
-
92
-
93
-
94
-
95
-
96
-
97
-
98
-
99
-
100
-
101
-
102
-
103
-
104
-
105
-
106
-
107
-
108
-
109
-
110
 |
 |
User’s Guide
June 2005
Lexmark and Lexmark with diamond design are trademarks of Lexmark International, Inc.,
registered in the United States and/or other countries.
© 2005 Lexmark International, Inc. All rights reserved.
740 West New Circle Road
Lexington, Kentucky 40550
E240, E240n