Lexmark E240 User's Guide - Page 96
How to change a photoconductor kit
 |
View all Lexmark E240 manuals
Add to My Manuals
Save this manual to your list of manuals |
Page 96 highlights
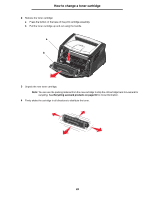
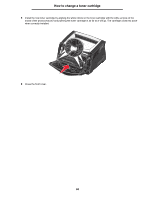
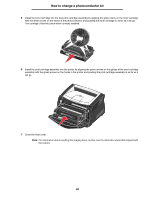
How to change a photoconductor kit How to change a photoconductor kit Warning: When replacing a photoconductor kit, do not leave the toner cartridge or the new photoconductor kit exposed to direct light for an extended period of time. Extended light exposure can cause print quality problems. 1 Open the front cover by pressing the button on the left side of the printer and lowering the cover. 96
-
 1
1 -
2
-
3
-
4
-
5
-
6
-
7
-
8
-
9
-
10
-
11
-
12
-
13
-
14
-
15
-
16
-
17
-
18
-
19
-
20
-
21
-
22
-
23
-
24
-
25
-
26
-
27
-
28
-
29
-
30
-
31
-
32
-
33
-
34
-
35
-
36
-
37
-
38
-
39
-
40
-
41
-
42
-
43
-
44
-
45
-
46
-
47
-
48
-
49
-
50
-
51
-
52
-
53
-
54
-
55
-
56
-
57
-
58
-
59
-
60
-
61
-
62
-
63
-
64
-
65
-
66
-
67
-
68
-
69
-
70
-
71
-
72
-
73
-
74
-
75
-
76
-
77
-
78
-
79
-
80
-
81
-
82
-
83
-
84
-
85
-
86
-
87
-
88
-
89
-
90
-
 91
91 -
 92
92 -
 93
93 -
 94
94 -
 95
95 -
 96
96 -
 97
97 -
 98
98 -
 99
99 -
 100
100 -
 101
101 -
102
-
103
-
104
-
105
-
106
-
107
-
108
-
109
-
110
 |
 |

96
How to change a photoconductor kit
How to change a photoconductor kit
Warning:
When replacing a photoconductor kit, do not leave the toner cartridge or the new photoconductor kit
exposed to direct light for an extended period of time. Extended light exposure can cause print quality
problems.
1
Open the front cover by pressing the button on the left side of the printer and lowering the cover.