Lexmark Impact S301 Quick Reference - Page 14
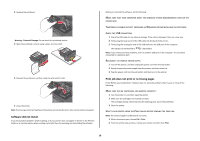
Printing documents from a memory card or flash drive (Windows only), Canceling print jobs - will not print in black
 |
View all Lexmark Impact S301 manuals
Add to My Manuals
Save this manual to your list of manuals |
Page 14 highlights
If document files and image files are stored in the memory device, then press the arrow buttons to select Photos, and then press . 4 Press the arrow buttons to scroll to Easy Photo or Print Photos, and then press . Notes: • Select Easy Photo if you want to print photos quickly. • Select Print Photos if you want to customize the photos before printing them. 5 Press the arrow buttons to select a photo printing option, and then press . Note: You can choose to print the most recent photo, print all the photos, print photos that fall within a date range, print photos by selecting the photo numbers on a proof sheet, or print pre-selected photos from a digital camera using Digital Print Order Format (DPOF). The DPOF option appears only when there is a valid DPOF file in your memory device. 6 Adjust the print settings: • If you are in the Easy Photo menu, then press the arrow buttons to select the paper size and photo size. Press each time you make a selection. • If you are in the Print Photos menu, then press the arrow buttons to select the photo size, paper size, paper type, layout, photo effects, and quality of the photos, and to adjust the brightness and color effects of the photos. Press each time you make a selection. 7 Press the Color/Black button to set a color or black-and-white print. When you select color or black-only printing, the light near your choice comes on. 8 Press . Note: For best results, allow the prints to dry at least 24 hours before stacking, displaying, or storing. Printing documents from a memory card or flash drive (Windows only) To enable the File Print function: • The printer must be connected to a computer through a USB cable or through a network. • The printer and the computer must be on. • The memory card or flash drive must contain document files that are supported by the printer. For more information, see "Supported memory cards and file types" on page 8. • The computer must contain applications that support the file types in the memory device. 1 Insert a memory card or flash drive. When the printer detects the memory device, Memory Card Detected or Storage Device Detected appears on the display. 2 If only document files are stored on the memory device, then the printer automatically switches to File Print mode. If document files and image files are stored on the memory device, then press Documents. 3 Select and print the document: to select If the printer is using a USB connection a Press the arrow buttons to select the file name of the document that you want to print or the folder where the document is saved in the memory device. b Press , and then press to start printing the document. If the printer is using a Wireless connection (selected models only) a Press the arrow buttons to select the file name of the document that you want to print. b Press , and then wait for the printer to connect to the network computer or to finish searching the network for available computers. c When prompted, press the arrow buttons to select the name of the network computer, and then press to start printing the document. Notes: • You may be prompted to enter a PIN if the computer requires it. Enter the PIN using the keypad. • To assign a computer name and a PIN to the computer, see the Help for the printer software associated with your operating system. Canceling print jobs To cancel a print job from the printer control panel, press . To cancel a print job from the computer, do the following: For Windows users 1 Click , or click Start and then click Run. 2 In the Start Search or Run box, type control printers. 3 Press Enter, or click OK. The printer folder opens. 4 Right-click the printer, and then select Open or See what's printing. 5 Cancel the print job: • If you want to cancel a particular print job, then right-click the document name, and then select Cancel. • If you want to cancel all print jobs in the queue, then click Printer > Cancel All Documents. 14
-
 1
1 -
2
-
3
-
4
-
5
-
6
-
7
-
8
-
 9
9 -
 10
10 -
 11
11 -
 12
12 -
 13
13 -
 14
14 -
 15
15 -
 16
16 -
 17
17 -
 18
18 -
 19
19 -
20
-
21
-
22
 |
 |
