Lexmark MS711 Print Quality Guide
Lexmark MS711 Manual
 |
View all Lexmark MS711 manuals
Add to My Manuals
Save this manual to your list of manuals |
Lexmark MS711 manual content summary:
- Lexmark MS711 | Print Quality Guide - Page 1
by the printer. The problem is solved. Contact customer support. Are the fonts installed on the computer supported by the printer? Clipped pages or images Leading edge ABCDE ABCDE ABCDE Trailing edge Action Yes Step 1 Go to step 2. a Move the width and length guides in the tray to - Lexmark MS711 | Print Quality Guide - Page 2
the imaging unit. Contact customer support. 1 Remove the toner cartridge. 2 Remove the imaging unit. Warning-Potential Damage: Do not expose the imaging unit to direct light for more than 10 minutes. Extended exposure to light may cause print quality problems. 3 Install the imaging unit, and - Lexmark MS711 | Print Quality Guide - Page 3
printer control panel, decrease the toner darkness. Note: 8 is the factory default setting. b Resend the print job. Yes The problem is solved. No Go to step 2. Did the gray background disappear from the prints? Step 2 The problem is solved. Reinstall the imaging unit and the toner cartridge - Lexmark MS711 | Print Quality Guide - Page 4
the imaging unit. 1 Remove the toner cartridge, and then the imaging unit. 2 Firmly shake the imaging unit. Warning-Potential Damage: Do not expose the imaging unit to direct light for more than 10 minutes. Extended exposure to light may cause print quality problems. 3 Reinstall the imaging unit - Lexmark MS711 | Print Quality Guide - Page 5
support. Are the margins correct? Paper curl Action Step 1 Move the width and length guides in the tray to the correct positions for the size of the paper loaded. Yes Go to step 2. Are the width and length guides positioned correctly? Step 2 Go to step 3. From the printer control panel, set - Lexmark MS711 | Print Quality Guide - Page 6
a Move the width and length guides in the tray to the correct positions for the size of the paper loaded in the tray. b Resend the print job. No The problem is solved. Do print irregularities still appear? Step 2 Go to step 3. From the printer control panel, set the paper size and type in the - Lexmark MS711 | Print Quality Guide - Page 7
Contact customer The problem is solved. support at http://support.lexmark. com or your service representative. Print is too dark ABC DEF Action Step 1 a From the Quality menu on the printer control panel, reduce the toner darkness. Note: 8 is the factory default setting. b Resend the print - Lexmark MS711 | Print Quality Guide - Page 8
the printer control Go to step 5. panel, change the texture settings in the Paper Texture menu to match the paper you are printing on. Go to step 6. The problem is solved. Is the print still too dark? Step 6 Replace the imaging unit, and then resend the print job. Contact customer support. The - Lexmark MS711 | Print Quality Guide - Page 9
printer control Go to step 5. panel, change the texture settings in the Paper Texture menu to match the paper you are printing on. Go to step 6. The problem is solved. Is the print still too light? Step 6 Go to step 7. a Redistribute the toner in the imaging unit. 1 Remove the toner cartridge - Lexmark MS711 | Print Quality Guide - Page 10
problems. 3 Reinstall the imaging unit, and then the cartridge. b Resend the print job. Is the printer still printing blank pages? Step 2 Go to step 3. a Redistribute the toner in the imaging unit. 1 Remove the toner cartridge, and then the imaging unit. 2 Firmly shake the imaging unit - Lexmark MS711 | Print Quality Guide - Page 11
to light may cause print quality problems. 2 Install the imaging unit, and then the cartridge. b Resend the print job. Is the printer printing solid black pages? Step 2 Replace the imaging unit, and then resend the print job. Contact customer support. Is the printer printing solid black pages - Lexmark MS711 | Print Quality Guide - Page 12
unit, and then resend the print job. Contact customer support. Do shadow images still appear on prints? No The problem is solved. No Load paper with the correct paper type and weight in the tray. Change the paper loaded in the tray to match the paper type and weight specified in the tray settings - Lexmark MS711 | Print Quality Guide - Page 13
? Step 2 Go to step 3. From the printer control panel, set the paper type and weight in the Paper menu to match the paper loaded in the tray. Do the paper type and weight match the type and weight of the paper in the tray? No The problem is solved. Change the paper type and weight to match the - Lexmark MS711 | Print Quality Guide - Page 14
step 5. a Reinstall the imaging unit. 1 Remove the toner cartridge, and then the imaging unit. Warning-Potential Damage: Do not expose the imaging unit to direct light for more than 10 minutes. Extended exposure to light may cause print quality problems. 2 Install the imaging unit, and then the - Lexmark MS711 | Print Quality Guide - Page 15
the tray to match the paper texture, type, and weight specified in the tray settings. The problem is solved. Do streaked vertical lines appear on prints? Step 4 Go to step 5. a Reinstall the imaging unit. 1 Remove the toner cartridge, and then the imaging unit. Warning-Potential Damage: Do not - Lexmark MS711 | Print Quality Guide - Page 16
the imaging unit, and then resend the print job. The problem is solved. Contact customer support. Did the toner fog or background shading disappear from the prints? Toner rubs off ABC DEF Leading edge Trailing edge Action Yes No Step 1 From the Paper menu on the printer control panel - Lexmark MS711 | Print Quality Guide - Page 17
appear on prints Action Replace the imaging unit, and then resend the print job. Do toner specks appear on prints? Yes Contact customer support. Transparency print quality is poor Action Yes Step 1 Go to step 2. From the printer control panel, set the paper type in the Paper menu to match the - Lexmark MS711 | Print Quality Guide - Page 18
the imaging unit. 1 Remove the toner cartridge, and then the imaging unit. 2 Firmly shake the imaging unit. Warning-Potential Damage: Do not expose the imaging unit to direct light for more than 10 minutes. Extended exposure to light may cause print quality problems. 3 Reinstall the imaging unit - Lexmark MS711 | Print Quality Guide - Page 19
: Tech Library You can browse our library of manuals, support documentation, drivers, and other downloads to help you solve common problems. E-mail You can send an e-mail to the Lexmark team, describing your problem. A service representative will respond and provide you with information to
-
 1
1 -
 2
2 -
 3
3 -
 4
4 -
 5
5 -
 6
6 -
 7
7 -
8
-
9
-
10
-
11
-
12
-
13
-
14
-
15
-
16
-
17
-
18
-
19
 |
 |

Print quality Guide
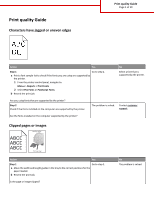
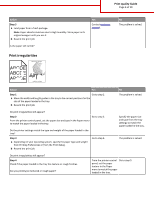
Characters have jagged or uneven edges
Action
Yes
No
Step 1
a
Print a font sample list to check if the fonts you are using are supported by
the printer.
1
From the printer control panel, navigate to:
Menus
>
Reports
>
Print Fonts
2
Select
PCL Fonts
or
PostScript Fonts
.
b
Resend the print job.
Are you using fonts that are supported by the printer?
Go to step 2.
Select a font that is
supported by the printer.
Step 2
Check if the fonts installed on the computer are supported by the printer.
Are the fonts installed on the computer supported by the printer?
The problem is solved.
Contact
customer
support
.
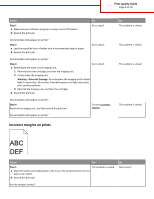
Clipped pages or images
Leading edge
Trailing edge
ABCDE
ABCDE
ABCDE
Action
Yes
No
Step 1
a
Move the width and length guides in the tray to the correct positions for the
paper loaded.
b
Resend the print job.
Is the page or image clipped?
Go to step 2.
The problem is solved.
Print quality Guide
Page 1 of 19