Lexmark MX310 Quick Reference - Page 3
Notes
 |
View all Lexmark MX310 manuals
Add to My Manuals
Save this manual to your list of manuals |
Page 3 highlights
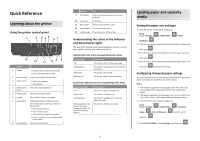
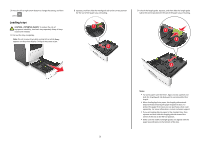
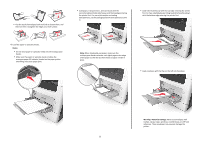
5 Load the paper stack. A4 EXEC LTR B5 A5 4 Flex the sheets back and forth to loosen them, and then fan them. Do not fold or crease the paper. Straighten the edges on a level surface. Notes: • Load with the printable side facedown when using recycled or preprinted paper. • Load prepunched paper with the holes on the top edge toward the front of the tray. • Load letterhead facedown, with the top edge of the sheet toward the front of the tray. For two‑sided printing, load letterhead faceup with the bottom edge of the sheet toward the front of the tray. • Make sure the paper is below the maximum paper fill indicator located on the side of the width guide. 6 Insert the tray. 3
-
 1
1 -
 2
2 -
 3
3 -
 4
4 -
 5
5 -
 6
6 -
 7
7 -
 8
8 -
 9
9 -
10
-
11
-
12
-
13
-
14
-
15
-
16
 |
 |

B5
A5
4
Flex the sheets back and forth to loosen them, and then fan them.
Do not fold or crease the paper. Straighten the edges on a level
surface.
5
Load the paper stack.
Notes:
•
Load with the printable side facedown when using recycled
or preprinted paper.
•
Load prepunched paper with the holes on the top edge
toward the front of the tray.
•
Load letterhead facedown, with the top edge of the sheet
toward the front of the tray. For two
‑
sided printing, load
letterhead faceup with the bottom edge of the sheet toward
the front of the tray.
•
Make sure the paper is below the maximum paper fill
indicator located on the side of the width guide.
6
Insert the tray.
3