Lexmark MX810 Universal Print Driver Version 2.0 White Paper - Page 17
Using the Quality tab - user manual
 |
View all Lexmark MX810 manuals
Add to My Manuals
Save this manual to your list of manuals |
Page 17 highlights
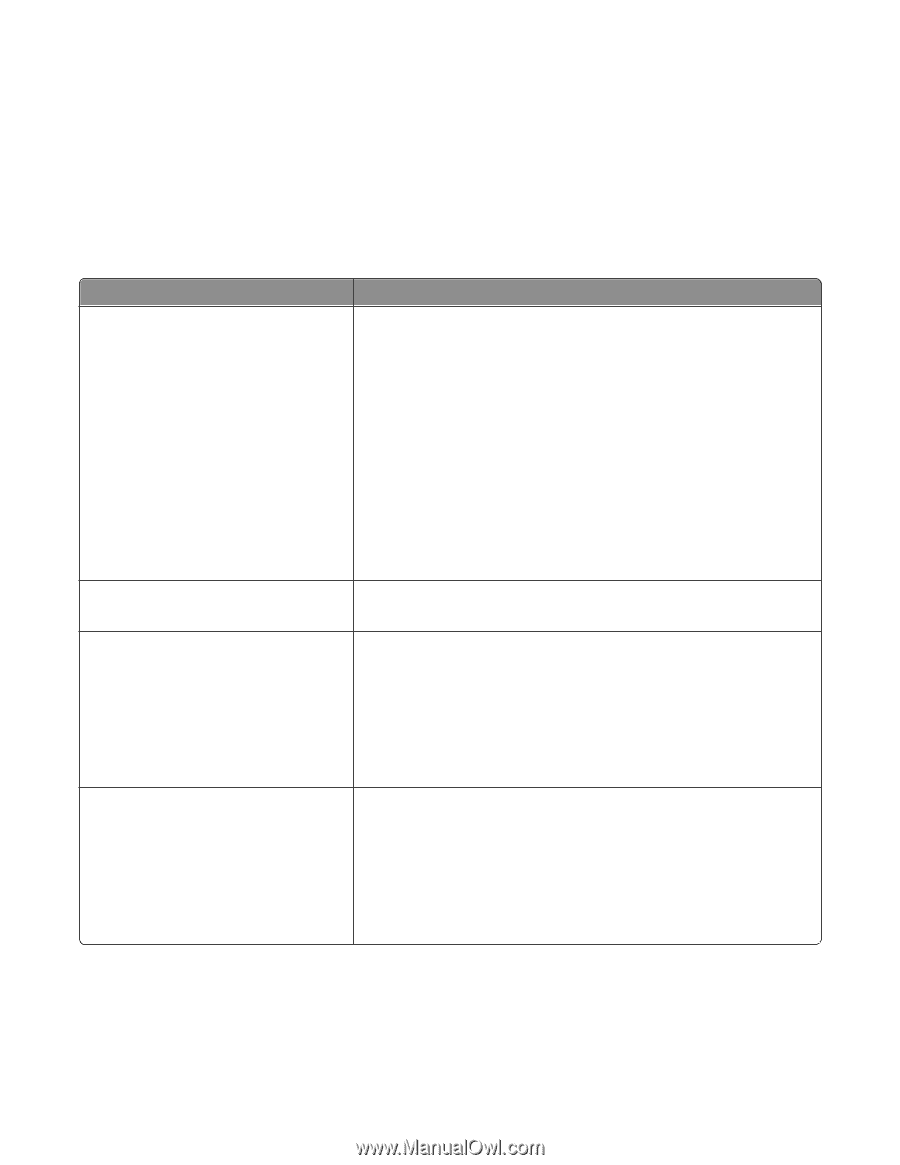
Notes: • Some finishing options are available only on select printers. For more information on the available finishing options, see the User's Guide documentation. • Finisher options must be installed for them to be available in the Paper/Finishing tab. Using the Quality tab The Quality tab controls the print and image quality settings of a print job. Use Print Quality settings Resolution Enhance fine lines Gray Correction To Optimize the print quality of the print job. For color printers: • Text-Print the document using settings optimized for text. • Text/Photo-Print the document using settings optimized for text and photos. • Photo-Print the document using settings optimized for photos. • Custom-Print the document using Quality settings specified by the user. For monochrome printers: • Draft-Print the document using the lowest resolution for faster printing. • Normal-Print the document using the standard print quality settings. • Best-Print the document using the best possible resolution. • Custom-Print the document using Quality settings specified by the user. Specify the printed output resolution. Note: This option is available only in laser printers. Print the document with finer detail. • Use printer settings (Default)-The printer applies this setting as configured in the printer. • On-Enable the "Enhance fine lines" feature and provide fine detail on print jobs. • Off-Disable the "Enhance fine lines" feature. Note: This option is available only in laser printers. Specify detail control of Brightness and Contrast settings when printing in black and white. • Use printer settings-The printer applies this setting as configured in the printer. • Off-Disable the Gray Correction feature. • Manual-Enable the Gray Correction Brightness and Contrast controls. Note: Gray Correction is available only in monochrome laser printers. Understanding the Universal Print Driver 17
-
 1
1 -
2
-
3
-
4
-
5
-
6
-
7
-
8
-
9
-
10
-
11
-
 12
12 -
 13
13 -
 14
14 -
 15
15 -
 16
16 -
 17
17 -
 18
18 -
 19
19 -
 20
20 -
 21
21 -
 22
22 -
23
-
24
-
25
-
26
-
27
 |
 |