Lexmark P350 Setup Solutions - Page 11
Photo Does Not Print, Solution Solution Solution Solution Solution Solution Solution Solution - ink
 |
View all Lexmark P350 manuals
Add to My Manuals
Save this manual to your list of manuals |
Page 11 highlights
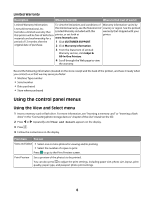
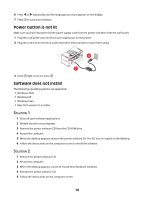
SOLUTION 3 1 Check the USB cable for any obvious damage. 2 Firmly plug the square end of the USB cable into the back of the printer. 3 Firmly plug the rectangular end of the USB cable into the USB port of the computer. The USB port is marked with the USB symbol. SOLUTION 4 1 Disconnect the USB cable from any other device, such as a USB hub or switch box. 2 Directly connect the cable to the printer and the computer. Photo does not print SOLUTION 1 If an error message is displayed, see "Error messages" in the "Troubleshooting" chapter of the User's Guide on the CD. SOLUTION 2 If the light is not on, see "Power button is not lit" on page 10. SOLUTION 3 Remove and then load paper. For more information, see "Loading paper" in the "Loading paper" chapter of the User's Guide on the CD. SOLUTION 4 Check the ink level, and install a new print cartridge if necessary. For more information, see "Installing the print cartridge" in the "Maintaining the printer" chapter of the User's Guide on the CD. SOLUTION 5 If the printer is connected to the computer through another device: 1 Disconnect the USB cable from any other device, such as a USB hub or switch box. 2 Directly connect the cable to the printer and the computer. SOLUTION 6 1 Press to turn the printer off. 2 Disconnect the power supply cord from the wall outlet. 3 Disconnect the other end of the power supply cord from the printer. 4 Reconnect the power supply cord to the printer. 11
-
 1
1 -
2
-
3
-
4
-
5
-
 6
6 -
 7
7 -
 8
8 -
 9
9 -
 10
10 -
 11
11 -
 12
12
 |
 |