Lexmark P350 Setup Solutions - Page 6
Using the control panel menus, Using the View and Select menu - photo printer
 |
View all Lexmark P350 manuals
Add to My Manuals
Save this manual to your list of manuals |
Page 6 highlights
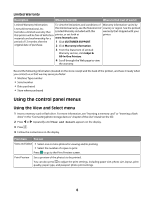
Limited Warranty Description Where to find (US) Where to find (rest of world) Limited Warranty Information To view the limitations and conditions of Warranty information varies by Lexmark International, Inc. this limited warranty, see the Statement of country or region. See the printed furnishes a limited warranty that Limited Warranty included with this warranty that shipped with your this printer will be free of defects in printer, or set forth at printer. materials and workmanship for a www.lexmark.com. period of 12 months after the 1 Click CUSTOMER SUPPORT. original date of purchase. 2 Click Warranty Information. 3 From the Statement of Limited Warranty section, click Inkjet & All-In-One Printers. 4 Scroll through the Web page to view the warranty. Record the following information (located on the store receipt and the back of the printer), and have it ready when you contact us so that we may serve you faster: • Machine Type number • Serial number • Date purchased • Store where purchased Using the control panel menus Using the View and Select menu 1 Insert a memory card or flash drive. For more information, see "Inserting a memory card" or "Inserting a flash drive" in the "Connecting photo storage devices" chapter of the User's Guide on the CD. 2 Press or repeatedly until View and Select appears on the display. 3 Press . 4 Follow the instructions on the display. From here You can View and Select • Select one or more photos for viewing and/or printing. • Select the number of copies to print. Press to go to the Print Preview screen. Print Preview See a preview of the photo/s to be printed. You can also press to adjust the print settings, including paper size, photo size, layout, print quality, paper type, and passport photo print settings. 6
-
 1
1 -
 2
2 -
 3
3 -
 4
4 -
 5
5 -
 6
6 -
 7
7 -
 8
8 -
 9
9 -
 10
10 -
 11
11 -
 12
12
 |
 |
